实验二 SDS-聚丙烯酰胺凝胶电泳法
(SDS-PAGE)测定蛋白质的分子量
1 原理
1.1聚丙烯酰胺凝胶的性能及制备原理
1.1.1性能
聚丙烯酰胺凝胶的机械性能好,有弹性,透明,相对地化学稳定,对pH和温度变化比较稳定,在很多溶剂中不溶,是非离子型的,没有吸附和电渗作用。通过改变浓度和交联度,可以控制孔径在广泛的范围内变动,并且制备凝胶的重复性好。由于纯度高和不溶性,因此还适于少量样品的制备,不致污染样品。
1.1.2 制备原理
聚丙烯酰胺凝胶是用丙烯酰胺(Acr)和交联剂甲叉双丙烯酰胺(Bis)在催化剂的作用下聚合而成。聚丙烯酰胺凝胶聚合的催化系统有化学聚合和光聚合两种。本实验是用化学聚合。化学聚合的催化剂通常多采用过硫酸铵(AP)或过硫酸钾,此外还需要一种脂肪族叔胺作加速剂,最有效的加速剂是N,N,N’,N’-四甲基乙二胺(TEMED)。在叔胺的催化下,由过硫酸铵形成氧的自由基,后者又使单体形成自由基,从而引发聚合反应。叔胺要处于自由碱基状态下才有效,所以在低pH时,常会延长聚合时间;分子氧阻止链的延长,妨碍聚合作用;一些金属也能抑制聚合;冷却可以使聚合速度变慢。通常控制这些因素使聚合在1小时内完成,以便使凝胶的性质稳定。
1.1.3 凝胶浓度和交联度与孔径的关系
凝胶浓度根据被分离的物质的分子量大小确定。当分析一个未知样品时,常先用7.5%的标准凝胶或用4~10%的凝胶梯度来试测,而后选出适宜的凝胶浓度。凝胶的机械性能、弹性是否适中很重要,胶太软易断裂,;太硬则脆,也易折断。
1.2 SDS-凝胶电泳法测定蛋白质分子量的原理
蛋白质分子在聚丙烯酰胺凝胶中电泳时,它的迁移率取决于所带净电荷及分子的大小和形状等因素。如果在聚丙烯酰胺凝胶系统中加入SDS和巯基乙醇,则蛋白质分子的迁移率主要取决于它的分子量,而与所带电荷和形状无关。
在蛋白质溶液中加入SDS和巯基乙醇后,巯基乙醇能使蛋白质分子中的二硫键还原;SDS能使蛋白质的氢键、疏水键打开,并结合到蛋白质分子上,形成蛋白质-SDS复合物。SDS与蛋白质的结合带来两个后果:第一,使各种蛋白质的SDS-复合物都带上相同密度的负电荷,掩盖了不同种类蛋白质间原有的电荷差别,使所有的SDS-蛋白质复合物在电泳时都以同样的电荷/蛋白质比向正极移动;第二,SDS与蛋白质结合后,还引起了蛋白质构象的改变。这两个原因使蛋白质-SDS复合物在凝胶电泳中的迁移率不再受蛋白质原有电荷和形状的影响,而只是蛋白质分子量的函数。
选择一系列不同分子量的球形或基本呈球形的蛋白质作为标准物,使其形成SDS复合物。把这些复合物在相同条件下进行电泳分离,分子量小的物质泳动距离大,分子量大的物质泳动距离小。测定出相对泳动率,用相对泳动率对蛋白质的分子量的对数作图,它们在一定范围内呈直线关系。因此可作为标准曲线来检测样品蛋白质的分子量。
1.3 染色原理
常用的染料主要有氨基黑10B、考马斯亮蓝R250、考马斯亮蓝G250、1-苯胺基-8-萘磺酸,各有优缺点,本实验选用考马斯亮蓝R250,它的染色灵敏度比氨基黑高5倍,尤其适用于SDS电泳微量蛋白质染色。
2试剂与器材
2.1 试剂
2.1.1 (1号液)凝胶贮备液
丙烯酰胺(Acr) 29.2 g
甲叉双丙烯酰胺(Bis) 0.8 g
加蒸馏水至 100 mL
2.1.2 (2号液)浓缩胶缓冲液(0.5mol/L Tris-HCl 缓冲液,pH 6.8)
三羟甲基氨基甲烷(Tris) 6g
加蒸馏水约50 mL,溶解后以6mol/L HCl调到 pH 6.8,
定容至100 mL
2.1.3 (3号液)分离胶缓冲液(1.5 mol/L Tris-HCl 缓冲液,pH 8.8)
三羟甲基氨基甲烷(Tris) 18.15 g
加蒸馏水 约50 mL
溶解后以6mol/L HCl调到 pH 8.8
加蒸馏水至 100 mL
2.1.4 (4号液)10% 十二烷基硫酸钠(SDS)水溶液
SDS* (电泳用) 1.0 g
蒸馏水 10.0 mL
2.1.5 (5号液)过硫酸铵(APS)溶液
过硫酸铵 100 mg
蒸馏水 1.0 mL
临用前配置
2.1.6 (6号液)N,N,N’,N’-四甲基乙二胺(TEMED)
2.1.6 电泳缓冲液
Tris 3 g
甘氨酸 14.4 g
4号液 10ml
加蒸馏水至 1 000 mL
2.1.5 样品缓冲液
2号液 0.5 mL
4号液 4 mL
甘油 2 mL
β-巯基乙醇 1 mL
0.04% 溴酚蓝 0.5 mL
加水至10mL
2.1.9 染色剂
考马斯亮蓝R250 0.31g
甲醇 125mL
乙酸 25mL
蒸馏水 100mL
2.1.10 脱色剂
甲醇 250mL
乙酸 50mL
蒸馏水 200mL
2.1.11 保存液
7%乙酸水溶液
2.1.12 SDS-PAGE低分子量标准蛋白质
蛋白质名称 分子量(MW)
兔磷酸化酶B 97400
牛血清白蛋白 66200
兔肌动蛋白 43000
牛碳酸酐酶 31000
胰蛋白酶抑制剂 20100
鸡蛋清溶菌酶 14400
2.2 器材
电泳仪,垂直板电泳槽,酸度计,电导仪,分析天平,真空泵,高速台式离心机,微量加样器,染色槽,电炉。
3 实验步骤
3.1 制备电泳分离胶
根据样品分子量的大小,配制所需浓度的分离胶。10~100 K分子量的样品,宜采用T=12%的胶,40~200 K分子量的样品宜采用T=7.5%的胶。本实验采用T=10%的胶,具体配方如下:
分离胶:
1号液 10mL
3号液 7.5 mL
4号液 0.3 mL
蒸馏水 12 mL
6号液 18μL
5号液 180μL
按顺序配制,加完6号液后暂时停下来,临用时再加5号液,混匀后立即装入制胶槽,约60 min后就可以凝固。
3.2 制备电泳浓缩胶(T=0.38%)
浓缩胶:
1号液 1.33 mL
2号液 2.5 mL
4号液 0.1mL
蒸馏水 6.1mL
6号液 5μL
5号液 0.1mL
按顺序配制,加完6号液后暂时停下来,临用时再加5号液,混匀后立即装入制胶槽,约30 min后就可以凝固。
3.3 制备凝胶板
制备凝胶板前先用无水乙醇擦拭玻璃板内面。用2.5%琼脂封边,并用蒸馏水检验是否密封完好。密封好后用吸管缓慢加入分离胶,离顶端约1.5 cm时注入蒸馏水。待界面清晰后,吸去蒸馏水,用吸管吸取配好的浓缩胶冲洗凝固的分离胶面,插入样品槽模板,用吸管缓慢注入浓缩胶。待凝固好后,在玻璃板上用记号笔划出点样槽底线,轻轻拔出样品槽模板。
3.4 样品制备
称取脱盐或冻干的蛋白0.01g,加1mL蒸馏水溶解后,10000rpm离心5min,吸取上清50μL加等体积的样品缓冲液,沸水浴加热3min,取出瞬间离心,上清液备用。
3.5 标准蛋白制备
方法同样品制备,本实验的标准蛋白已经制备好,解冻后直接加样即可。
3.6 加样
用加样器分别取已高速离心过的样品液的上清液5、10、15μL,依次加到三个样品槽的底部。用加样器分别取标准蛋白质10、20μL,依次加到三个样品槽的底部,标准蛋白泳道的两侧各加10μL样品缓冲液作空白对照。并作好记录以免混淆。上好样后缓慢往样品槽中加入电极缓冲液,注意不要有气泡。
3.7 电泳
连接电泳仪的直流电源,正极连在凝胶板的下端,负极连在凝胶板的上端,即有样品的一端。电流值恒为10mA。大约经过4~5 h,样品缓冲液中的溴酚蓝指示剂到达离凝胶底部0.5 cm处,关闭电源,取下电泳板,并将两片玻璃板分开,将凝胶板小心移入染色槽中。
3.8 染色、脱色
加染色剂染色过夜。倾去染色液,加脱色剂将背景的蓝色脱尽,中间要更换数次脱色固定液,然后将凝胶板制成干板、扫描。
3.9 测量相对泳动率Rm值,计算分子量
测量溴酚蓝的泳动距离,将它作为相对泳动率的标准1.0。测量标准分子量蛋白质的泳动距离,算出它们的Rm值(Rm=样品迁移距离/染料迁移距离)。
以分子量的对数值为横坐标,Rm值为纵坐标,将标准分子量蛋白质的坐标点连为一条直线,即得标准曲线。
算出样品蛋白质的Rm值,从标准曲线上查出其分子量的对数值,换算出分子量。
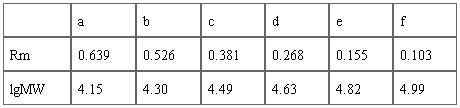
4实验结果 作出标准曲线及换算样品蛋白质分子量
图1 SDS-PAGE测定蛋白质分子量的电泳图谱

图1中,标准蛋白产生的6条条带分别标记为a、b、c、d、e、f,卵清蛋白产生的两条条带分别标记为A、B;人血清蛋白产生的三条带分别标记为C、D、E。5、10分别指样品蛋白质加样量;
在图中测量出下列值:溴酚蓝的泳动距离D= 9.7;
标准蛋白的泳动距离:Da =1.0;Db =1.5;Dc =2.6;Dd =3.7;De =5.1;Df =6.2。
标准蛋白的相对泳动率:Ra =0.103 ;Rb =0.155;Rc =0.268 ;Rd =0.381;Re =0.526 ;Rf =0.639。
卵清蛋白的泳动距离:DA =1.7;DB =3.4;人血清蛋白的泳动距离:DC =1.9;DD =4.2;DE =4.9。
样品蛋白质的相对泳动率:RA=0.175;RB =0.351 ;RC =0.196 ;RD =0.433;RE=0.505 。 (Rm=Dm/D)
表1 标准蛋白的lgMW与Rm值
各条带对应的标准蛋白分子量的对数值与相对迁移率见表1。根据表1,以标准分子量的对数值(lgMW)为横坐标,相对迁移率(Rm)为纵坐标,将标准蛋白质的坐标点连为一条直线,即得标准曲线(图2),并根据此曲线得趋势线公式:y= -0.1116x + 0.7359,由该公式计算出样品蛋白质中各个条带相对应的蛋白质样品分子量对数值,换算出分子量(表2)。
5 讨论
1.卵清蛋白中分离出2种蛋白质,分子量分别为106169.6和2811.9;人血清蛋白中分离出三种蛋白质,分子量分别为68865.2、517.6和116.9。
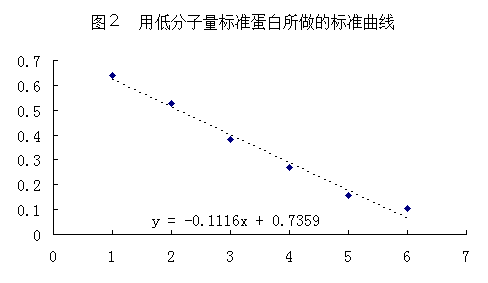
表2 样品蛋白质的Rm值、lgMW和分子量(MW)
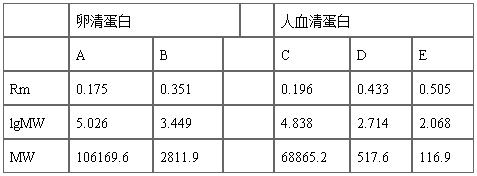
2. 电泳条带的粗细能定性的反映样品中蛋白质含量的相对多少,所以在本实验中,卵清蛋白所得的2条带中,,B条带是我们所提取的卵清蛋白的条带;人血清蛋白所得的3条条带中,C条带是我们所提取的人血清蛋白的条带。
3.实验所得蛋白质分子量与实际分子量相差较大,即测量值与真实值相差较大,原因可能如下:1)实验过程中测量的不准确;2)分子量的测定不能完全依赖SDS-PAGE,因为一些蛋白质的迁移是不规则的;3) 要做到非常严谨的测定蛋白质分子量,至少应在两个不同的丙烯酰胺凝胶浓度下进行电泳;4)从图1上看,样品蛋白质的两种加样量的泳道上都产生了很粗的条带,这可能是由于样品浓度太大,给迁移位置的测量造成了困难,这也是造成结果误差的一个原因;5)干胶后引起蛋白质带变宽,尤其是厚胶难以准确对蛋白质和指示剂前沿定位。
3. 每空的上样量不能过大,以免样品溢出,造成各泳道相互污染。
4. 为了避免边缘效应,在未加样的泳道加入等量的样品缓冲液。
5. 加样的过程中,个别样品不能沉到加样孔底部。其原因可能是:样品缓冲液中没有足够的甘油,或梳子安放的不合适,使孔底留有聚合的丙烯酰胺,本实验中后面一个原因的存在的可能性更大一些。
6. 样品蛋白质条带出现拖尾现象。这是因为在浓缩胶中蛋白质浓度过高而产生沉淀所致。一般认为聚合的蛋白质在电泳过程中会逐渐溶解,所以电泳前充分热变性和对样品进行稀释可以得到改善。
7. 未聚合的丙烯酰胺是一种皮肤刺激物和神经毒素,操作时必须戴手套。
第二篇:06 SDS 聚丙烯酰胺凝胶电泳法
实验六 SDS聚丙烯酰胺凝胶电泳法—蛋白质的分子量测定
【实验目的】
1.掌握SDS—聚丙烯酰胺电泳法的原理。
2.学会用此种方法测定蛋白质的分子量。
【实验原理】
SDS—聚丙烯酰胺凝胶电泳(SDS-PAGE)是对蛋白质进行量化,比较及特性鉴定的一种经济、快速、而且可重复的方法。该法主要依据蛋白质的分子量对其进行分离。SDS与蛋白质的疏水部分相结合,破坏其折叠结构,并使其稳定地存在于一个广泛均一的溶液中。SDS—蛋白质复合物的长度与其分子量成正比。由于在样品介质和聚丙烯酰胺凝胶中加入离子去污剂和强还原剂后,蛋白质亚基的电泳迁移率主要取决于亚基分子量的大小,而电荷因素可以被忽略。SDS—PAGE因易于操作和广泛的用途,使它成为许多研究领域中一种重要的分析技术。
SDS是十二烷基硫酸钠(sodium dodecyl sulfate)的简称,它是一种阴离子表面活性剂,加入到电泳系统中能使蛋白质的氢键和疏水键打开,并结合到蛋白质分子上(在一定条件下,大多数蛋白质与SDS的结合比为1.4gSDS/1g蛋白质),使各种蛋白质—SDS复合物都带上相同密度的负电荷,其数量远远超过了蛋白质分子原有的电荷量,从而掩盖了不同种类蛋白质间原有的电荷差别。这样就使电泳迁移率只取决于分子大小这一因素,于是根据标准蛋白质分子量的对数和迁移率所作的标准曲线,可求得未知物的分子量。
【实验材料】
1.实验器材
微型凝胶电泳装置;电源(电压200V,电流500mA);100℃沸水浴;Eppendorf管;微量注射器(50μl或100μl);干胶器、真空泵或水泵;带盖的玻璃或塑料小容器;摇床。
2.实验试剂
⑴ 2mol/L Tris-HCl (pH8.8):取24.2g Tris, 加50ml蒸馏水,缓慢的加浓盐酸至pH8.8(约加4ml);让溶液冷却至室温,pH将会升高,加蒸馏水至100ml。
⑵ 1mol/L Tris-HCl (pH8.8):取12.1g Tris, 加50ml蒸馏水,缓慢的加浓盐酸至pH6.8(约加8ml);让溶液冷却至室温,pH将会升高,加蒸馏水至100ml。
⑶ 10% (w/v) SDS: 取10g的SDS,加蒸馏水至100ml。
⑷ 50% (v/v) 甘油: 取50ml 100%甘油,加入50ml蒸馏水。
⑸ 1% (w/v) 溴酚蓝:取100mg溴酚蓝,加蒸馏水至10ml,搅拌,直到完全溶解,过滤除去聚合的染料。
⑹ A液--丙烯酰胺储备液(配制含30% (w/v) 丙烯酰胺和0.8% (w/v) 甲叉双丙烯酰胺的溶液100ml)在通风柜中操作,取29.2g丙烯酰胺,0.8g甲叉双丙烯酰胺,加蒸馏水至100ml,缓慢搅拌直至丙烯酰胺粉末完全溶解,用石蜡膜封口,可在4℃存放数月。
⑺ B液--4×分离胶缓冲液:取75ml 2mol/L Tris-HCl (pH8.8),加入4ml 10% SDS, 加21ml蒸馏水,混匀,可在4℃存放数月。
⑻ C液--4×浓缩胶缓冲液:取50ml 1mol/L Tris-HCl (pH6.8),加入4ml 10% SDS, 加46ml蒸馏水,混匀,可在4℃存放数月。
⑼ 10%过硫酸铵:取0.5g过硫酸铵,加入5ml蒸馏水,可保存在密封的管内,于4℃存放数月。
⑽ 电泳缓冲液:取3g Tris,14.4g甘氨酸,1g SDS,加蒸馏水至1L, pH约为8.3, 也可配制成10×的储备液,在室温下长期保存。
⑾ 5×样品缓冲液:取0.6ml 1mol/L Tris-HCl (pH6.8),加入2ml 10% SDS, 5ml 50%的甘油,0.5ml 2-巯基乙醇,1ml 1%溴酚蓝,0.9ml的蒸馏水混匀,可在4℃保存数周,或在-20℃保存数月。
⑿ 考马斯亮蓝染液:1.0g 考马斯亮蓝R-250,加入450ml甲醇,450ml蒸馏水及100ml冰醋酸即成。
⒀ 考马斯亮蓝脱色液:将100ml甲醇,100ml冰醋酸,800ml蒸馏水混匀备用。
【实验操作】
1.灌制分离胶
⑴ 组装凝胶模具: 可按照使用说明书装配好灌胶用的模具。对于Bio-Rad的微型凝胶电泳系统,在上紧螺丝之前,必须确保凝胶玻璃板和隔片的底部与一个平滑的表面紧密接触,有细微的不匹配就会导致凝胶的渗漏。
⑵ 将A液、B液及蒸馏水在一个小烧瓶或试管中混合,丙烯酰胺(A液中)是神经毒素,操作时必须戴手套。加入过硫酸铵和TEMED后,轻轻搅拌使其混匀(过量气泡的产生会干扰聚合)。凝胶很快会聚合,操作要迅速。小心将凝胶溶液用吸管沿隔片缓慢加入模具内,这样可以避免在凝胶内产生气泡。
⑶ 当加入适量的分离胶溶液时(对于小凝胶,凝胶液加至约距前玻璃板顶端1.5cm或距梳子齿约0.5cm),轻轻在分离胶溶液上覆盖一层1mm~5mm的水层,这使凝胶表面变得平整。当凝胶聚合后,在分离胶和水层之间将会出现一个清晰的界面。
2.灌制浓缩胶
⑴ 吸尽覆盖在分离胶上的水后将A液、C液和蒸馏水在三角烧瓶或小试管中混合。加入过硫酸铵和TEMED,并轻轻搅拌使其混匀。
⑵ 将浓缩胶溶液用吸管加至分离胶的上面,直至凝胶溶液到达前玻璃板的顶端。将梳子插入凝胶内,直至梳子齿的底部与前玻璃板的顶端平齐。必须确保梳子齿的末端没有气泡。将梳子稍微倾斜插入可以减少气泡的产生。
⑶ 凝胶聚合后,小心拔出梳子,不要将加样孔撕裂。将凝胶放入电泳槽内,如果使用Bio-Rad的微型凝胶系统,可预先接好电极。将电泳缓冲液加入内外电泳槽中,使凝胶的上下端均能浸泡在缓冲液中。
3.制备样品和上样
⑴ 将蛋白质样品与5x样品缓冲液(20μl+5μl)在一个Eppendorf管中混合。100℃加热2 min~10min。离心1s,如果有大量蛋白质碎片则应延长离心时间。
⑵ 用微量注射器将样品加入样品孔中。将蛋白质样品加至样品孔的底部,并随着染料水平的升高而升高注射器针头。避免带入气泡,气泡易使样品混入到相邻的加样孔中。
4.电泳
⑴ 将电极插头与适当的电极相接。电流流向阳极。将电压调至200V(保持恒压;对于两块0.75mm的胶来说,电流开始时为100mA,在电泳结束时应为60mA;对于两块1.5mm的胶来说,开始时应为110mA,结束时应为80mA。)。
⑵ 对于两块0.75mm的凝胶,染料的前沿迁移至凝胶的底部约需30~40分钟(1.5mm的凝胶则需40 min~50min)。关闭电源,从电极上拔掉电极插头,取出凝胶玻璃板,小心移动两玻璃板之间的隔片,将其插入两块玻璃板的一角。轻轻撬开玻璃板,凝胶便会贴在其中的一块板上。
5.考马斯亮蓝染色
这种染色方法在单条电泳带中蛋白质最小检出量为0.1μg的蛋白。通常可以根据所需要的敏感度来选择是使用考马斯亮蓝染色或银染色。
⑴ 戴上手套避免将手指印留在电泳凝胶上,将凝胶移入一个小的盛有少量考马斯亮蓝(20ml已经足够)的容器内(小心不要将胶撕破)。或将玻璃板连同凝胶浸在染料中轻轻振荡直至凝胶脱落。
⑵ 对于0.75mm的凝胶,可在摇床上缓慢震荡5分钟~l0分钟,对于1.5mm的凝胶,则需10分钟~20分钟,在染色和脱色过程中要用盖子或封口膜密闭容器口。弃去染液,将凝胶在水中漂洗数次。戴手套以避免将双手染色。
⑶ 加入考马斯亮蓝脱色液(约50ml),清晰的条带很快会显现出来,大部分凝胶脱色需要1h,使用过的脱色液则可用水冲洗掉。为了脱色完全,需数次更换脱色液并震荡过夜。
6.干胶
⑴ 用一张l0cm×l2cm的Whatman 3MM滤纸覆盖凝胶,用一张玻璃纸或塑料保鲜膜覆盖在凝胶的另一个表面,小心不要将气泡裹进去,这样会导致凝胶的破裂。可用一个试管作为卷轴推赶,可以有效的除去气泡。
⑵ 将滤纸置于干胶器上,开启加热和抽真空开关,并盖上带有密封圈的盖子。待凝胶烘干后小心取出即可。
【实验结果】
根据凝胶中标准品与待测样品的相对迁移率判断待测样品的大致分子量。
【思考题】
⒈ 利用SDS—聚丙烯酰胺电泳法测定蛋白质的分子量与利用凝胶层析测定蛋白质的分子量有何不同?
⒉ SDS在该电泳方法中的作用是什么?
Experiment 6 SDS-polyacrylamide Gel Electrophoresis
—Assay Molecular Weight of Protein
【Purpose】
1 Master the principle of SDS-PAGE (sodium dodecyl sulfate polyacrylamide gel electrophoresis).
2 Learn to use this approach to determine the molecular weight of protein.
【Principle】
SDS is the short term of sodium dodecyl sulfate. It is a kind of anion surface-active agent. It can open the hydrogen bond and hydrophobic bond in the electrophoresis system and combine with the protein molecule (under a certain condition, most of proteins combine with SDS in a ratio of 1.4 gram of SDS per gram protein). As a result, all kinds of SDS-protein complexes carry the same negative charge density that is far more than the native net charge of the protein. In this case, the difference of charge between different kinds of proteins will be covered. Thus the electrophoretic mobility only depends on the molecular size. And according to the standard curve of the log molecular weight of standard proteins and the electrophoretic mobility, the molecular weight of unknown proteins can be estimated.
【Materials】
1 Apparatus
Minigel apparatus; Power supply (capacity 200V, 500MA); Boiling water bath; Eppendorf centrifuge (optional); Hamilton Syringes (50μl and 100μl capacity); Gel dryer and high vacuum pump or water pump (optional); Small glass or plastic container with lid (i.e. 12 cm×16 cm×3cm); Rocking or rotary shaker.
2 Reagents
⑴ 2M Tris-HCl (pH 8.8), 100ml: Weigh out 24.2g Tris, add to 50ml distilled water and add concentrated HCI slowly to pH 8.8 (about 4ml) (allow solution to cool to room temperature, pH will increase), add distilled water to a total volume of 100ml;
⑵ 1M Tris-HCl (pH 6.8), 100ml: Weigh out 12.1g Tris, add to 50ml distilled water and add concentrated HCI slowly to pH 6.8 (about 8ml) (allow solution to cool to room temperature, pH will increase), add distilled water to a total volume of 100ml;
⑶ 10% (w/v) SDS, 100ml: Weigh out 10g SDS and add distilled water to a total volume of 100ml, then store at room temperature;
⑷ 50% (v/v) glycerol, l00ml: Pour 50ml 100% glycerol and add 50ml distilled water;
⑸ 1% (w/v) bromophenol blue, 10ml: Weigh out 100mg bromophenol blue, add 10ml distilled water and stir until bromophenol blue dissolved, then filtration will remove aggregated dye.
⑹ Solution A (Acrylamide Stock Solution), 30% (w/v) acrylamide, 0.8% (w/v) bis-acrylamide, 100ml: Weigh out 29.2g acrylamide and 0.8g bis-acrylamide, add distilled water to make 100ml and stir until completely dissolved. Work under hood and keep acrylamide solution covered with Parafilm until acrylamide powder is completely dissolved, it can be stored for months in the refrigerator.
⑺ Solution B (4x Separating Gel Buffer), 100ml: Mix 75ml 2M Tris-HCl (pH 8.8), 4ml 10% SDS and 21ml H20 together, it can be stored for months in the refrigerator.
⑻ Solution C (4x Stacking Gel Buffer), 100ml: Mix 50ml 1M Tris-HCl (pH 6.8), 4ml 10% SDS and 46ml H20 together, it can be stored for months in the refrigerator.
⑼ 10% ammonium persulfate, 5ml: Weigh out 0.5g ammonium persulfate and 5ml H2O, it can be stored for months in a capped tube in the refrigerator;
⑽ Electrophoresis Buffer,1L: Weigh out 3g Tris, 14.4g glycine, lg SDS and add H20 to make 1L, pH should be approximately 8.3. It also can be make a 10×stock solution, stable indefinitely at room temperature;
⑾ 5x Sample Bufler,10ml: Mix 0.6ml 1M Tris-HCl (pH 6.8), 5ml 50% glycerol, 2ml 10% SDS, 0.5ml 2-mercaptoethanol, 1ml 1% bromophenol blue and 0.9ml H2O together, it can be stable for weeks in the refrigerator or for months at -20°C;
⑿ Coomassie Gel Stain, 1 L: Add 1.0g Coomassie Blue R-250 into 450ml methanol, 450ml H20 and 100ml glacial acetic acid;
⒀ Coomassie Gel Destain, 1 L: Mix 100ml methanol, 100ml glacial acidic acid and 800ml H20 together.
【Procedures】
1 Pouring the Separating Gel
⑴ Assemble gel sandwich according to the manufacturer's instructions, in the case of commercial apparatus (e.g., Bio-Rad Mini-Gel), or according to the usage of alternative systems. For Mini-Gel, be sure that the bottom of both gel plates and spacers are perfectly flush against a flat surface before tightening clamp assembly. A slight misalignment will result in a leak.
⑵ Combine Solutions A and B and water in a small Erlenmeyer flask or a nest tube. Acrylamide (in Solution A) is a neurotoxin, so plastic gloves should be worn at all times; Add ammonium persulfate and TEMED, and mix by swirling or inverting container gently (excessive aeration will interfere with polymerization). Work rapidly at this point because polymerization will be under way; carefully introduce solution into gel sandwich descending along a spacer by using a pipet. This minimizes the possibility of air bubbles becoming trapped within the gel.
⑶ When the appropriate amount of separating gel solution has been added (in the case of the Mini-Gel, about 1.5cm from top of front plate or 0.5cm below level where teeth of comb will reach,), gently layer about l cm of water on top of the separating gel solution. This keeps the gel surface flat. When the gel has polymerized, a distinct interface will appear between the separating gel and the water.
⒉. Pouring the Stacking Gel
⑴ Pour off water covering the separating gel. The small droplets remaining will not disturb the stacking gel; Combine Solutions A and C and water in a small Erlenmeyer flask or a test tube; Add ammonium persulfate and TEMED and mix by gently swirling or inverting the container.
⑵ Pipet stacking gel solution onto separating gel until solution reaches top of front plate; Carefully insert comb into gel sandwich until bottom of teeth reaches top of front plate. Be sure no bubbles are trapped on ends of teeth. Tilting the comb at a slight angle is helpful for insertion without trapping air bubbles;
⑶ After stacking gel has polymerized, remove comb carefully (making sure not to tear the well ears); Place gel into electrophoresis chamber. If using the Mini-Gel system, attach both gels to electrode assembly before inserting into electrophoresis tank; Add electrophoresis buffer to inner and outer reservoir, making sure that both top and bottom of gel are immersed in buffer.
3 Preparing and Loading Samples
⑴ Combine protein sample with 5×Sample Buffer (i.e.20µl+5µl) in an Eppendorf tube; Heat at 100℃ for 2 minutes~10 minutes; Spin down protein solution for 1 second in microfuge-longer if large quantities of debris are present.
⑵ Introduce sample solution into well using a Hamilton syringe. Layer protein solution on bottom of well and raise syringe tip as dye level rises. Be careful to avoid introducing air bubbles as this may allow some of sample to be carried to adjacent well.
4 Running a Gel
⑴ Attach electrode plugs to proper electrodes. Current should flow towards the anode; Turn on power supply to 200V (constant voltage; amperage will be about 100mA at start, 60mA at end of electrophoresis for two 0.75mm gels; 110mA at start, 80mA at end for two 1.5mm gets);
⑵ The dye front should migrate to lcm from the bottom of the gel in 30 min~40 min for two 0.75mm gels (40 min~50 min for 1.5mm gels); Turn off power supply; Remove electrode plugs from electrodes; Remove gel plates from electrode assembly; Carefully remove a spacer, and insert the spacer in one corner between the plates, gently pry apart the gel plates. The gel will stick to one of the plates.
5 Staining a Gel with Coomassie Blue
This method of staining can detect as little as 0.lμg of protein in a single band. Generally a choice is made between using Coomassie Blue or Silver Stain depending on sensitivity desired.
⑴ Wearing gloves to prevent transfer of fingerprints to the gel, pick up the gel and transfer it to a small container (taking care not to tear the gel) containing a small amount of Coomassie Stain (20ml is sufficient), or gently agitate the glass plate in stain solution until gel separates from plate;
⑵ Agitate for 5 minutes~10 minutes for 0.75mm, 10 minutes~20 minutes for 1.5mm gel on slow rotary or rocking shaker. Cover container with lid or plastic wrap during staining and destaining; Pour out stain (can be reused several times, but it is fairly inexpensive so we generally discard it) and rinse the gel with a few changes of water. Use gloves to avoid staining hands;
⑶ Add destaining buffer (about 50ml). Strong bands are visible immediately on a light box, and the gel is largely destained within an hour. Used destaining buffer can be washed down the sink with ample water. To destain completely, change destain solution and agitate overnight.
6 Drying a Gel
⑴ Cover gel with a 10 cm×12 cm piece of Whatman 3MM paper and the other side of gel is covered with an acetate sheet or plastic wrap taking care not to trap air bubbles, which can lead to gel cracking. It is useful to roll out air bubbles, using a test tube as a rolling pin;
⑵ Place Whatman paper on gel dryer, turn on heat and suction, and cover with sealing gasket. Drying can be finished when the gel has been dried.
【Result】
According to the electrophoretic mobility of the standard protein and the unknown protein, identify the putative molecular weight of unknown protein.
【Questions】
1. What is the difference of molecular weight assay between SDS/PAGE and gel chromatography?
2. What is the biological function of SDS in SDS/PAGE?