Latex 排版 论文 Quick Start
准备工作:
1. 安装WinEdit
2. 安装MikTex,最好是直接下载80M的安装包
3. 安装JabRef 2.3.1
4. 安装gnuplot
5. 安装 GSView和GSGhost
6. 下载论文的模板:注意,至少有两个文件,并不是指下载.tex文件。 下面以elsart journal 模板为例:
a. elsart.cls: 指定elsart的格式
b. template-num.tex: 给出了title,author,abstract,introduction等各section的空白,只需要填空即可。
7. 用winEdit打开template-num.tex进行编辑。
8. 编译
9. dvi->pdf
以下是一些小技巧:
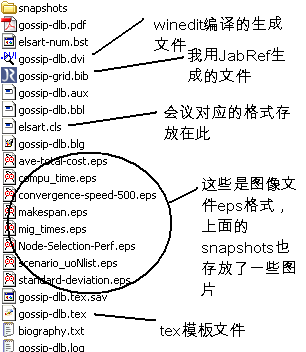
首先建一个工作目录:gossip-dlb-tex
最后,这个文件中应该有如下的文件。
首先要注意不要忘记在.tex文件首加入对应的package.
\documentclass{elsart}
\usepackage{ifpdf}
\usepackage{graphicx,amssymb,lineno}
\usepackage{algorithm}
\usepackage{algorithmic}
\usepackage{multirow}
\usepackage{subfigure}
如果需要编辑公式,可以安装一个MathType,将配置设置成“输出为Latex格式”。然后copy-paste到winEdit中即可。
注意:考过去是\[sin?1?(a) \] 格式,如果需要将公式放在文本里,需要用$:即$sin?1?(a)$, 如果将公式独立:
\def\formulaA{
sin?1?(a)
}
\advance\mathindent-20pt
\begin{equation}
\label{eq:1}
\formulaA
\end{equation}
如果需要在公式中加入空格,用 \
注意:所有的公式都是斜体,但是一般不要用$$来讲文本斜体,而应该用
\emph{},因为如果你的文本中有特殊字符就会被公式化:如single, EMPTY。
编辑算法:
\begin{algorithm}
\caption{The Skeleton of Gossip-based DLB Design algorithm} \label{alg-g-dlb} \begin{algorithmic} [1] \footnotesize
\IF{the current time is in a \emph{gossip cycle}}
\STATE Receive the \emph{gossip messages} ( \emph{aggregation message} and \emph{state-updating message} ) from the current node $g_i$'s neighbors.
\STATE Compute the new aggregation values.
\IF{load level change of the node > $dc_t$}
\STATE Encapsulate a \emph{state-updating message}.
\IF{$ dc_i< \overline {dc}+d_{p\min i}/(2c_i)$}
\STATE Compute $hops\_distance_u$ , according to Formula \ref{eq:4}. \ENDIF
\IF{\emph{state-updating message}'s $dc_j> \overline {dc}+d_{p\min i}/(2c_j)$} \STATE Compute $hops\_distance_o$ , according to Formula \ref{eq:5}. \ENDIF
\STATE Send \emph{state-updating message} to its neighbors.
\ENDIF
\FOR{each \emph{state-updating message} transmitted from the current node $g_i$'s neighbors}
\IF{\emph{state-updating message}'s $dc_j< \overline {dc}+d_{p\min i}/(2c_j )$} \STATE Put \emph{state-updating message} to \emph{uNList}.
\ENDIF
\IF{\emph{state-updating message}'s $dc_j> \overline {dc}+ d_{p\min i}/(2c_j )$} \STATE Put \emph{state-updating message} to $oNList$.
\ENDIF
\STATE \emph{state-updating message}'s $hops\_count$++.
\IF{$hops\_count$ $<$ \emph{state-updating message}'s $hops\_distance$} \STATE Forward \emph{state-updating message} to its neighbors.
\ENDIF
\ENDFOR
\ENDIF
\IF{the current time is in \emph{epoch interval}}
\IF{$dc_i > \overline {dc} + \ d_{p\min i} /(2c_i )$}
\STATE Search its \emph{uNList} for \emph{underloaded nodes}.
\STATE Sample some global nodes and search its stored \emph{uNList}. \STATE Perform \emph{Rank-based Autonomous Scheduler} in terms of $underloaded \ nodes$ selected.
\ENDIF
\ENDIF
\end{algorithmic}
\end{algorithm}
编辑表格:
\begin{table}
\caption{Relative Coefficients} \centering
\scriptsize
\begin{tabular}{|l|l|}
\hline \multicolumn{1}{|c|}{\textbf{Metric}}& \multicolumn{1}{|c|}{\textbf{Value or Scale}} \\
\hline Bootstrap for aggregation & 10 cycles \\
\hline Bootstrap for status gossip & 5 cycles \\
\hline $f_0$ (rank criterion) & $0.6\sim0.8$ \\
\hline Capacity of \emph{candidate\_list} & 3 \\
\hline Sampling Times & 20 \\
\hline
\end{tabular}
\label{tab:RelativeCoefficients}
\end{table}
加入图片:
\begin{figure}
\centering
%\includegraphics[width=12cm, height=4cm]{scenario_uoNlist.eps}
\includegraphics[scale=0.8]{Node-Selection-Perf.eps}
\caption{Node Selection Preference}
\label{fig:nsPre}
\end{figure}
\begin{figure}[ht]
\centering
\subfigure[Intialization State]{
\includegraphics[scale=0.33]{snapshots/3Dstates_epoch0.eps}
}
\subfigure[After 1st $epoch$]{
\includegraphics[scale=0.33]{snapshots/3Dstates_epoch1.eps}
}
\subfigure[After 2nd $epoch$]{
\includegraphics[scale=0.33]{snapshots/3Dstates_epoch2.eps}
}
\subfigure[After 3rd $epoch$]{
\includegraphics[scale=0.33]{snapshots/3Dstates_epoch3.eps}
}
\subfigure[After 6th $epoch$]{
\includegraphics[scale=0.33]{snapshots/3Dstates_epoch6.eps}
}
\subfigure[After 9th $epoch$]{
\includegraphics[scale=0.33]{snapshots/3Dstates_epoch9.eps}
}
\subfigure[After 12th $epoch$]{
\includegraphics[scale=0.33]{snapshots/3Dstates_epoch12.eps}
}
\subfigure[After 15th $epoch$]{
\includegraphics[scale=0.33]{snapshots/3Dstates_epoch15.eps}
}
\subfigure[After 18th $epoch$]{
\includegraphics[scale=0.33]{snapshots/3Dstates_epoch18.eps}
}
\caption{$RAS$ Dynamic Load Balancing Effect Snapshots ($n=500$)}
\label{fig:5}
\end{figure}
图片如何制作呢?
– 首先,必须是.eps格式的图像,因为这种图像是矢量图,不会失真。一般的方法,如果是数据图,用gnuplot, 非常优秀的软件,都是例子。
– 如果是自己用Visio画的图,首先生成wmf格式的图片。然后,下载wmf2eps软件(注意:安装好wmf2eps以后要配置一下,按照安装包里面help配置打印机即可)。然后,生成eps图片。
生成的eps可以下载GSView看它。
Bibliography的排版:
用到的软件有JabRef 2.3.1以及在citeulike网站注册。用JabRef2.3.1或者自己创建一个后缀是.bib的文件,放在工作目录下。
如果要加入一个title为An adaptive clustering approach to dynamic load balancing的论文的reference.首先在google中搜索,找到它对应的网址URL,如/xpls/abs_all.jsp?arnumber=1300515

然后,login “CiteULike”网站:/
选择post article?post article from web page. 然后,将URL拷贝到空白后点击Post it!
然后,在Home page点击My CiteULike ? Library.
找到你加入的那个paper的item,点击进去就能看到对应的bibTex。
然后,将bibTex复制下来。
接下来,运行JabRef软件,点击“New BibTex Entry”图标(就是那个绿色的加号),如果是Journal 就选择Article, 如果是Proceeding,就选择InProceedings等等。注意,你这样实际上在gossip-dlb.bib文件中加入了相应的条目。
如果遇到找不到包的错误提示,
比如:
可以安装一个MikTex然后下载安装包即可。如果更新包有问题,请检查Repository设置中的代理有没有配置好。
第二篇:Latex学习总结
1. 一般需要哪些库?
\usepackage{amsmath}
\usepackage{amssymb}
\usepackage{graphicx}
2. LaTex里面没有跟\textsuperscript相对应的下标命令,但是可以自己定义一下:
\usepackage{amsmath}
\def\textsubscript#1%
{$_{\text{#1}}$}
3. 同一行如何插入两幅图?
\begin{figure}[!h]
\centering
\begin{minipage}[t]{0.45\linewidth}
\centering
\includegraphics[width=2in,keepaspectratio]{左图的文件名}
\end{minipage}
\begin{minipage}[t]{0.45\linewidth}
\centering
\includegraphics[width=2in,keepaspectratio]{右图的文件名}
\end{minipage}
\caption{主图片标题}
\end{figure}
4. 什么样的图片格式被支持?
使用PCTex的时候 内嵌PDFTex 所以最好能直接把图片做成pdf
(1) Origin画出的图,可以直接导出成wmf,eps或者pdf。要用在PCTex中需要直接导出成pdf。导出eps的话还需要使用EPS2PDF转换为pdf。直接导出的格式中以wmf最为清晰,也可以导出wmf文件,继续使用WMF2EPS转为eps,再转为pdf。
(2) 使用Fireworks等矢量绘图软件,可以存成png文件,而PCTex可以直接导进png文件并转为pdf
5. 摄氏度符号怎么打?
自定义一个:
\def\centigrade{$^{\circ}\mathrm{C}$}
5. 傅立叶变换那种特殊的F字母怎么打出来?
首先需要
\usepackage{mathrsfs}
然后
$\mathscr{F}$
即可
6. 矩阵怎么输入?
\left[
\begin{array}{ccc}
1 & 0 & 1\\ \\
0 & 2 & 0\\ \\
1 & 0 & 1
\end{array}
\right]
7. 怎样改变公式自动编号中的章节号?
\setcounter{chapter}{12}
自动变成12章
改页码:
\setcounter{page}{1}
8. 单边的大括号怎么输入?
例如,使用推出符号来证明
\[
\left.
\begin{array}{r}
-2x_{13} = -iy_{13}\\ \\
-2y_{13} = ix_{13}
\end{array}
\right\}
\quad\Rightarrow\quad -2x_{13} = \left(-i\right)\left(-\frac{i}{2}\right)x_{13} = -\frac{1}{2}x_{13} \quad\Rightarrow\quad x_{13} = 0
\]
如果是右括号,左边要使用\left.来作空
9. 数学上的删除线,例如分子分母同时消去。
首先
\usepackage{ulem}
然后
\left(\frac{\xout{\partial{\mathscr{E}}}}{\xout{\partial{k}}}\frac{\xout{\partial{k}}}{\xout{\partial\mathscr{E}}}\right)
效果:
