实验三 三点弯曲实验报告
一、实验目的
试样类型:
二、设备及仪器
三、实验数据及计算结果
1、矩形截面钢梁尺寸规格
2、 弯曲试验时,跨距L为( ),进行三点弯曲或四点弯曲加载,试验速度一般为( )。
3、试样在弹性范围内弯曲时,受拉侧表面的最大弯曲应力 (抗弯强度)按下式计算:

M ----- 最大弯矩,三点弯曲时, 。
。
W ----- 试样抗弯截面系数。宽度为b、高度为h的矩形试样, 。
。
实验四 材料剪切实验报告
实验机器型号名称:
测件尺寸的量具名称:
试验数据:
(1)实验记录

(2)计算结果

讨论题:
1、低碳钢剪断时断口有什么特点?
第二篇:影像裁剪与镶嵌处理实验报告
影像裁剪与镶嵌处理
实验报告
姓 名: 李丹
学 号: 20113310
班 级: 遥感20##-01班
时间:20##年5月18日
目录
一、实验目的... 2
1.了解影像镶嵌的原理... 2
2.了解影像镶嵌过程中参数的设置及意义... 2
3.掌握影像镶嵌的处理方法... 2
二、实验内容... 2
1.航空影像镶嵌... 2
2.卫星影像镶嵌... 2
3.近红外相片镶嵌... 2
三、实验步骤... 2
(一)、航空影像镶嵌... 2
(二)、卫星影像镶嵌... 4
(三)、近红外相片镶嵌... 5
四、实验体会... 8
一、实验目的
1. 了解影像镶嵌的原理
2. 了解影像镶嵌过程中参数的设置及意义
3. 掌握影像镶嵌的处理方法
二、实验内容
1. 航空影像镶嵌
重点:剪切线的生成
2. 卫星影像镶嵌
重点:影像色彩纠正
3. 近红外相片镶嵌
重点:区域排除;色彩均衡处理
三、实验步骤
(一)、航空影像镶嵌
(使用图像Examples\air-photo-1.img, air-photo-2.img, 2-2.img, 2-3.img)
1.打开影像镶嵌工具
Data Preparation->Mosaic Images->Mosaic Tool
2. 设置输入影像
(1).Viewer:  ->air-photo-1.img->AOI->Tools->
 ->绘制一个长方形将整个影像包围->File->Save->AOI Layer As->template.aoi->OK
(2) Mosaic Tool: Add Images ->Image Area Options->Template->Set->AOI File->Select the AOI File: template.aoi->OK->File-> air-photo-1.img/air-photo-2.img->OK
3. 影像镶嵌
方法一:
(1).剪切线的绘制:
Mosaic Tool: ->
-> ->viewer#3:leica_ggm_imagine->mosaic_INTERSECT_ANT_004992:AOI->TOOL->
 ->绘制剪切线
(2).加载剪切线:
Mosaic Tool: AOI Cutline-> -> AOI from Viewer/ AOI from Viewer.
Mosaic Tool:  ->Set Overlap Function-> Intersection Type : Cutline Exists;
Select Function : Feathering->Apply
(3).设置输出文件
Mosaic Tool:  -> Define Output Map Area(s)-> Union of All Inputs->ok
(4).影像的镶嵌
Mosaic Tool: Process-> Run Mosaic->Output Options: Stats Ignore Value->Output File Name: AirMosaic ->ok
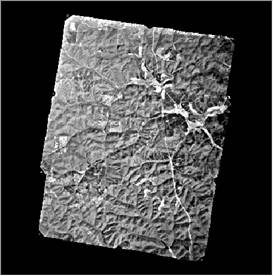 镶嵌后的图像如图1所示:
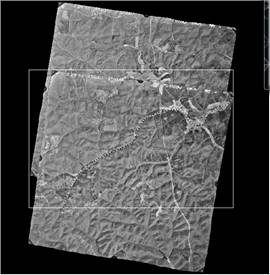 (a)镶嵌前的图像 (b)镶嵌后的图像
图1,航空影像镶嵌前后对比图
方法二:
(1).剪切线的自动生成
Mosaic Tool: Add Images: 2-2.img/2-3.img-> ->
-> ->Cutline Generation Options: Weighted Cutline->ok
(2).镶嵌后图像的显示
Mosaic Tool:双击重叠区域-> .
.
 镶嵌后的图像如图2所示:
图2,自动生成剪切线的镶嵌图像
(二)、卫星影像镶嵌
(使用图像:wasia1_mss.img, wasia2_mss.img, wasia3_tm.img)
1.影像的显示
Viewer: ->Raster Options : Background Transparent/Fit to Frame/unchecked Clear Display->File: wasia1_mss.img/wasia2_mss.img/wasia3_tm.img->OK
2. 将影像加入至Mosaic Tool窗口
Mosaic Tool: Add Images->Image Area Options->Compute Active Area->OK
3.影像色彩纠正
(1).设置色彩纠正方式
Mosaic Tool:  ->Use Histogram Matching->Set->Matching Method : overlap Areas ; Histogram Type : Band by Band->OK
(2).设置覆盖函数
Mosaic Tool: -> -> Intersection Type: No Cutline Exists ; Select Function : Overlay->Apply
4. 影像镶嵌
Mosaic Tool: Process->Run Mosaic->name: wasia_mosaic.img->OK
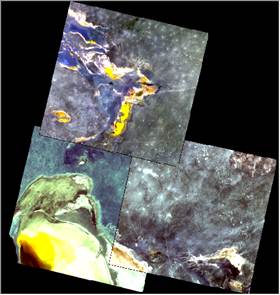
 镶嵌后的图像如图3所示:
(a)处理前的图像 (b)处理后的图像
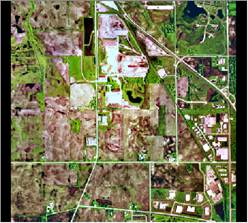
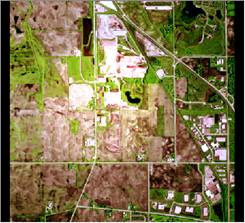
图3,卫星影像镶嵌色彩纠正前后对比图
(三)、近红外相片镶嵌
(使用图像:2-2.img, 2-3.img, 2-4.img, 3-2.img, 3-3.img, 3-4.img, 4-2.img, 4-3.img, 4-4.img, image-dodge-bright-spot.img)
1. 影像显示
Viewer: ->Raster Options->Background Transparent/Fit to Frame/unchecked ClearDisplay->File->2-2.img/2-3.img/2-4.img/3-2.img/3-3.img/3-4.img/4-2.img/4-3.img/4-4.img->OK
2. 将影像加入至Mosaic Tool窗口
Mosaic Tool: Add Images->Image Area Options->Use Entire Image->File->2-2.img/2-3.img/2-4.img/3-2.img/3-3.img/3-4.img/4-2.img/4-3.img/4-4.img->OK
3. 区域排除
Mosaic Tool: ->Exclude Areas->Set-> ->绘制排除区域->
 ->Select layer to view AOI stats and set searching criteria:1;Min Pixel Value:8;Max Pixel Value:75;Exclude Area Color:
  ->OK->
4.色彩均衡处理
Color Corrections: Color Balancing-> Set->Set Color Balancing Method->Manual Color Manipulation->Set: Display Setting: RGB ; Surface Method: Conic->Compute for all/Accept for all->OK
5. 直方图匹配
Color Corrections: Use Histogram Matching->Set:Matching Method:For all Images;Histogram Type:Band by Band->OK
6.生成剪切线
Mosaic Tool:->  ->
-> ->Geometry-based Cutline Generation->OK
7. 设置覆盖函数
Mosaic Tool: : Cutline Exists;No Smoothing; Feathering->Apply
8. 影像镶嵌
Mosaic Tool: Process->Run Mosaic->name: color_infrared.img
纠正后图像如图4所示:
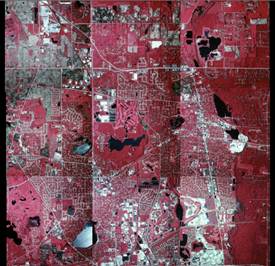
 (a)处理前的图像 (b)处理后的图像
图4,近红外相片色彩纠正前后对比图
9. 影像色调纠正
Mosaic Tool: Add Images->image-dodge-bright-spot.img-> ->Use Image Dodging->Set->Compute Current->Accept->OK
10. 影像镶嵌
MosaicTool:Process->RunMosaic->name:image-dodge-bright-spot.img->OK.
纠正后图像如图5所示:
(a)处理对比度前的图像 (b)处理对比度后的图像
图5,影像纠正前后对比图
四、实验体会
通过本次实验,我学会了如何对航空影像、卫星影像、近红外相片进行镶嵌以及如何色彩的纠正。其中,在航空影像的镶嵌中剪切线的生成有两种方法:一种是将两张图片叠加在一起用手绘的方式生成剪切线;第二种可以用ERDAS的自动生成剪切线的功能。而在航空影像的镶嵌中比较重要的是影像色彩的校正,在本次实验中采用的是直方图匹配的方法进行色彩纠正。最后,在近红外相片的镶嵌中,我学会了如何进行区域排除、以及色彩均衡处理。进行区域排除的原因是:在进行色彩均衡处理时,灰度为零的区域会影响均衡处理的效果,因此必须先进行区域排除后再进行色彩的均衡处理。此外,在在近红外相片的镶嵌中我还学会了如何进行色调的纠正,通过实验中处理图像的前后对比可以发现进行色调纠正的图像对比度发生了变化。