服装CAD原理与应用
实验报告
目录
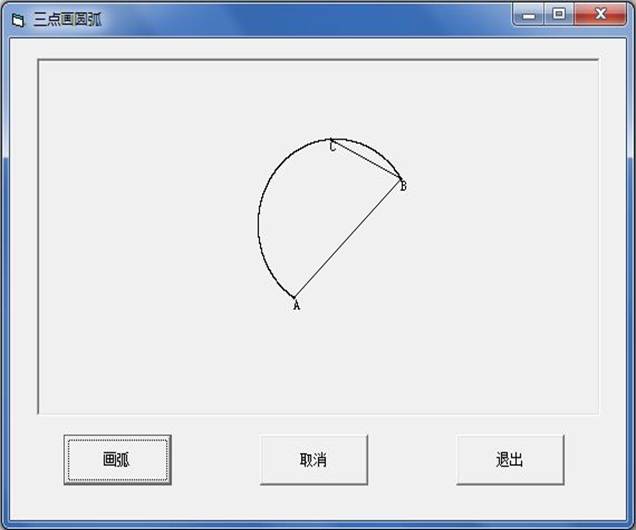
实验报告(一)三点画圆弧----------------------(02-07)
实验报告(二)两点画圆弧----------------------(08-12)
实验报告(三)Bezier曲线的绘制----------------(13-17)
实验报告(四)Hermite曲线的绘制---------------(18-22)
实验报告(五)B样条曲线的绘制-----------------(23-27)
实验报告(一)
一、 实验题目
使用VB软件实现三点画圆弧
二、 实验目的
1.了解服装CAD中的常用曲线,灵活运用理论知识加以运用,实现操作;
2.掌握三点画圆弧的基本原理和绘制方法;
3.运用Visual Basic 6.0软件编写程序实现通过三点的控制成功绘制圆弧。
三、 实验目的
1.实验原理
已知三个点A(x1,y1),B(x2,y2)C(x3,y3)的坐标
①根据中垂线相交于圆心可以求出圆心(x,y)的坐标以及半径r
②根据圆心以及已知三点的坐标,判断出所画圆弧的起始角,终止角和中间角的正切角度值,进而求出这三个角的角度。
③比较起始角,终止角和中间角这三点的角度大小,判断出所画圆弧的方向。
2.源代码
VERSION 5.00
Begin VB.Form Form1
Caption = "三点画圆弧"
ClientHeight = 5835
ClientLeft = 120
ClientTop = 450
ClientWidth = 8280
LinkTopic = "Form1"
ScaleHeight = 5835
ScaleWidth = 8280
StartUpPosition = 3 '窗口缺省
Begin VB.CommandButton Command3
Caption = "退出"
Height = 615
Left = 6000
TabIndex = 3
Top = 4800
Width = 1455
End
Begin VB.CommandButton Command2
Caption = "取消"
Height = 615
Left = 3360
TabIndex = 2
Top = 4800
Width = 1455
End
Begin VB.CommandButton Command1
Caption = "画弧"
Height = 615
Left = 720
TabIndex = 1
Top = 4800
Width = 1455
End
Begin VB.PictureBox Picture1
Height = 4335
Left = 360
ScaleHeight = 4275
ScaleWidth = 7515
TabIndex = 0
Top = 240
Width = 7575
End
End
Attribute VB_Name = "Form1"
Attribute VB_GlobalNameSpace = False
Attribute VB_Creatable = False
Attribute VB_PredeclaredId = True
Attribute VB_Exposed = False
Private pt() As mypoint
Private Sub Form_Load()
ReDim pt(1)
End Sub
Private Sub Picture1_MouseDown(Button As Integer, Shift As Integer, x As Single, y As Single)
Dim s As Integer
pt(UBound(pt)).x = x
pt(UBound(pt)).y = y
Picture1.Circle (x, y), 15
s = Val(UBound(pt))
Select Case s
Case 1
Picture1.Print "A"
Case 2
Picture1.Print "B"
Case 3
Picture1.Print "C"
End Select
If UBound(pt) > 1 Then
Picture1.Line (pt(UBound(pt) - 1).x, pt(UBound(pt) - 1).y)-(pt(UBound(pt)).x, pt(UBound(pt)).y)
End If
ReDim Preserve pt(UBound(pt) + 1)
End Sub
Private Sub Command1_Click()
Dim A1, A2, B1, B2, C1, C2 As Single
Dim X0, Y0, r, PI As Double
Dim t1, t2, t3 As Double
Dim t As Double
A1 = pt(1).x ^ 2 + pt(1).y ^ 2 - pt(3).x ^ 2 - pt(3).y ^ 2
A2 = pt(2).x ^ 2 + pt(2).y ^ 2 - pt(3).x ^ 2 - pt(3).y ^ 2
B1 = 2 * pt(3).x - 2 * pt(1).x
B2 = 2 * pt(3).x - 2 * pt(2).x
C1 = 2 * pt(1).y - 2 * pt(3).y
C2 = 2 * pt(2).y - 2 * pt(3).y
X0 = (A1 * C2 - A2 * C1) / (B2 * C1 - B1 * C2)
Y0 = (A1 * B2 - A2 * B1) / (B2 * C1 - B1 * C2)
r = Sqr((pt(1).x - X0) * (pt(1).x - X0) + (pt(1).y - Y0) * (pt(1).y - Y0))
PI = 4 * Atn(1)
t1 = Atn((pt(1).y - Y0) / (pt(1).x - X0))
If pt(1).x - X0 > 0 And pt(1).y - Y0 > 0 Then
t1 = t1
Else
If pt(1).x - X0 < 0 And pt(1).y - Y0 > 0 Then
t1 = t1 + PI
Else
If pt(1).x - X0 < 0 And pt(1).y - Y0 < 0 Then
t1 = t1 + PI
Else
t1 = t1 + 2 * PI
End If
End If
End If
t2 = Atn((pt(2).y - Y0) / (pt(2).x - X0))
If pt(2).x - X0 > 0 And pt(2).y - Y0 > 0 Then
t2 = t2
Else
If pt(2).x - X0 < 0 And pt(2).y - Y0 > 0 Then
t2 = t2 + PI
Else
If pt(2).x - X0 < 0 And pt(2).y - Y0 < 0 Then
t2 = t2 + PI
Else
t2 = t2 + 2 * PI
End If
End If
End If
If t1 < t3 < t2 Then
For t = t1 To t2 Step 0.001
x = X0 + r * Cos(t)
y = Y0 + r * Sin(t)
Picture1.PSet (x, y)
Next t
ElseIf t2 < t1 < t3 Then
t2 = t2 + 2 * PI
For t = t1 To t2 Step 0.001
x = X0 + r * Cos(t)
y = Y0 + r * Sin(t)
Picture1.PSet (x, y)
Next t
ElseIf t3 < t2 < t1 Then
t2 = t2 + 2 * PI
For t = t1 To t2 Step 0.001
x = X0 + r * Cos(t)
y = Y0 + r * Sin(t)
Picture1.PSet (x, y)
Next t
ElseIf t1 < t2 < t3 Then
t1 = t1 + 2 * PI
For t = t2 To t1 Step 0.001
x = X0 + r * Cos(t)
y = Y0 + r * Sin(t)
Picture1.PSet (x, y)
Next t
ElseIf t3 < t1 < t2 Then
t1 = t1 + 2 * PI
For t = t2 To t1 Step 0.001
x = X0 + r * Cos(t)
y = Y0 + r * Sin(t)
Picture1.PSet (x, y)
Next t
ElseIf t2 < t3 < t1 Then
For t = t2 To t1 Step 0.001
x = X0 + r * Cos(t)
y = Y0 + r * Sin(t)
Picture1.PSet (x, y)
Next t
End If
End Sub
Private Sub Command2_Click()
Picture1.Cls
ReDim pt(1)
End Sub
Private Sub Command3_Click()
End
End Sub
四 实验结果
实验报告(二)
一、 实验题目
使用VB软件实现两点画圆弧
二、 实验目的
1.了解服装CAD中的常用曲线,灵活运用理论知识加以运用,实现操作;
2.掌握使用两端点,以及其中一端点切线画圆弧的基本原理和绘制方法;
3.运用Visual Basic 6.0软件编写程序实现通过两端点,以及其中一端点切线成功绘制圆弧。
三、 实验内容
1、实验原理
已知一圆弧两端点A,B和A端点切线的方向数L
①根据向量的知识,由已知一圆弧两端点A,B和A端点切线的方向数L求出圆心的坐标和半径大小;
②计算在圆心为原点的新坐标系下初始角和终止角的正切值,进而求出对应的角度;
③判断L和半径向量的乘积,若大于0,则为逆时针方向画圆弧,小于0,则为顺时针方向画圆弧;
④根据圆的参数方程表达式,利用VB绘制圆弧。
2、源代码
VERSION 5.00
Begin VB.Form Form1
AutoRedraw = -1 'True
Caption = "两点加切线画圆弧"
ClientHeight = 6810
ClientLeft = 120
ClientTop = 450
ClientWidth = 8340
LinkTopic = "Form1"
ScaleHeight = 6810
ScaleWidth = 8340
StartUpPosition = 3 '窗口缺省
Begin VB.CommandButton Command3
Caption = "退出"
Height = 615
Left = 6240
TabIndex = 3
Top = 6000
Width = 1575
End
Begin VB.CommandButton Command2
Caption = "取消"
Height = 615
Left = 3360
TabIndex = 2
Top = 6000
Width = 1575
End
Begin VB.CommandButton Command1
Caption = "画弧"
Height = 615
Left = 480
TabIndex = 1
Top = 6000
Width = 1575
End
Begin VB.PictureBox Picture1
AutoRedraw = -1 'True
Height = 5175
Left = 360
ScaleHeight = 5115
ScaleWidth = 7515
TabIndex = 0
Top = 480
Width = 7575
End
End
Attribute VB_Name = "Form1"
Attribute VB_GlobalNameSpace = False
Attribute VB_Creatable = False
Attribute VB_PredeclaredId = True
Attribute VB_Exposed = False
Private pt() As mypoint
Private Sub Form_Load()
ReDim pt(1)
End Sub
Private Sub Picture1_MouseDown(Button As Integer, Shift As Integer, x As Single, y As Single)
Dim s As Integer
pt(UBound(pt)).x = x
pt(UBound(pt)).y = y
Picture1.Circle (x, y), 1
s = Val(UBound(pt))
Select Case s
Case 1
Picture1.Print "A"
Case 2
Picture1.Print "B"
Case 3
Picture1.Print "L" '曲线在A点处的切线矢量
Picture1.Line (pt(1).x, pt(1).y)-(pt(3).x, pt(3).y)
End Select
ReDim Preserve pt(UBound(pt) + 1)
End Sub
Private Sub Command1_Click()
Dim X0, Y0, r As Double
Dim a1, a2, b1, b2, c1, c2 As Double
Dim t, t1, t2, i, j, k, m, n As Double
Dim pi As Single
pi = 4 * Atn(1)
a1 = 2 * pt(1).x - 2 * pt(2).x
a2 = pt(3).x - pt(1).x
b1 = 2 * pt(1).y - 2 * pt(2).y
b2 = pt(3).y - pt(1).y
c1 = pt(1).x ^ 2 - pt(2).x ^ 2 + pt(1).y ^ 2 - pt(2).y ^ 2
c2 = (pt(1).x - pt(3).x) * pt(1).x + (pt(1).y - pt(3).y) * pt(1).y
X0 = (b2 * c1 - b1 * c2) / (a1 * b2 - a2 * b1)
Y0 = (a1 * c2 - a2 * c1) / (a1 * b2 - a2 * b1)
r = Sqr((pt(1).x - X0) ^ 2 + (pt(1).y - Y0) ^ 2)
k = (pt(3).y - pt(1).y) * (pt(1).x - X0) - (pt(3).x - pt(1).x) * (pt(1).y - Y0)
m = pt(1).x - X0
n = pt(1).y - Y0
t1 = Atn(Abs(n / m))
If m > 0 And n > 0 Then
t1 = t1
ElseIf m < 0 And n > 0 Then
t1 = pi - t1
ElseIf m < 0 And n < 0 Then
t1 = pi + t1
ElseIf m > 0 And n < 0 Then
t1 = 2 * pi - t1
End If
i = pt(2).x - X0
j = pt(2).y - Y0
t2 = Atn(Abs(j / i))
If i > 0 And j > 0 Then
t2 = t2
ElseIf i < 0 And j > 0 Then
t2 = pi - t2
ElseIf i < 0 And j < 0 Then
t2 = pi + t2
ElseIf i > 0 And j < 0 Then
t2 = 2 * pi - t2
End If
If k > 0 Then
If t1 < t2 Then
For t = t1 To t2 Step 0.0001
x = X0 + r * Cos(t)
y = Y0 + r * Sin(t)
Picture1.PSet (x, y)
Next t
Else: t2 = t2 + 2 * pi
For t = t1 To t2 Step 0.0001
x = X0 + r * Cos(t)
y = Y0 + r * Sin(t)
Picture1.PSet (x, y)
Next t
End If
Else
If t1 > t2 Then
For t = t2 To t1 Step 0.0001
x = X0 + r * Cos(t)
y = Y0 + r * Sin(t)
Picture1.PSet (x, y)
Next t
Else: t1 = t1 + 2 * pi
For t = t2 To t1 Step 0.0001
x = X0 + r * Cos(t)
y = Y0 + r * Sin(t)
Picture1.PSet (x, y)
Next t
End If
End If
End Sub
Private Sub Command2_Click()
Picture1.Cls
ReDim pt(1)
End Sub
Private Sub Command3_Click()
End
End Sub
四、  实验结果
实验结果
实验报告(三)
一、 实验题目
运用VB软件绘制Bezier曲线
二、 实验目的
1、了解服装CAD中的常用曲线,通过实际操作加以深入认识;
2、了解Bezier曲线的特点,根据Bezier曲线的基本原理,推断出绘制方法并进行操作;
3、运用Visual Basic 6.0软件编写程序实现曲线的成功绘制。
三、 实验内容
1、实验原理
设空间有n+1个点P0,P1,P2,……,Pn,则称下列函数所决定的参数曲线为Bezier曲线:

在给定几个点时,可在t [0,1]区间取一系列值,相应的计算一系列的x(t),y(t),z(t)的值,由此可确定空间曲线上各点的位置,连接后即得该空间曲线。
2、源代码
VERSION 5.00
Begin VB.Form Bezier
Caption = "Bezier曲线"
ClientHeight = 7575
ClientLeft = 60
ClientTop = 450
ClientWidth = 9255
LinkTopic = "Form1"
ScaleHeight = 7575
ScaleWidth = 9255
StartUpPosition = 3 '窗口缺省
Begin VB.CommandButton Command2
Caption = "取 消"
Height = 495
Left = 3840
TabIndex = 3
Top = 6600
Width = 1455
End
Begin VB.CommandButton Command3
Caption = "退 出"
Height = 495
Left = 6720
TabIndex = 2
Top = 6600
Width = 1455
End
Begin VB.CommandButton Command1
Caption = "画 弧"
Height = 495
Left = 1080
TabIndex = 1
Top = 6600
Width = 1455
End
Begin VB.PictureBox Picture1
Height = 5655
Left = 600
ScaleHeight = 5595
ScaleWidth = 7995
TabIndex = 0
Top = 480
Width = 8055
End
End
Attribute VB_Name = "Bezier"
Attribute VB_GlobalNameSpace = False
Attribute VB_Creatable = False
Attribute VB_PredeclaredId = True
Attribute VB_Exposed = False
Private pt() As mypoint
Private Sub Form_Load()
ReDim pt(1)
End Sub
Private Sub Picture1_MouseDown(Button As Integer, Shift As Integer, x As Single, y As Single)
Dim s As Integer
pt(UBound(pt)).x = x
pt(UBound(pt)).y = y
Picture1.Circle (x, y), 15
s = Val(UBound(pt))
Select Case s
Case 1
Picture1.Print "P0"
Case 2
Picture1.Print "P1"
Case 3
Picture1.Print "P2"
Case 4
Picture1.Print "P3"
Case 5
Picture1.Print "P4"
Case 6
Picture1.Print "P5"
Case 7
Picture1.Print "P6"
Case 8
Picture1.Print "P7"
Case 9
Picture1.Print "P8"
Case 10
Picture1.Print "P9"
Case 11
Picture1.Print "P10"
End Select
If UBound(pt) > 1 Then
Picture1.Line (pt(UBound(pt) - 1).x, pt(UBound(pt) - 1).y)-(pt(UBound(pt)).x, pt(UBound(pt)).y)
End If
ReDim Preserve pt(UBound(pt) + 1)
End Sub
Private Sub Command1_Click()
Dim i%, t#
Dim j, n As Integer
Dim s, x, y As Single
n = UBound(pt) - 1 - 1
For j = 1 To 1000
x = 0
y = 0
For i = 0 To n
t = j / 1000
x = x + pt(i + 1).x * B(i, n, t)
y = y + pt(i + 1).y * B(i, n, t)
Next i
Picture1.PSet (x, y)
Next j
End Sub
Private Function fact(n As Integer)
Dim i As Integer
Dim s As Long
s = 1
For i = 1 To n
s = s * i
Next i
fact = s
End Function
Private Function B(i%, n%, t#) As Single
B = (fact(n) * t ^ i * (1 - t) ^ (n - i)) / (fact(i) * fact(n - i))
End Function
Private Sub Command2_Click()
Picture1.Cls
ReDim pt(1) 'pt(1)为第一个点P0
End Sub
Private Sub Command3_Click()
End
End Sub
四、 实验结果

实验报告(四)
一、 实验题目
运用VB软件绘制三次Hermite曲线
二、 实验目的
1、了解服装CAD中的常用曲线,通过实际操作加以深入认识;
2、了解Hermite曲线的特点,根据Hermite曲线的基本原理,推断出绘制方法并进行操作;
3、运用Visual Basic 6.0软件编写程序实现Hermite曲线的成功绘制。
三、 实验内容
1、实验原理
 2、源代码
2、源代码
VERSION 5.00
Begin VB.Form Hermite
Caption = "三次Hermite曲线"
ClientHeight = 7575
ClientLeft = 60
ClientTop = 450
ClientWidth = 9255
LinkTopic = "Form1"
ScaleHeight = 7575
ScaleWidth = 9255
StartUpPosition = 3 '窗口缺省
Begin VB.PictureBox Picture1
Height = 5655
Left = 600
ScaleHeight = 5595
ScaleWidth = 7995
TabIndex = 3
Top = 480
Width = 8055
End
Begin VB.CommandButton Command1
Caption = "画 弧"
Height = 495
Left = 1200
TabIndex = 2
Top = 6600
Width = 1455
End
Begin VB.CommandButton Command3
Caption = "退 出"
Height = 495
Left = 6600
TabIndex = 1
Top = 6600
Width = 1455
End
Begin VB.CommandButton Command2
Caption = "取 消"
Height = 495
Left = 3960
TabIndex = 0
Top = 6600
Width = 1455
End
End
Attribute VB_Name = "Hermite"
Attribute VB_GlobalNameSpace = False
Attribute VB_Creatable = False
Attribute VB_PredeclaredId = True
Attribute VB_Exposed = False
Private pt() As mypoint
Private Sub Form_Load()
ReDim pt(1)
End Sub
Private Sub Picture1_MouseDown(Button As Integer, Shift As Integer, x As Single, y As Single)
Dim s As Integer
pt(UBound(pt)).x = x
pt(UBound(pt)).y = y
Picture1.Circle (x, y), 1
s = Val(UBound(pt))
Select Case s
Case 1
Picture1.Print "P0"
Case 2
Picture1.Print "P1"
Case 3
Picture1.Print "P01" '曲线在P0点处的切线矢量
Picture1.Line (pt(1).x, pt(1).y)-(pt(3).x, pt(3).y)
Case 4
Picture1.Print "P11" '曲线在P1点处的切线矢量
Picture1.Line (pt(2).x, pt(2).y)-(pt(4).x, pt(4).y)
End Select
ReDim Preserve pt(UBound(pt) + 1)
End Sub
Private Sub Command1_Click()
Dim Ax, Bx, Cx, Dx, Ay, By, Cy, Dy As Single
Dim P01x!, P11y!
Dim j%, t As Single
P01x = 2 * (pt(3).x - pt(1).x)
P01y = 2 * (pt(3).y - pt(1).y)
P11x = 2 * (pt(2).x - pt(UBound(pt) - 1).x)
P11y = 2 * (pt(2).y - pt(UBound(pt) - 1).y)
Ax = 2 * (pt(1).x - pt(2).x) + P01x + P11x
Ay = 2 * (pt(1).y - pt(2).y) + P01y + P11y
Bx = 3 * (pt(2).x - pt(1).x) - 2 * P01x - P11x
By = 3 * (pt(2).y - pt(1).y) - 2 * P01y - P11y
Cx = P01x
Cy = P01y
Dx = pt(1).x
Dy = pt(1).y
For j = 1 To 1000
t = j / 1000
x = Ax * t ^ 3 + Bx * t ^ 2 + Cx * t + Dx
y = Ay * t ^ 3 + By * t ^ 2 + Cy * t + Dy
Picture1.PSet (x, y)
Next j
End Sub
Private Sub Command2_Click()
Picture1.Cls
ReDim pt(1) 'pt(1)为第一个点P0
End Sub
Private Sub Command3_Click()
End
End Sub
Private Sub Form_Activate()
Picture1.Scale (0, 500)-(500, 0)
End Sub
四、 实验结果

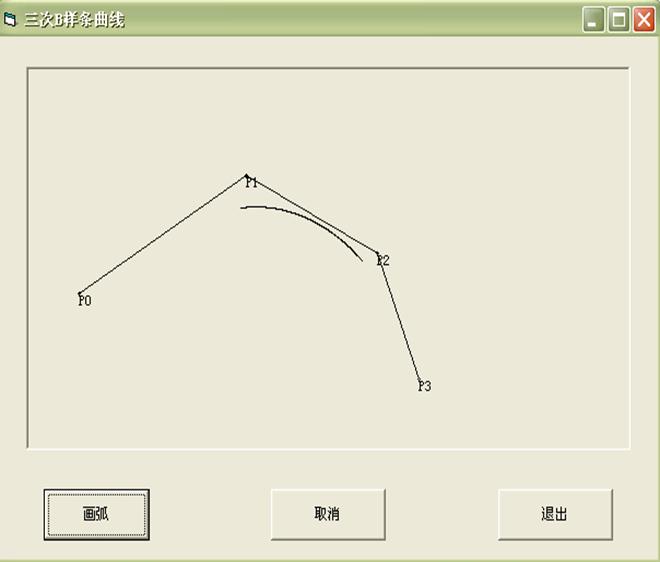
实验报告(五)
一、 实验题目
用VB绘制三次B样条曲线
二、 实验目的
1、了解服装CAD中的常用曲线。
2、掌握B样条曲线的基本原理和方法,了解B样条曲线的特点。
3、运用Visual Basic 6.0软件编写程序实现三次B样条曲线的成功绘制
三、 实验内容
1、实验原理
B样条曲线的数学模型:
设空间有n+k+1个点 ,称下列函数所决定的参数曲线为第i段B样条曲线:

k=3时,称为三次B样条曲线
根据上式可得:

代入前面的式中,第i段三次B样条曲线表达式为:
 =
=
根据给定四个点的,可在t [0,1]区间取一系列值,相应的计算一系列的x(t),y(t),z(t)的值,由此可确定空间曲线上各点的位置,连接后即得该空间曲线。
2、源代码
VERSION 5.00
Begin VB.Form Form1
Caption = "三次B样条曲线"
ClientHeight = 6240
ClientLeft = 120
ClientTop = 450
ClientWidth = 9030
LinkTopic = "Form1"
ScaleHeight = 6240
ScaleWidth = 9030
StartUpPosition = 3 '窗口缺省
Begin VB.CommandButton Command3
Caption = "退出"
Height = 615
Left = 6840
TabIndex = 3
Top = 5400
Width = 1575
End
Begin VB.CommandButton Command2
Caption = "取消"
Height = 615
Left = 3720
TabIndex = 2
Top = 5400
Width = 1575
End
Begin VB.CommandButton Command1
Caption = "画弧"
Height = 615
Left = 600
TabIndex = 1
Top = 5400
Width = 1455
End
Begin VB.PictureBox Picture1
Height = 4575
Left = 360
ScaleHeight = 4515
ScaleWidth = 8235
TabIndex = 0
Top = 360
Width = 8295
End
End
Attribute VB_Name = "Form1"
Attribute VB_GlobalNameSpace = False
Attribute VB_Creatable = False
Attribute VB_PredeclaredId = True
Attribute VB_Exposed = False
Private pt() As mypoint
Private Sub Form_Load()
ReDim pt(1)
End Sub
Private Sub Picture1_MouseDown(Button As Integer, Shift As Integer, x As Single, y As Single)
Dim s As Integer
pt(UBound(pt)).x = x
pt(UBound(pt)).y = y
Picture1.Circle (x, y), 15
s = Val(UBound(pt))
Select Case s
Case 1
Picture1.Print "P0"
Case 2
Picture1.Print "P1"
Case 3
Picture1.Print "P2"
Case 4
Picture1.Print "P3"
End Select
If UBound(pt) > 1 Then
Picture1.Line (pt(UBound(pt) - 1).x, pt(UBound(pt) - 1).y)-(pt(UBound(pt)).x, pt(UBound(pt)).y)
End If
ReDim Preserve pt(UBound(pt) + 1)
End Sub
Private Sub Command1_Click()
Dim f0, f1, f2, f3 As Double
Dim x, y, i, n, j As Integer
Dim t As Single
n = UBound(pt) - 3
For j = 1 To 1000
t = j / 1000
f0 = 1 / 6 * (-t ^ 3 + 3 * t ^ 2 - 3 * t + 1)
f1 = 1 / 6 * (3 * t ^ 3 - 6 * t ^ 2 + 4)
f2 = 1 / 6 * (-3 * t ^ 3 + 3 * t ^ 2 + 3 * t + 1)
f3 = 1 / 6 * t ^ 3
x = f0 * pt(1).x + f1 * pt(2).x + f2 * pt(3).x + f3 * pt(4).x
y = f0 * pt(1).y + f1 * pt(2).y + f2 * pt(3).y + f3 * pt(4).y
Picture1.PSet (x, y)
Next j
End Sub
Private Sub Command2_Click()
Picture1.Cls
ReDim pt(1)
End Sub
Private Sub Command3_Click()
End
End Sub
四、 实验结果