C# 多语言
C#多语言支持的一个简单示例,步骤很简单
1、为每种语言创建资源文件,资源文件名类似:类名.语言.resx 如 Form1.zh-CHS.resx 为中文的资源文件
Form1.en.resx 为英文的资源文件
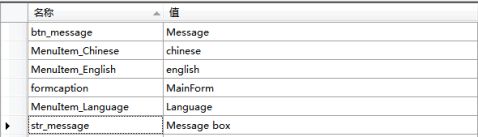
Form1.en.resx内容:
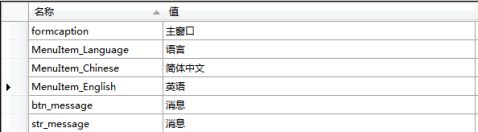
Form1.zh-CHS.resx内容
2、引入命名空间
using System.Resources;
using System.Threading;
3、 声明资源管理变量
ResourceManager rm;
4、让程序在启动时自动选择语言类型
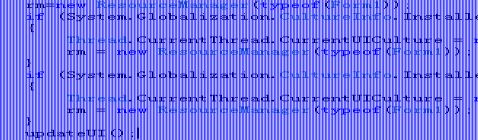
updateUI()函数如下:
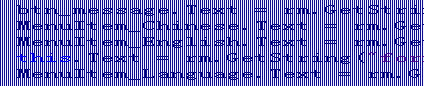
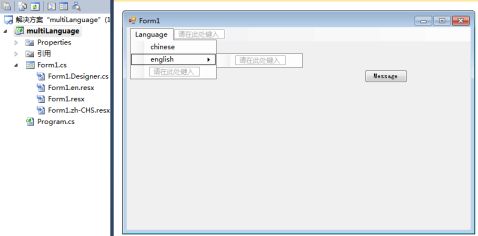
Btn_message :消息按钮控件名称, “btn_message”为资源文件中的字段名称 MenuItem_Language :菜单项名称
MenuItem_Chinese :子菜单项名称
MenuItem_English :子菜单项名称
5、程序启动后自由切换语言,比如选择英文,对应处理函数如下

6、某些固定的消息文本也可以做多语言显示
在资源文件中预先定义好要显示的消息文本,在弹出消息,根据当前语言弹出对应的消息。 如示例中消息按下后:

7、附:示例全部代码
using System;
using System.Collections.Generic;
using System.ComponentModel;
using System.Data;
using System.Drawing;
using System.Linq;
using System.Text;
using System.Windows.Forms;
using System.Resources;//资源管理
using System.Threading;//线程
namespace multiLanguage
{
public partial class Form1 : Form
{
ResourceManager rm;//声明资源管理变量
public Form1()
{
InitializeComponent();
changeLanguage();//根据系统语言更改界面文字
}
//消息button
private void button1_Click(object sender, EventArgs e)
{
MessageBox.Show(rm.GetString("str_message"), this.Text);
}
private void changeLanguage()
{
rm=new ResourceManager(typeof(Form1));
if (System.Globalization.CultureInfo.InstalledUICulture.Name.Substring(0, 2) == "zh")
{
Thread.CurrentThread.CurrentUICulture=
new System.Globalization.CultureInfo("zh-CHS");
rm = new ResourceManager(typeof(Form1));
}
if (System.Globalization.CultureInfo.InstalledUICulture.Name.Substring(0, 2) == "en")
{
Thread.CurrentThread.CurrentUICulture=
new System.Globalization.CultureInfo("en");
rm = new ResourceManager(typeof(Form1));
}
updateUI();
}
//刷新界面文本
private void updateUI()
{
btn_message.Text = rm.GetString("btn_message");
MenuItem_Chinese.Text = rm.GetString("MenuItem_Chinese");
MenuItem_English.Text = rm.GetString("MenuItem_English");
this.Text = rm.GetString("formcaption");
MenuItem_Language.Text = rm.GetString("MenuItem_Language");
}
private void chineseToolStripMenuItem_Click(object sender, EventArgs e) {
Thread.CurrentThread.CurrentUICulture=
new System.Globalization.CultureInfo("zh-CHS");
ResourceManager rm = new ResourceManager(typeof(Form1));
updateUI();
}
private void englishToolStripMenuItem_Click(object sender, EventArgs e) {
Thread.CurrentThread.CurrentUICulture=
new System.Globalization.CultureInfo("en");
ResourceManager rm = new ResourceManager(typeof(Form1));
updateUI();
}
}
}
第二篇:多语言支持
最近,经常有朋友问ASP.NET如何实现国际化(多语言)支持方面的问题。前段时间我正好做过这样的一个组件,现本着“人人为我,我为人人”共享精神,发布于此。
其实ASP.NET已经集成对国际化和本地化的支持,但前些日子我正好在研究CS。所以没有采用微软内置的多语言支持方案,而是采用CS2.1项目的多语言支持方案为蓝本进行改写的。
此方案主要由多语言支持组件和站点工程交互来实现多语言支持的.
一.组件工程:
由ResourceManager对象负责资源(文本)读取的相关操作,由Ryu666Cache对象负责缓存资源文件数据(添加了缓存依赖).
二.站点工程:
主要有两职责:其一,在站点目录下的Languages目录下提供所有语言版本的资源文件(XML).其二,在Web.Config文件中appSettings节中提供站点的默认语言版本. 使用说明:
根据上述说明得知,其实运用此模块相当简单,针对以下几个方面说明:
1.资源读取:
在需要读取资源文本的地方调用ResourceManager.GetString("XXXX"),XXXX为资源文件中的resource元素的name属性.特别提醒:不一定在站点工程中读取资源,如果使用自定义控件时,本组件功效会更显著.
2.资源文件提供:
在站点工程中建立Languages目录,然后在其中的languages.xml声明所有支持的语言版本.然后建立以相应语言代码为名字的子目录,在其中再以自应的格式建立
Resources.xml资源文件.
3.设置默认站点语言:
在Web.config文件的appSettings节中声明.其值需要对应语言目录下languages.xml所声明的语言代码.
4.用户个性化语言选择:
在需要切换用户语言的地方设置Session["userLanguage"]值便可.设置默认站点语言类似,所设的值需要在语言声明文件中被定义.
为演示方便现版本采用Session存放用户定制的语言版本,若用于产品化时建议结合ASP.NET 2.0的Profile管理用户的个性化语言版本.
因该组件不是产品,功能也不能算是完备,只作为共享用途.各位可以在此基础上继续进行开发,也欢迎大家留言交流http://R
下载链接:/Files/Ryu666/多语言支持.rar
换肤
01./*
02.保存Cookie
03.c_name--key
04.value---value
05.默认时长为一年
06.*/
07.function setCookie(c_name, value, expiredays) {
08. var exdate = new Date();
09. exdate.setDate(exdate.getDate() + expiredays);
10. document.cookie = c_name + "=" + escape(value) + ((expiredays == null) ? "" : "; expires=" + exdate.toGMTString());
11.}
12./*
13.获取Cookie,根据c_name--key值来获取
14.*/
15.function getCookie(c_name) {
16. if (document.cookie.length > 0) {
17. var c_start = document.cookie.indexOf(c_name + "=");
18. if (c_start != -1) {
19. c_start = c_start + c_name.length + 1;
20. var c_end = document.cookie.indexOf(";", c_start);
21. if (c_end == -1) {
22. c_end = document.cookie.length;
23. }
24. return unescape(document.cookie.substring(c_start, c_end));
25. }
26. }
27. return "";
28.}
29./*
30.递归换肤
31.*/
32.function changeSkin(winObj, cssPath) {
33. var frames = winObj.frames;
34. for (var i = 0; i < frames.length; i++) {
35. //证明是该页面是框架页面
36. //alert(frames[i].name + ":" + frames[i].frames.length);
37. if (frames[i].frames.length > 0) {
38. //判断页面中是否存在iframe
39. iframes = frames[i].document.getElementsByTagName("iframe");
40. if(iframes.length > 0){//如果页面含有iframe,那么此页面也需要换肤
41. var linkObj = frames[i].document.getElementById("style"); //获取link对象
42. if (linkObj != null) {
43. linkObj.href = basePath + "/css/" + cssPath + "/test.css";
44. }
45. }
46. //alert("iframes:" + iframes.length);
47. changeSkin(frames[i], cssPath);//递归换肤
48. } else {
49. //非框架页面,换肤
50. var linkObj = frames[i].document.getElementById("style"); //获取link对象
51. if (linkObj != null) {
52. linkObj.href = basePath + "/css/" + cssPath + "/test.css";
53. }
54. }
55. }
56.}
57./*
58.下拉框调用此方法
59.*/
60.function changeCss(winObj, cssPath) {
61. setCookie("cssPath", cssPath, 365); //设置cookie
62. changeSkin(winObj, cssPath); //换肤
63.}
/*
保存Cookie
c_name--key
value---value
默认时长为一年
*/
function setCookie(c_name, value, expiredays) {
var exdate = new Date(); exdate.setDate(exdate.getDate() + expiredays); document.cookie = c_name + "=" + escape(value) + ((expiredays == null) ? "" : "; expires=" +
exdate.toGMTString());
}
/*
获取Cookie,根据c_name--key值来获取 */
function getCookie(c_name) {
if (document.cookie.length > 0) {
} var c_start = document.cookie.indexOf(c_name + "="); if (c_start != -1) { } c_start = c_start + c_name.length + 1; var c_end = document.cookie.indexOf(";", c_start); if (c_end == -1) { } c_end = document.cookie.length; return unescape(document.cookie.substring(c_start, c_end)); } return "";
/*
递归换肤
*/
function changeSkin(winObj, cssPath) { var frames = winObj.frames;
for (var i = 0; i < frames.length; i++) {
//证明是该页面是框架页面 //alert(frames[i].name + ":" + frames[i].frames.length); if (frames[i].frames.length > 0) { //判断页面中是否存在iframe iframes = frames[i].document.getElementsByTagName("iframe"); if(iframes.length > 0){//如果页面含有iframe,那么此页面也需要换肤 var linkObj = frames[i].document.getElementById("style"); //获取link对象 } if (linkObj != null) { linkObj.href = basePath + "/css/" + cssPath + "/test.css"; } //alert("iframes:" + iframes.length); changeSkin(frames[i], cssPath);//递归换肤 } else { //非框架页面,换肤 var linkObj = frames[i].document.getElementById("style"); //获取link对象 if (linkObj != null) { linkObj.href = basePath + "/css/" + cssPath + "/test.css"; }
}
}
}
/*
下拉框调用此方法
*/
function changeCss(winObj, cssPath) {
}
方法准备好了以后,需要在共享页面(taglibs.jsp)加入以下代码:
view plaincopy to clipboardprint?
01.<script type="text/javascript"
src="${basePath}/script/skin.js"></script>
02.<script type="text/javascript">
03.var basePath = '${basePath}'; //基路径
04.var cssPath = getCookie("cssPath"); //获取默认皮肤路径
05.//判断用户Cookie中是否有路径,无采用默认,有采用用户的信息
06.if (cssPath != null && cssPath != ""){
07. document.write("<link href="${basePath}/css/" + cssPath + "/test.css" href="${basePath}/css/" + cssPath + "/test.css" id='style' rel='stylesheet' type='text/css' />");
08.}else{
09. setCookie('cssPath',"blue",365);
10. document.write("<link href="${basePath}/css/blue/test.css" href="${basePath}/css/blue/test.css" id='style' rel='stylesheet' type='text/css' />");
11.}
12.</script>
<script type="text/javascript"
src="${basePath}/script/skin.js"></script>
<script type="text/javascript">
var basePath = '${basePath}'; //基路径
var cssPath = getCookie("cssPath"); //获取默认皮肤路径
//判断用户Cookie中是否有路径,无采用默认,有采用用户的信息
if (cssPath != null && cssPath != ""){
document.write("<link href="${basePath}/css/" + cssPath + "/test.css" href="${basePath}/css/" + cssPath + "/test.css" id='style' rel='stylesheet' type='text/css' />"); src="${basePath}/script/skin.js" setCookie("cssPath", cssPath, 365); //设置cookie changeSkin(winObj, cssPath); //换肤 src="${basePath}/script/skin.js"
}else{
setCookie('cssPath',"blue",365);
document.write("<link href="${basePath}/css/blue/test.css" href="${basePath}/css/blue/test.css" id='style' rel='stylesheet' type='text/css' />");
}
</script>
下拉框的调用:
view plaincopy to clipboardprint?
01.<select onchange="changeCss(window.top,this.value)">
02. <option value="blue" selected="selected">
03. 默认皮肤
04. </option>
05. <option value="red">
06. 红海
07. </option>
08. <option value="green">
09. 苍绿
10. </option>
11. </select>
<select onchange="changeCss(window.top,this.value)">
本文来自CSDN博客,转载请标
明出处: <option value="blue" selected="selected"> 默认皮肤 </option> <option value="red"> 红海 </option> <option value="green"> 苍绿 </option> </select> OK,完成框架网站的全站换肤
利用Themes我们可以很容易的更改控件、页面的风格,而不需要修改我们的代码和页面文件。Themes文件被单独的放在1个App_Themes文件夹下面,与你的程序是完全分开的。
添加辅助方法:GetThemes()——用于取得App_Themes文件夹下所有文件夹名,并缓存,返回string[],
public string[] GetThemes()
{
if (HttpContext.Current.Cache["Themes"] != null)
return (string[])HttpContext.Current.Cache["Themes"];
else
{
string themeDirPath = HttpContext.Current.Server.MapPath("~/App_Themes");
string[] themes = Directory.GetDirectories(themeDirPath);
for (int i = 0; i < themes.Length; i++)
themes[i] = Path.GetFileName(themes[i]);
CacheDependency dep = new CacheDependency(themeDirPath);
HttpContext.Current.Cache.Insert("Themes", themes, dep);
return themes;
}
}