CentOS5.3下开启vncserver服务
1.首先确认系统是否安装了vnc:
#rpm -qa | grep vnc
如果没有任何显示,则说明系统没有安装vnc包,需要至CentOS 5.3安装光盘下CentOS目录下寻找vnc开头的安装包,即:
vnc-server-4.1.2-14.el5.x86_64.rpm
使用root用户安装:
#rpm -ivh vnc-server-4.1.2-14.el5.x86_64.rpm
安装好后,可以再次执行:
#rpm -qa | grep vnc
如果显示:
vnc-server-4.1.2-14.el5
则说明已经安装成功,如果第一次执行后就显示,说明系统已经安装了vnc包。
2.配置xstartup文件
编辑配置之前,需要使用vncserver命令创建默认配置文件
#vncserver
输入口令
确认口令
#vim /root/.vnc/xstartup
将文件内原来的内容全部注释掉,只留下以下几行,如果没有则需要添加:
#!/bin/sh
#Uncomment the following two lines for normal desktop:
unset SESSION_MANAGER
exec /etc/X11/xinit/xinitrc
[ -x /etc/vnc/xstartup ] exec /etc/vnc/xstartup
[ -r $HOME/.Xresources ] xrdb $HOME/.Xresources
xsetroot -solid grey
vncconfig -iconic
gnome-session & set starting GNOME desktop #为了使用gnome界面,否则是xfce界面
保存后退出。
export DISPLAY=:0.0
这个变量改变化境
3.设置远程登录口令
#vncpasswd
Password:123456
Verifu:123456
4.启动vncserver服务
#service vncserver start
启动 VNC 服务器:,3:root
New 'hyxcky:3 (root)' desktop is hyxcky:3
Starting applications specified in /root/.vnc/xstartup
Log file is /root/.vnc/[主机名]:3.log
至此,vncserver已经配置启动完毕,可以通过vncviewer来远程登录: 在地址栏输入“主机地址:3”,确定后输入登录口令。
注:上文标红3为桌面号。
VNC服务使用的端口号与桌面号相关,VNC使用TCP端口从5900开始,对应关系如下 桌面号为“1” ---- 端口号为5901
桌面号为“2” ---- 端口号为5902
桌面号为“3” ---- 端口号为5903
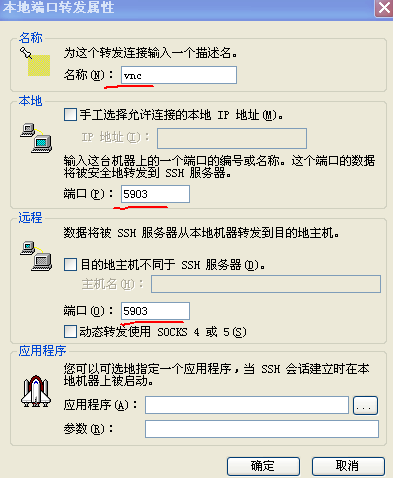
5 如果服务器是用的端口映射而不是直接外网ip地址,可以借助CRT软件连接

此时xvnc需要连接的端口是5903,所以在CRT上进行配置,将远程服务器5903端口映射到本地。
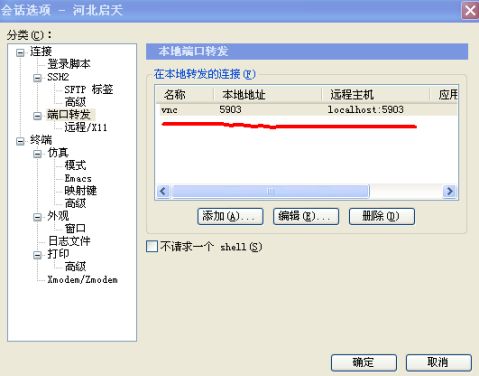
然后在本地进行连接:
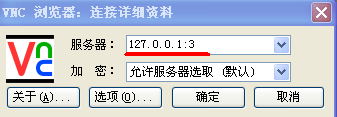
输入密码:

123456
然后就可以连接:
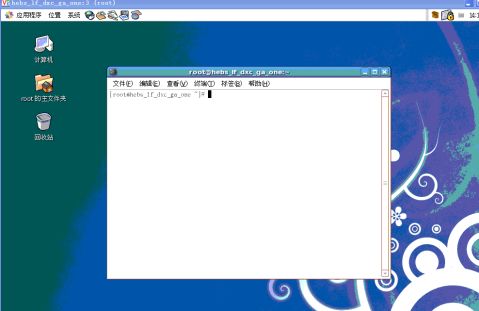
第二篇:CentOS5.3下开启vncserver服务
CentOS5.3下开启vncserver服务
1.首先确认系统是否安装了vnc:
#rpm -qa | grep vnc
如果没有任何显示,则说明系统没有安装vnc包,需要至CentOS 5.3安装光盘下CentOS目录下寻找vnc开头的安装包,即:
vnc-server-4.1.2-14.el5.x86_64.rpm
使用root用户安装:
#rpm -ivh vnc-server-4.1.2-14.el5.x86_64.rpm
安装好后,可以再次执行:
#rpm -qa | grep vnc
如果显示:
vnc-server-4.1.2-14.el5
则说明已经安装成功,如果第一次执行后就显示,说明系统已经安装了vnc包。
2.配置xstartup文件
编辑配置之前,需要使用vncserver命令创建默认配置文件
#vncserver
输入口令
确认口令
#vim /root/.vnc/xstartup
将文件内原来的内容全部注释掉,只留下以下几行,如果没有则需要添加:
#!/bin/sh
#Uncomment the following two lines for normal desktop:
unset SESSION_MANAGER
exec /etc/X11/xinit/xinitrc
[ -x /etc/vnc/xstartup ] exec /etc/vnc/xstartup
[ -r $HOME/.Xresources ] xrdb $HOME/.Xresources
xsetroot -solid grey
vncconfig -iconic
gnome-session & set starting GNOME desktop #为了使用gnome界面,否则是xfce界面
保存后退出。
3.设置远程登录口令
#vncpasswd
Password:123456
Verifu:123456
4.启动vncserver服务
#service vncserver start
启动 VNC 服务器:,3:root
New 'hyxcky:3 (root)' desktop is hyxcky:3
Starting applications specified in /root/.vnc/xstartup
Log file is /root/.vnc/[主机名]:3.log
至此,vncserver已经配置启动完毕,可以通过vncviewer来远程登录: 在地址栏输入“主机地址:3”,确定后输入登录口令。
注:上文标红3为桌面号。
VNC服务使用的端口号与桌面号相关,VNC使用TCP端口从5900开始,对应关系如下 桌面号为“1” ---- 端口号为5901
桌面号为“2” ---- 端口号为5902
桌面号为“3” ---- 端口号为5903
5 如果服务器是用的端口映射而不是直接外网ip地址,可以借助CRT软件连接
此时xvnc需要连接的端口是5903,所以在CRT上进行配置,将远程服务器5903端口映射到本地。
然后在本地进行连接:
输入密码:
123456
然后就可以连接: