实验八:用OpenGL生成曲线
实验目的:
一、理解Bézier曲线和B样条曲线的定义、性质及绘制算法。
二、理解OpenGL中窗口坐标与世界坐标的映射关系。
三、掌握OpenGL的Bézier曲线和NURBS曲线的绘制方法。
实验内容:
文件一:StdAfx.cpp
// stdafx.cpp : source file that includes just the standard includes
// OpenGL框架.pch will be the pre-compiled header
// stdafx.obj will contain the pre-compiled type information
#include "stdafx.h"
// TODO: reference any additional headers you need in STDAFX.H
// and not in this file
文件二:StdAfx.h
// stdafx.h : include file for standard system include files,
// or project specific include files that are used frequently, but
// are changed infrequently
//
#if !defined(AFX_STDAFX_H__A9DB83DB_A9FD_11D0_BFD1_444553540000__INCLUDED_)
#define AFX_STDAFX_H__A9DB83DB_A9FD_11D0_BFD1_444553540000__INCLUDED_
#if _MSC_VER > 1000
#pragma once
#endif // _MSC_VER > 1000
#define WIN32_LEAN_AND_MEAN // Exclude rarely-used stuff from Windows headers
#include <windows.h>
#include <gl\gl.h> // OpenGL32库的头文件
#include <gl\glu.h> // GLu32库的头文件
#include <gl\glaux.h> // GLaux库的头文件
#pragma comment( lib, "winmm.lib")
#pragma comment( lib, "opengl32.lib") // OpenGL32连接库
#pragma comment( lib, "glu32.lib") // GLu32连接库
#pragma comment( lib, "glaux.lib") // GLaux连接库
// TODO: reference additional headers your program requires here
//{{AFX_INSERT_LOCATION}}
// Microsoft Visual C++ will insert additional declarations immediately before the previous line.
#endif // !defined(AFX_STDAFX_H__A9DB83DB_A9FD_11D0_BFD1_444553540000__INCLUDED_)
文件三:bzcurve.cpp
#include "stdafx.h"
void myinit(void);
void CALLBACK myReshape(GLsizei w, GLsizei h);
void CALLBACK display(void);
GLfloat ctrlpoints[4][3] = {
{ -4.0, -4.0, 0.0 }, { -2.0, 4.0, 0.0 },
{2.0,-4.0,0.0},{4.0,4.0,0.0}
};
void myinit(void)
{
glClearColor(0.0, 0.0, 0.0, 1.0);
glMap1f(GL_MAP1_VERTEX_3, 0.0, 1.0, 3, 4, &ctrlpoints[0][0]);
glEnable(GL_MAP1_VERTEX_3);
glShadeModel(GL_FLAT);
}
void CALLBACK display(void)
{
int i;
glClear(GL_COLOR_BUFFER_BIT);
glColor3f(1.0, 1.0, 1.0);
glBegin(GL_LINE_STRIP);
for (i = 0; i <= 30; i++)
glEvalCoord1f((GLfloat) i/30.0);
glEnd();
/* 显示控制点 */
glPointSize(5.0);
glColor3f(1.0, 1.0, 0.0);
glBegin(GL_POINTS);
for (i = 0; i < 4; i++)
glVertex3fv(&ctrlpoints[i][0]);
glEnd();
glFlush();
}
void CALLBACK myReshape(GLsizei w, GLsizei h)
{
glViewport(0, 0, w, h);
glMatrixMode(GL_PROJECTION);
glLoadIdentity();
if (w <= h)
glOrtho(-5.0, 5.0, -5.0*(GLfloat)h/(GLfloat)w, 5.0*(GLfloat)h/(GLfloat)w, -5.0, 5.0);
else
glOrtho(-5.0*(GLfloat)w/(GLfloat)h, 5.0*(GLfloat)w/(GLfloat)h, -5.0, 5.0, -5.0, 5.0);
glMatrixMode(GL_MODELVIEW);
glLoadIdentity();
}
void main(void)
{
auxInitDisplayMode (AUX_SINGLE | AUX_RGBA);
auxInitPosition (0, 0, 500, 500);
auxInitWindow ("Bezier Curves");
myinit();
auxReshapeFunc (myReshape);
auxMainLoop(display);
}
//处理窗口消息-------------------------------------------------------
实验结果:

实验心得:
1、这一次的实验比上一次花了更长的时间。如果算上尝试做MFC框架的时间,整整花了两个星期的时间。而因为有其他的一些事情,每个星期只有大约三天的时间在做这个实验,所以整个实验过程的时间跨度很大,大概持续了三个多星期。
2、原来以为对OpenGL应该算是了解得差不多了,这次实验过后发现,没搞明白的尚且有许多,更不用提还有许多根本不知道的应用方法。而且有许多高级的应用都要跟Windows编程结合起来做,不可能一下子就把所有关于OpenGL的东西都搞通。时间不允许自己再在这上面做功夫,只好先放一边,等以后有机会再慢慢学了。
3、尝试尝试,尝试仍然是实验的主要内容。原来屡思不得其解的问题都在尝试中弄明白了,原来不想去深究的数学原理也在尝试中搞懂了。
第二篇:openGL虚线,点划线,KOCK曲线实验报告
实验四实验报告
1、实验目的和要求
利用OpenGL实现实线,虚线,点划线的绘制,及kock曲线。
2、实验内容
1)用OpenGL程序绘制实现,虚线和点划线
2)用OpenGL程序,分别以直线和正三角形为初始生成员,实现迭代次数在6次以内的kock曲线,要求用键盘交互控制迭代次数。
3、实验步骤
1)相关算法及原理描述
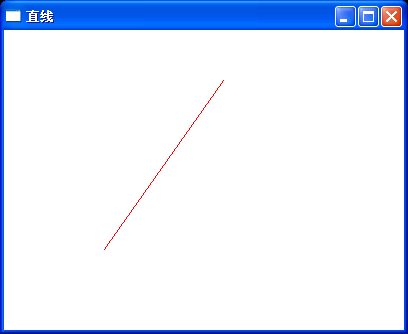
① 直线的绘制
在OpenGL中绘制直线通过指定直线段的端点来实现,用glVertex函数指定直线段端点的坐标位置,用glBegin/glEnd函数对包含一系列的点坐标,并利用符号常量解释这些点构成直线的方式。
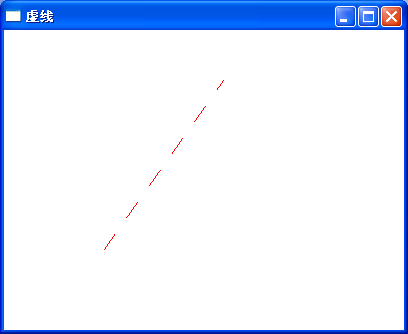
② 虚线的绘制
绘制虚线需要先调用函数过了Enable(GL_LINE_STIPPLE);打开划线模式。然后,函数glLineStipple将建立用于划线的模式
glLineStipple(Glint factor, GLushort pattern);
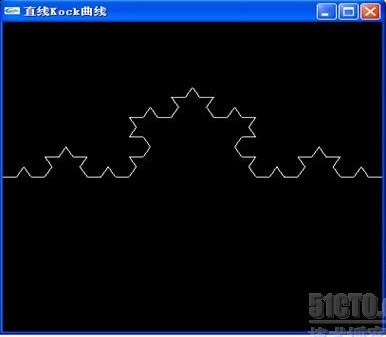
③ Kock曲线
Kock曲线的初始生成员是一条直线,生成规则是将直线段分为三等分,首尾两段保持不变,中间用两段等长且互成60°角的直线段代替。这样,直线段被分成四段,每段长度都只有原来的1/3。Kock曲线的分形维数为 D=ln4/ln3≈1.26186
假设原直线的首尾点是P0(x0,y0),P1(x1,y1),则新的四段直线段的五个端点坐标分别为
(x0 , y0) (x0+(x1-x0)/3 , y0+(y1-y0)/3)
((x1+x0)/2±(y0-y1)√3/6 , (y1+y0)/2±(x1-x0)√3/6)
(x0+2(x1-x0)/3 , y0+2(y1-y0)/3) (x1 , y1)
其中,第三个点坐标公式中的正负号表示中间两条心直线段处于元直线段的哪一侧。根据这一规则迭代六次。
2)程序调试、测试与运行结果分析
① 直线的绘制结果
② 虚线的绘制结果
③ 以直线作为初始生成元的Kock曲线
④ 以三角形作为初始生成元的Kock曲线

4、 实验总结
在上一次的实验基础上,利用 GL_LINES画直线,这项实验内容比较容易。然后,利用glEnable(GL_LINE_STIPPLE)函数和glLineStiopple(Glint factor ,GLushort pattern)进行虚线和点画线的实现。也是比较简单的。
第二个实验是利用Kock曲线实现迭代生成图形,这个实验很难。用了两节课的时间,最终也没有成功。我自己没有做成功,去请教别人,看别人的才做出来的。看到生成的图像很漂亮
不管结果怎么样,我在这次的实验中学到了很多知识,对编程也好,对openGL也好,都有了更好更深的理解。
5、附录
1>直线的绘制
#include<gl/glut.h>
int winWidth=400,winHeight=300;
void Initial(void)
{
glClearColor(1.0f,1.0f,1.0f,1.0f);
}
void ChangeSize(int w,int h)
{
winWidth=w;
winHeight=h;
glViewport(0,0,w,h);
glMatrixMode(GL_PROJECTION);
glLoadIdentity();
gluOrtho2D(0.0,winWidth,0.0,winHeight);
}
void Display(void)
{
glClear(GL_COLOR_BUFFER_BIT);
glColor3f(1.0f,0.0f,0.0f);
glBegin(GL_LINES);
glVertex2i(100,80);
glVertex2i(220,250);
glEnd();
glutSwapBuffers();
}
int main(int argc,char*argv[])
{
glutInit(&argc,argv);
glutInitDisplayMode(GLUT_DOUBLE|GLUT_RGB);
glutInitWindowSize(400,300);
glutInitWindowPosition(100,100);
glutCreateWindow("直线");
glutDisplayFunc(Display);
glutReshapeFunc(ChangeSize);
Initial();
glutMainLoop();
return 0;
}
2>虚线及点划线的绘制
#include<gl/glut.h>
int winWidth=400,winHeight=300;
void Initial(void)
{
glClearColor(1.0f,1.0f,1.0f,1.0f);
}
void ChangeSize(int w,int h)
{
winWidth=w;
winHeight=h;
glViewport(0,0,w,h);
glMatrixMode(GL_PROJECTION);
glLoadIdentity();
gluOrtho2D(0.0,winWidth,0.0,winHeight);
}
void Display(void)
{
glClear(GL_COLOR_BUFFER_BIT);
glColor3f(1.0f,0.0f,0.0f);
glBegin(GL_LINES);
glVertex2i(100,80);
glVertex2i(220,250);
glEnd();
glutSwapBuffers();
}
int main(int argc,char*argv[])
{
glutInit(&argc,argv);
glutInitDisplayMode(GLUT_DOUBLE|GLUT_RGB);
glutInitWindowSize(400,300);
glutInitWindowPosition(100,100);
glutCreateWindow("虚线");
glEnable(GL_LINE_STIPPLE);
glLineStipple(2,0X00FF);
glutDisplayFunc(Display);
glutReshapeFunc(ChangeSize);
Initial();
glutMainLoop();
return 0;
}
3>以直线为生成元的Kock曲线
#include <GL/glut.h>
#include <iostream>
#include <vector>
#include <math.h>
#define PI 3.1415926
using namespace std;
struct Point
{
float x;
float y;
};
static vector<Point> count;
static int m = 0; //迭代次数
float line ;
void first_state(vector<Point> &count) //初始情况是只有两个点
{
Point first = {-1.0f,0.0f},end = {1.0f,0.0f};
line = sqrt( pow(first.x - end.x,2) + pow(first.y - end.y,2) );
count.push_back(first);
count.push_back(end);
}
void Draw_pic(vector<Point> &count)
{
for (vector<Point>::size_type i = 0; i != (count.size()-1) ; i++)
{
glBegin(GL_LINES);
glVertex2f(count[i].x, count[i].y);
glVertex2f(count[i+1].x, count[i+1].y);
glEnd();
}
}
void Calculate_point(vector<Point> &count)
{
vector<Point> new_count;
float pline = line /(float) pow((float)3,(int)m) ;
vector<Point>::size_type i;
for ( i= 0; i != (count.size() - 1); i++ )
{
Point p1 , p2 , pmid;
p1.x = count[i].x + (count[i+1].x - count[i].x) / 3;
p1.y = count[i].y + (count[i+1].y - count[i].y) / 3;
p2.x = count[i+1].x - (count[i+1].x - count[i].x) / 3;
p2.y = count[i+1].y - (count[i+1].y - count[i].y) / 3;
double alpha = 0.0;
if (count[i+1].y >= count[i].y)
{
alpha = atan((double) (count[i+1].y - count[i].y) / (count[i+1].x - count[i].x) );
if (count[i+1].x > count[i].x)
{
pmid.x = p1.x + pline * cos(alpha + PI / 3);
pmid.y = p1.y + pline * sin(alpha + PI / 3);
}
else
{
pmid.x = p1.x - pline * cos(alpha + PI / 3);
pmid.y = p1.y - pline * sin(alpha + PI / 3);
}
}
else
{
alpha = atan((double) (count[i].y - count[i+1].y) / (count[i+1].x - count[i].x) );
if (count[i+1].x > count[i].x)
{
pmid.x = p2.x - pline * cos(alpha + PI / 3);
pmid.y = p2.y + pline * sin(alpha + PI / 3);
}
else
{
pmid.x = p2.x + pline * cos(alpha + PI / 3);
pmid.y = p2.y - pline * sin(alpha + PI / 3);
}
}
new_count.push_back(count[i]);
new_count.push_back(p1);
new_count.push_back(pmid);
new_count.push_back(p2);
}
new_count.push_back(count[i]);
count.clear();
count = new_count; //之前要清空
}
void myDisplay()
{
glClear(GL_COLOR_BUFFER_BIT);
switch (m)
{
case 0:
case 1:
case 2:
case 3:
case 4:
case 5:
case 6:
case 7:
case 8:
case 9:
case 10:
Draw_pic(count);
break;
default:
break;
}
glFlush();
}
void Keyboard(unsigned char key,int x,int y)
{
if (key == ' ')
{
++m;
Calculate_point(count);
}
glutPostRedisplay();
}
int main(int argc, char *argv[])
{
first_state(count);
glutInit(&argc, argv);
glutInitDisplayMode(GLUT_RGB | GLUT_SINGLE);
glutInitWindowPosition(100, 100);
glutInitWindowSize(400, 400);
glutCreateWindow("直线Kock曲线");
glutDisplayFunc(&myDisplay);
glutKeyboardFunc(Keyboard); //键盘响应回调函数
glutMainLoop();
return 0;
}
4>以三角形为初始生成元的Kock曲线
#include <GL/glut.h>
#include <iostream>
#include <vector>
#include <math.h>
#define PI 3.1415926
using namespace std;
struct Point
{
float x;
float y;
};
static vector<Point> count1,count2,count3;
const Point first = {-0.5f,0.1f},end = {0.5f,0.1f},second = {0.0f,-0.766f};
static int m = 0; //迭代次数
float line ;
void first_state(vector<Point> &count1,vector<Point> &count2,vector<Point> &count3) //初始情况是只有两个点
{
line = sqrt( pow(first.x - end.x,2) + pow(first.y - end.y,2) );
count1.push_back(first);
count1.push_back(end);
count2.push_back(end);
count2.push_back(second);
count3.push_back(second);
count3.push_back(first);
}
void Draw_pic(vector<Point> &count1)
{
for (vector<Point>::size_type i = 0; i != (count1.size()-1) ; i++)
{
glBegin(GL_LINES);
glVertex2f(count1[i].x, count1[i].y);
glVertex2f(count1[i+1].x, count1[i+1].y);
glEnd();
}
for (vector<Point>::size_type j = 0; j != (count2.size()-1) ; j++)
{
glBegin(GL_LINES);
glVertex2f(count2[j].x, count2[j].y);
glVertex2f(count2[j+1].x, count2[j+1].y);
glEnd();
}
for (vector<Point>::size_type k = 0; k != (count3.size()-1) ; k++)
{
glBegin(GL_LINES);
glVertex2f(count3[k].x, count3[k].y);
glVertex2f(count3[k+1].x, count3[k+1].y);
glEnd();
}
}
void Calculate_point(vector<Point> &count1)
{
vector<Point> new_count;
float pline = line /(float) pow((float)3,(int)m) ;
vector<Point>::size_type i;
for ( i= 0; i != (count1.size() - 1); i++ )
{
Point p1 , p2 , pmid;
p1.x = count1[i].x + (count1[i+1].x - count1[i].x) / 3;
p1.y = count1[i].y + (count1[i+1].y - count1[i].y) / 3;
p2.x = count1[i+1].x - (count1[i+1].x - count1[i].x) / 3;
p2.y = count1[i+1].y - (count1[i+1].y - count1[i].y) / 3;
//mark count[i+1].x < count[i].x情况下不成立
double alpha = 0.0;
if (count1[i+1].y >= count1[i].y)
{
alpha = atan((double) (count1[i+1].y - count1[i].y) / (count1[i+1].x - count1[i].x) );
if (count1[i+1].x > count1[i].x)
{
pmid.x = p1.x + pline * cos(alpha + PI / 3);
pmid.y = p1.y + pline * sin(alpha + PI / 3);
}
else
{
pmid.x = p1.x - pline * cos(alpha + PI / 3);
pmid.y = p1.y - pline * sin(alpha + PI / 3);
}
}
else
{
alpha = atan((double) (count1[i].y - count1[i+1].y) / (count1[i+1].x - count1[i].x) );
if (count1[i+1].x > count1[i].x)
{
pmid.x = p2.x - pline * cos(alpha + PI / 3);
pmid.y = p2.y + pline * sin(alpha + PI / 3);
}
else
{
pmid.x = p2.x + pline * cos(alpha + PI / 3);
pmid.y = p2.y - pline * sin(alpha + PI / 3);
}
}
new_count.push_back(count1[i]);
new_count.push_back(p1);
new_count.push_back(pmid);
new_count.push_back(p2);
}
new_count.push_back(count1[i]);
count1.clear();
count1 = new_count; //之前要清空
}
void myDisplay()
{
glClear(GL_COLOR_BUFFER_BIT);
switch (m)
{
case 0:
case 1:
case 2:
case 3:
case 4:
case 5:
case 6:
case 7:
case 8:
case 9:
case 10:
Draw_pic(count1);
Draw_pic(count2);
Draw_pic(count3);
break;
default:
break;
}
glFlush();
}
void Keyboard(unsigned char key,int x,int y)
{
if (key == ' ')
{
++m;
Calculate_point(count1);
Calculate_point(count2);
Calculate_point(count3);
}
glutPostRedisplay();
}
int main(int argc, char *argv[])
{
first_state(count1,count2,count3);
glutInit(&argc, argv);
glutInitDisplayMode(GLUT_RGB | GLUT_SINGLE);
glutInitWindowPosition(100, 100);
glutInitWindowSize(400, 400);
glutCreateWindow("三角形Kock曲线");
glutDisplayFunc(&myDisplay);
glutKeyboardFunc(Keyboard); //键盘响应回调函数
glutMainLoop();
return 0;
}