北师大珠海分校信息技术学院
计算机图形学实验报告
实验报告文件命名方式:学号姓名_实验序号_实验名称.doc

第二篇:opengl学习指导实验 计算机图形学上机
计算机图形学
实验指导书
计算机科学与信息工程学院
目录
实验一 OpenGL程序设计………………………………………….. 3
实验二 二维基本图元的生成 ……………………………………….7
实验三 二维图元的填充 ……………………………………………13
实验四 二维图形的几何变换 ……………………….…………..….18
实验五 裁剪………………………………………………………….. 23
实验六 自由曲线………………………………………………….. 26
实验七 造型技术………………………………………………….. 27
实验八 交互式技术……………………………………………….. 32
实验九 真实感图形的绘制……………………………………….. 37
计算机图形学实验指导
一、实验目的
1、培养学生动手编程解决实际问题的能力。
2、训练学生分析问题和调试程序的能力。
3、锻炼学生撰写科技实验论文的能力。
二、实验要求
1、问题分析
充分地分析和理解问题本身,弄清要求做什么,用什么算法。
2、程序设计
(1)根据所采用的算法,设计数据结构,画出流程图并编程。
(2)最后准备调试程序的数据及测试方案。
3、上机调试
(1)对程序进行编译,纠正程序中可能出现的语法错误。
(2)调试前,先运行一遍程序看看究竟将会发生什么。
(3)如果情况很糟,根据事先设计的测试方案并结合现场情况进行错误跟踪,包括单步调试、设置观察窗输出中间变量值等手段。
4、整理实习报告
三、实验报告
1、实验内容:采用的算法名称
2、问题描述:包括目标、任务、条件约束描述等。
3、设计:数据结构设计和核心算法设计。主要功能模块的输入,处理(算法框架)和输出。
4、测试范例:测试结果的分析讨论,测试过程中遇到的主要问题及所采用的解决措施。
5、心得:包括程序的改进设想,经验和体会。
6、程序清单:源程序,其中包括变量说明及详细的注释。
实验一 OpenGL程序设计
一、实验学时 2学时
二、实验类型 学习型实验
三、实验目的和要求
初步了解OpenGL程序设计结构;了解OpenGL的基本数据类型、核心函数及辅助函数的使用。
四、实验内容
1、综述
这次试验的目的主要是使大家初步熟悉OpenGL这一图形系统的用法,编程平台是Visual C++,它对OpenGL提供了完备的支持。
OpenGL提供了一系列的辅助函数,用于简化Windows操作系统的窗口操作,使我们能把注意力集中到图形编程上,这次试验的程序就采用这些辅助函数。
2、在VC中新建项目
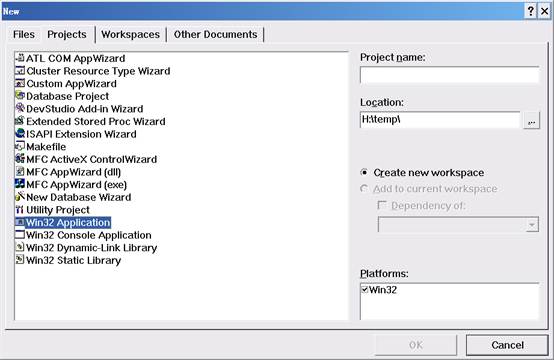
· 新建一个项目。
选择菜单File中的New选项,弹出一个分页的对话框,选中页Projects中的Win32 Console Application项,然后填入你自己的Project name,如Test,回车即可。VC为你创建一个工作区(WorkSpace),你的项目Test就放在这个工作区里。
· 为项目添加文件
为了使用OpenGL,我们需要在项目中加入三个相关的Lib文件:glu32.lib、glaux.lib、opengl32.lib,这三个文件位于c:\program files\Microsoft Visual Studio\vc98\lib目录中。
选中菜单Project->Add To Project->Files项(或用鼠标右键),把这三个文件加入项目,在FileView中会有显示。这三个文件请务必加入,否则编译时会出错。或者将这三个文件名添加到Project->Setting->Link->Object/library Modules 即可。
点击工具条中New Text File按钮,新建一个文本文件,存盘为Test.c作为你的源程序文件,再把它加入到项目中,然后就可以开始编程了。
#include <windows.h>
#include <GL/gl.h>
#include <GL/glu.h>
#include <GL/glaux.h>
//初始化OpenGL场景
void myinit (void)
{
glClearColor (0.0, 0.0, 0.0, 0.0); //将背景置成黑色
glShadeModel (GL_FLAT); //设置明暗处理
}
//用户的绘图过程
void CALLBACK display(void)
{
glClear (GL_COLOR_BUFFER_BIT | GL_DEPTH_BUFFER_BIT);
//清除缓存
glBegin(GL_LINES); //开始画一根白线
glColor3f (1.0f, 1.0f, 1.0f);
//设置颜色为白色
//设置第一根线的两个端点,请注意:OpenGL坐标系的原点是在屏幕左下角
glVertex2f(10.0f, 50.0f);
glVertex2f(110.0f, 50.0f);
glColor3f (1.0f, 0.0f, 0.0f);
//设置颜色为红色
//设置第二根线的两个端点
glVertex2f(110.0f, 50.0f);
glVertex2f(110.0f, 150.0f);
glEnd(); //画线结束
glFlush (); //绘图结束
}
//
//主过程:
// 初始化Windows的窗口界面
// 并初始化OpenGL场景,绘图
int main(int argc, char** argv)
{
auxInitDisplayMode (AUX_RGB);
//初始化显示模式,采用RGB彩色系统。
auxInitPosition (0, 0, 400, 150); //初始化窗口位置、大小
auxInitWindow ("Display Lists"); //初始化窗口,设置标题
myinit ();
auxMainLoop(display);
//循环运行display过程,display由用户编写
return(0);
}
3、程序说明
每个函数的具体含义在程序注释中已作了叙述,不再多说。
OpenGL的函数在格式上很有特点,它以gl为前缀,并且函数名的最后一个字母指出所用的数据类型,如:glColor3f(),字母f指明要使用浮点数。字母前的数字指明参数个数或指明二维还是三维,如:glVertex2f()是要设置二维的点。
OpenGL采用的是状态机的方式,用户设定一种状态,程序照此运行。如:glBegin(GL_LINES)设定画线状态(GL_LINES是OpenGL已定义好的常量),glColor3f()设定绘图所用颜色。
main()函数中的几个aux前缀函数是OpenGL提供的辅助库,用以初始化窗口,大家不必深究,我们关注的是display()函数,它是我们真正绘图的地方。
函数glColor3f()以RGB方式设置颜色,格式为:glColor3f(red, green, blue),每种颜色值在(0.0, 1.0)之间。为了能显示更多的颜色,最好把系统设置成16位真彩色模式。
函数glVertex2f(x, y)设置二维顶点。
函数glBegin(UINT State)、glEnd()是最基本的作图函数,下面对它作一介绍。
如上所述,OpenGL是一个状态机,glBegin(UINT State)可以设定如下状态:
GL_POINTS 画点
GL_LINES 画线,每两个顶点(Vertex)为一组
GL_LINE_STRIP 画线,把若干个顶点顺次连成折线
GL_LINE_LOOP 画线,把若干个顶点顺次连成封闭折线
GL_TRIANGLES 画三角形,每三个顶点为一组
GL_QUADS 画四边形,每四个顶点为一组
GL_POLYGON 画多边形
还有GL_TRIANGLE_STRIP, GL_TRIANGLE_FAN, GL_QUADS_STRIP 等等。大家可以把每一种状态都试一试。
程序可以有多组glBegin()、glEnd()并列的形式,如:
... ...
glBeing(GL_LINES);
......
glEnd();
glBeing(GL_QUADS);
... ...
glEnd();
... ...
除了上述的基本图元外,函数glRectf(x1, y1, x2, y2)可以画一个矩形,但这个函数不能放在glBegin()和glEnd()之间,下面的两句程序是画一个蓝色的矩形。
glColor3f (0.0f, 0.0f, 1.0f);
glRectf(10.0f, 10.0f, 50.0f,50.0f);
实验二 二维基本图元的生成
一、实验学时 2学时
二、实验类型 设计型实验
三、实验目的和要求
1、掌握二维基本图元直线段生成的DDA算法,中点算法;
2、掌握二维基本图元圆弧生成的中点算法;
3、掌握对线型线宽的属性的控制。
四、实验内容
1、编程实现DDA、中点算法生成直线
2、中点扫描转换生成圆、椭圆
五、建立工程步骤
1、新建一个项目。
选择菜单File中的New选项,弹出一个分页的对话框,选中页Projects中的Win32 Console Application项,然后填入你自己的Project name,如Test,回车即可。VC为你创建一个工作区(WorkSpace),你的项目Test就放在这个工作区里。
2、为项目添加文件
为了使用OpenGL,我们需要在项目中加入三个相关的Lib文件:glu32.lib、glaux.lib、opengl32.lib,这三个文件位于c:\program files\Microsoft Visual Studio\vc98\lib目录中。
选中菜单Project->Add To Project->Files项(或用鼠标右键),把这三个文件加入项目,在FileView中会有显示。这三个文件请务必加入,否则编译时会出错。或者将这三个文件名添加到Project->Setting->Link->Object/library Modules 即可。
点击工具条中New Text File按钮,新建一个文本文件,存盘为Test.c作为你的源程序文件,再把它加入到项目中,然后就可以开始编程了。
增量法画直线
void CALLBACK dda(void)
{
int x1=10; int x2=400; int y1=10; int y2=500;
int k,i;
float x, y, dx, dy;
k = abs(x2-x1);
if (abs(y2-y1)>k)
k = abs(y2-y1);
dx = (float)(x2-x1)/k;
dy = (float)(y2-y1)/k;
x = (float)x1;
y = (float)y1;
glClear (GL_COLOR_BUFFER_BIT | GL_DEPTH_BUFFER_BIT);
//清除缓存
glBegin(GL_LINES); //开始画一根白线
glColor3f(1.0f, 1.0f, 1.0f);
//设置颜色为白色
//设置第一根线的两个端点,请注意:OpenGL坐标系的原点是在屏幕左下角
for(i = 0; i <k ; i++ )
{
glVertex2f((int)(x), (int)(y));
glVertex2f((int)(x+dx), (int)(y+0.5+dy));
//g.drawLine((int)(x+.5f), (int)(y+.5f), (int)(x+.5f), (int)(y+.5f));
x = x+dx;
y = y+dy;
glColor3f (1.0f, 1.0f, 1.0f);
}
glEnd(); //画线结束
glFlush (); //绘图结束
}
//中点法画直线
//void CALLBACK bresenham(Graphics g, int xs, int ys, int xe, int ye)
void CALLBACK bresenham(void)
{
int xs=10; int xe=400; int ys=10; int ye=500;
int i;
int dx = xe-xs;
int dy = ye-ys;
int e = 2*dy-dx;
int x = xs;
int y = ys;
glClear (GL_COLOR_BUFFER_BIT | GL_DEPTH_BUFFER_BIT);
//清除缓存
glBegin(GL_LINES); //开始画一根白线
glColor3f(1.0f, 1.0f, 1.0f);
for( i= 0;i < dx; i++)
{
glVertex2f((int)(x), (int)(y));
if(e>=0)
{
y=y+1;
e=e-2*dx;
}
x=x+1;
e=e+2*dy;
glVertex2f((int)(x), (int)(y)); //画点(x, y)
glColor3f (1.0f, 1.0f, 1.0f);
}
glEnd(); //画线结束
glFlush (); //绘图结束
}
//中点法画圆
//void bresenham_arc(Graphics g,int radius)
void CALLBACK bresenham_arc(void)
{
int radius= 200;
int x,y,d;
x = 0; y = radius; d = 3-2*radius;
glClear (GL_COLOR_BUFFER_BIT | GL_DEPTH_BUFFER_BIT);
//清除缓存
glBegin(GL_LINES); //开始画一根白线
glColor3f(1.0f, 1.0f, 1.0f);
while (x < y)
{
glVertex2f((int)(x), (int)(y));
if(d<0) d=d+4*x+6;
else
{ d=d+4*(x-y)+10; y--; }
x++;
glVertex2f((int)(x), (int)(y));
glColor3f (1.0f, 1.0f, 1.0f);
}
glColor3f (1.0f, 1.0f, 1.0f);
if(x == y)
{
glVertex2f((int)(x), (int)(y));
glVertex2f((int)(x), (int)(y));
}
glEnd(); //画线结束
glFlush (); //绘图结束
}
//
//主过程:
// 初始化Windows的窗口界面
// 并初始化OpenGL场景,绘图
int main(int argc, char** argv)
{
auxInitDisplayMode (AUX_RGB);
//初始化显示模式,采用RGB彩色系统。
auxInitPosition (0, 0, 400, 850); //初始化窗口位置、大小
auxInitWindow ("Display Lists"); //初始化窗口,设置标题
myinit ();
//auxMainLoop(dda);
//auxMainLoop(bresenham);
auxMainLoop(bresenham_arc);
//auxMainLoop(display);
//dda(0,0,500,600);
//循环运行display过程,display由用户编写
return(0);
}
掌握对线型宽型的控制,将以上各图传入参数中增加线宽参数,查看图形绘制效果。
2、在visual c++中的建立控制台项目的步骤:
实验三 二维图元的填充
一、实验学时 2学时
二、实验类型 设计型实验
三、实验目的和要求
1、掌握二维图元填充的递归算法;
2、掌握二维图元填充的种子填充算法
四、实验内容
构造任意一个边界表示的多边形,假定该多边形内部是四连通的。要求:
1、用递归算法实现对多边形内部的填充,要求内部颜色和边界不一致。(参照教案进行)
2、用种子填充扫描线算法实现多边形内部的填充。
五、建立win32应用程序工程。
1、visual c++ 6.0下的界面
接下来,请按实验二中的方法给上面建立的空项目添加文件“recursion.cpp”,由于同学们初次接触WIN32编程,所以对于下文中很多代码可暂时不要求理解,重点了解红色代码。
递归算法源码如下:
// INCLUDES ///////////////////////////////////////////////
#define WIN32_LEAN_AND_MEAN // just say no to MFC
#include <windows.h> // include all the windows headers
#include <windowsx.h> // include useful macros
// DEFINES ////////////////////////////////////////////////
// defines for windows
#define WINDOW_CLASS_NAME "WINCLASS1"
#define WINDOW_WIDTH 400
#define WINDOW_HEIGHT 300
// GLOBALS ////////////////////////////////////////////////
HWND main_window_handle = NULL; // globally track main window
HINSTANCE hinstance_app = NULL; // globally track hinstance
void BoundaryFill4(HDC,int,int,COLORREF,COLORREF);
// FUNCTIONS //////////////////////////////////////////////
LRESULT CALLBACK WindowProc(HWND hwnd,
UINT message,
WPARAM wParam,
LPARAM lParam)
{
// this is the main message handler of the system
HDC hdc; // handle to a device context
HPEN hnewpen;
HPEN holdpen;
// what is the message
switch(message)
{
case WM_RBUTTONDOWN:
hdc=GetDC(hwnd);
hnewpen=CreatePen(PS_SOLID,1,RGB(0,255,0));
holdpen=(HPEN)SelectObject(hdc,hnewpen);
// 构造多边形
MoveToEx(hdc,30,40,NULL);
LineTo(hdc,60,40);
LineTo(hdc,90,100);
LineTo(hdc,60,150);
LineTo(hdc,30,150);
LineTo(hdc,30,40);
SelectObject(hdc,holdpen);
DeleteObject(hnewpen);
ReleaseDC(hwnd,hdc);
return(0);
break;
case WM_LBUTTONDOWN:
hdc = GetDC(hwnd); BoundaryFill4(hdc,LOWORD(lParam),HIWORD(lParam),RGB(0,255,0),RGB(255,0,0));
// release the dc
ReleaseDC(hwnd,hdc);
return(0);
break;
case WM_DESTROY:
{
// kill the application, this sends a WM_QUIT message
PostQuitMessage(0);
// return success
return(0);
} break;
default:break;
} // end switch
// process any messages that we didn't take care of
return (DefWindowProc(hwnd, message, wParam, lParam));
} // end WinProc
// WINMAIN ////////////////////////////////////////////////
int WINAPI WinMain( HINSTANCE hinstance,
HINSTANCE hprevinstance,
LPSTR lpcmdline,
int ncmdshow)
{
WNDCLASSEX winclass; // this will hold the class we create
HWND hwnd; // generic window handle
MSG message; // generic message
// first fill in the window class stucture
winclass.cbSize = sizeof(WNDCLASSEX);
winclass.style = CS_DBLCLKS | CS_OWNDC |
CS_HREDRAW | CS_VREDRAW;
winclass.lpfnWndProc = WindowProc;
winclass.cbClsExtra = 0;
winclass.cbWndExtra = 0;
winclass.hInstance = hinstance;
winclass.hIcon = LoadIcon(NULL, IDI_APPLICATION);
winclass.hCursor = LoadCursor(NULL, IDC_ARROW);
winclass.hbrBackground = (HBRUSH)GetStockObject(WHITE_BRUSH);
winclass.lpszMenuName = NULL;
winclass.lpszClassName = WINDOW_CLASS_NAME;
winclass.hIconSm = LoadIcon(NULL, IDI_APPLICATION);
// save hinstance in global
hinstance_app = hinstance;
// register the window class
if (!RegisterClassEx(&winclass))
return(0);
// create the window
if (!(hwnd = CreateWindowEx(NULL, // extended style
WINDOW_CLASS_NAME, // class
"Scanline Fill Demo", // title
WS_OVERLAPPEDWINDOW | WS_VISIBLE,
0,0, // initial x,y
WINDOW_WIDTH, // initial width
WINDOW_HEIGHT,// initial height
NULL, // handle to parent
NULL, // handle to menu
hinstance,// instance of this application
NULL))) // extra creation parms
return(0);
// save main window handle
main_window_handle = hwnd;
while(GetMessage(&message,NULL,0,0))
{
// translate any accelerator keys
TranslateMessage(&message);
// send the message to the window proc
DispatchMessage(&message);
} // end while
// return to Windows like this
return(message.wParam);
} // end WinMain
///////////////////////////////////////////////////////////
void BoundaryFill4(HDC hdc,int x,int y,COLORREF boundarycolor,COLORREF newcolor)
{
COLORREF color;
color=GetPixel(hdc,x,y);
if((color != boundarycolor) && (color !=newcolor))
{
SetPixel(hdc,x,y,newcolor);
BoundaryFill4(hdc,x,y+1,boundarycolor,newcolor);
BoundaryFill4(hdc,x,y-1,boundarycolor,newcolor);
BoundaryFill4(hdc,x-1,y,boundarycolor,newcolor);
BoundaryFill4(hdc,x+1,y,boundarycolor,newcolor);
}
}
2、vc.net中建立Win32工程
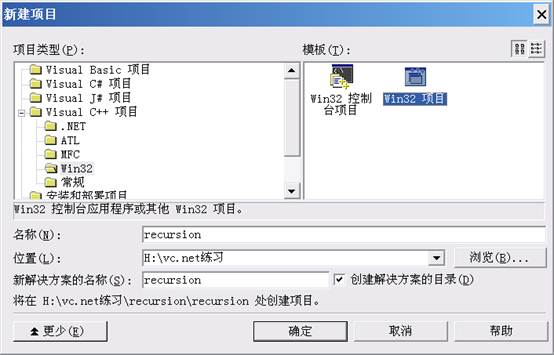
更改项目中recursion.cpp文件代码:
1)声明函数
void BoundaryFill4(HDC,int,int,COLORREF,COLORREF);
2)修改LRESULT CALLBACK WndProc(HWND hWnd, UINT message, WPARAM wParam, LPARAM lParam)函数中代码,把visualc++6.0介绍的recursion.cpp中的WndProc函数体复制即可。
3)在recursion.cpp文件末尾添加BoundaryFill4函数。
实验四 二维图形的几何变换
一、实验学时 2学时
二、实验类型 设计型实验
三、实验目的和要求
1、掌握二维图形的基本几何变换,如平移、旋转、缩放、对称、错切变换;
2、掌握OpenGL中模型变换函数,实现简单的动画技术。
四、实验内容
1、下面的代码采用GLUT库,实现了一个矩形在窗口中匀速转动(单击鼠标右键停止转动),请修改代码,实现矩形在窗口内沿着水平线匀速移动。
/*
* double.c
* This is a simple double buffered program.
* Pressing the left mouse button rotates the rectangle.
* Pressing the right mouse button stops the rotation.
*/
#include <GL/glut.h>
#include <stdlib.h>
static GLfloat spin = 0.0;
void display(void)
{
glClear(GL_COLOR_BUFFER_BIT);
glPushMatrix();
glRotatef(spin, 0.0, 0.0, 1.0);
glColor3f(1.0, 1.0, 1.0);
glRectf(-10.0, -10.0, 10.0, 10.0);
glPopMatrix();
glutSwapBuffers();
}
void spinDisplay(void)
{
spin = spin + 2.0;
if (spin > 360.0)
spin = spin - 360.0;
glutPostRedisplay();
}
void init(void)
{
glClearColor (0.0, 0.0, 0.0, 0.0);
glShadeModel (GL_FLAT);
}
void reshape(int w, int h)
{
glViewport (0, 0, (GLsizei) w, (GLsizei) h);
glMatrixMode(GL_PROJECTION);
glLoadIdentity();
glOrtho(-50.0, 50.0, -50.0, 50.0, -1.0, 1.0);
glMatrixMode(GL_MODELVIEW);
glLoadIdentity();
}
void mouse(int button, int state, int x, int y)
{
switch (button) {
case GLUT_LEFT_BUTTON:
if (state == GLUT_DOWN)
glutIdleFunc(spinDisplay);
break;
case GLUT_MIDDLE_BUTTON:
case GLUT_RIGHT_BUTTON:
if (state == GLUT_DOWN)
glutIdleFunc(NULL);
break;
default:
break;
}
}
/*
* Request double buffer display mode.
* Register mouse input callback functions
*/
int main(int argc, char** argv)
{
glutInit(&argc, argv);
glutInitDisplayMode (GLUT_DOUBLE | GLUT_RGB);
glutInitWindowSize (500, 500);
glutInitWindowPosition (100, 100);
glutCreateWindow (argv[0]);
init ();
glutDisplayFunc(display);
glutReshapeFunc(reshape);
glutMouseFunc(mouse);
glutMainLoop();
return 0; /* ANSI C requires main to return int. */
}
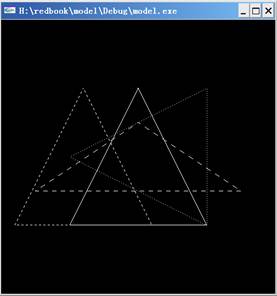
2、课堂教学中关于模型变化讲解时,对一个三角形分别实现平移、缩放、旋转等变化的源码及效果图。请以该例为蓝本,实现3题的代码编写。
源码:
#include <GL/glut.h>
#include <stdlib.h>
void init(void)
{
glClearColor (0.0, 0.0, 0.0, 0.0);
glShadeModel (GL_FLAT);
}
void draw_triangle(void)
{
glBegin (GL_LINE_LOOP);
glVertex2f(0.0, 25.0);
glVertex2f(25.0, -25.0);
glVertex2f(-25.0, -25.0);
glEnd();
}
void display(void)
{
glClear (GL_COLOR_BUFFER_BIT);
glColor3f (1.0, 1.0, 1.0);
glLoadIdentity ();
glColor3f (1.0, 1.0, 1.0);
draw_triangle ();
glEnable (GL_LINE_STIPPLE);
glLineStipple (1, 0xF0F0);
glLoadIdentity ();
glTranslatef (-20.0, 0.0, 0.0);
draw_triangle ();
glLineStipple (1, 0xF00F);
glLoadIdentity ();
glScalef (1.5, 0.5, 1.0);
draw_triangle ();
glLineStipple (1, 0x8888);
glLoadIdentity ();
glRotatef (90.0, 0.0, 0.0, 1.0);
draw_triangle ();
glDisable (GL_LINE_STIPPLE);
glFlush ();
}
void reshape (int w, int h)
{
glViewport (0, 0, (GLsizei) w, (GLsizei) h);
glMatrixMode (GL_PROJECTION);
glLoadIdentity ();
if (w <= h)
gluOrtho2D (-50.0, 50.0, -50.0*(GLfloat)h/(GLfloat)w,
50.0*(GLfloat)h/(GLfloat)w);
else
gluOrtho2D (-50.0*(GLfloat)w/(GLfloat)h,
50.0*(GLfloat)w/(GLfloat)h, -50.0, 50.0);
glMatrixMode(GL_MODELVIEW);
}
int main(int argc, char** argv)
{
glutInit(&argc, argv);
glutInitDisplayMode (GLUT_SINGLE | GLUT_RGB);
glutInitWindowSize (500, 500);
glutInitWindowPosition (100, 100);
glutCreateWindow (argv[0]);
init ();
glutDisplayFunc(display);
glutReshapeFunc(reshape);
glutMainLoop();
return 0;
}
实验结果图:
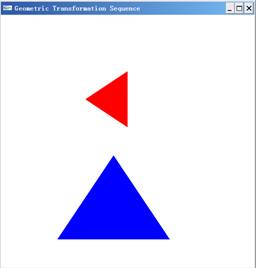
3、已知某三角形的三顶点坐标为{50.0,25.0},{150.0,25.0},{100.0,100.0}。
要求:(1)创建一个长宽分别为600、600的窗口,窗口的左上角位于屏幕坐标(100,100)处。(提示:请试着修改gluOrtho2D函数参数,使得绘制的三角形尽可能居中显示)
(2)绘制一个由上述顶点所描绘的三角形,实现该三角形进行下列的几何变化:首先使三角形沿着其中心的x轴,y轴方向缩小50%;然后沿着初始中心旋转90度;最后沿着y轴平移100个单位。
实验结果如下图所示:
实验五 裁剪
一、实验学时 2学时
二、实验类型 设计型实验
三、实验目的和要求
1、掌握二维图形的基本裁剪算法,如编码算法、中点分割算法、Liang-Barsky算法;
2、掌握OpenGL中矩阵堆栈函数的使用,实现简单的组合变换。
四、实验内容
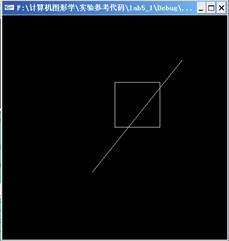
1、采用Liang-Barsky算法,编程实现教材177页6.15题。(其他裁剪算法同学们可作为课后练习)
要求:1)单击鼠标左键,运行窗口出现裁剪窗口及待裁剪线段,效果图如左下图;
2)单击鼠标右键,窗口呈现出裁剪后的裁剪窗口及裁剪线段,效果图如右下图。

提示:1)关于鼠标的交互操作,请同学们参考实验四中的第1题;
2)绘制图形的函数,建议放在回调函数mouse(int button,int state,int x,int y)中,而display()函数中可只保留glClear (GL_COLOR_BUFFER_BIT)清除颜色缓存这个函数。
3)考虑到该裁剪窗口和裁剪线段的大小,建议将reshape()函数中的正交投影函数参数变为glOrtho(-5.0, 5.0, -5.0, 5.0, -1.0, 1.0);
2、下面的程序绘制的是一个简单的太阳系,其中包括一个太阳和一颗行星,它们使用线框球体绘制函数实现。当按下键盘“D”或“d”时,行星将实现自转;按下键盘“Y”或“y”时,行星将绕太阳公转。
请同学们认真读懂每一段代码,然后试着修改这段程序,实现
1)将行星的中心倾斜;
2)给行星加上卫星。
#include <GL/glut.h>
#include <stdlib.h>
static int year = 0, day = 0;
void init(void)
{
glClearColor (0.0, 0.0, 0.0, 0.0);
glShadeModel (GL_FLAT);
}
void display(void)
{
glClear (GL_COLOR_BUFFER_BIT);
glColor3f (1.0, 1.0, 1.0);
glPushMatrix();
// glutWireSphere中第一、二、三个参数分别表示半径,经度线数、纬度线数
glutWireSphere(1.0, 20, 16); /* draw sun */
glRotatef ((GLfloat) year, 0.0, 1.0, 0.0);
glTranslatef (2.0, 0.0, 0.0);
glRotatef ((GLfloat) day, 0.0, 1.0, 0.0);
glutWireSphere(0.2, 10, 8); /* draw smaller planet */
glPopMatrix();
glutSwapBuffers();
}
void reshape (int w, int h)
{
glViewport (0, 0, (GLsizei) w, (GLsizei) h);
glMatrixMode (GL_PROJECTION);
glLoadIdentity ();
gluPerspective(60.0, (GLfloat) w/(GLfloat) h, 1.0, 20.0);
glMatrixMode(GL_MODELVIEW);
glLoadIdentity();
gluLookAt (0.0, 0.0, 5.0, 0.0, 0.0, 0.0, 0.0, 1.0, 0.0);
}
void keyboard (unsigned char key, int x, int y)
{
switch (key) {
case 'd':
day = (day + 10) % 360;
glutPostRedisplay();
break;
case 'D':
day = (day - 10) % 360;
glutPostRedisplay();
break;
case 'y':
year = (year + 5) % 360;
glutPostRedisplay();
break;
case 'Y':
year = (year - 5) % 360;
glutPostRedisplay();
break;
case 27:
exit(0);
break;
default:
break;
}
}
int main(int argc, char** argv)
{
glutInit(&argc, argv);
glutInitDisplayMode (GLUT_DOUBLE | GLUT_RGB);
glutInitWindowSize (500, 500);
glutInitWindowPosition (100, 100);
glutCreateWindow (argv[0]);
init ();
glutDisplayFunc(display);
glutReshapeFunc(reshape);
glutKeyboardFunc(keyboard);
glutMainLoop();
return 0;
}
实验六 自由曲线
一、实验学时 2学时
二、实验类型 设计型实验
三、实验目的和要求
1、掌握Hermite曲线生成算法;
2、掌握Bezier曲线的定义生成算法、离散生成算法;
3、掌握B样条曲线的定义生成算法。
四、实验内容
假设窗口的宽高分别是600,600个像素单位,定义的裁剪窗口由函数gluOrtho2D(-50.0,50.0,-50.0,50.0)决定。
1、已知空间点两点P0(-40.0,-40.0,0.0)、P1(10.0,-200.0,0.0)及该点上的切向量分别为R0(30.0,240.0,0.0),R1(30.0,-240.0,0.0)。试编程实现Hermite曲线的绘制。
2、已知空间四点P0(-40.0,-40.0,0.0)、P1(-10.0,200.0,0.0)、P2(10.0,-200.0,0.0)、P3(40.0,40.0,0.0),根据Bezier曲线的定义编程绘制曲线。
3、已知空间四点P0(-40.0,-40.0,0.0)、P1(-10.0,200.0,0.0)、P2(10.0,-200.0,0.0)、P3(40.0,40.0,0.0),根据Bezier曲线的离散生成算法绘制曲线。
4、已知空间四点P0(-40.0,-40.0,0.0)、P1(-10.0,200.0,0.0)、P2(10.0,-200.0,0.0)、P3(40.0,40.0,0.0),根据B样条曲线的定义绘制曲线。
实验七 造型技术
一、实验学时 2学时
二、实验类型 设计型实验
三、实验目的和要求
了解分形几何的基本概念,实现分形(Cayley)树、koch曲线、Sierpinski三角形、Mandelbrot集的绘制。
四、实验内容
下面给出了几种分形图案实现的原理或C语言代码,同学们选做其中两题,实现在VC编译器下分形图的绘制。
1、Cayley树的初始生成元是一个“丫”字形的几何形状,经过有限次自相似的迭代过程完成。下面的代码是在TC下实现.。
#include "graphics.h"
#include "math.h"
#define PI 3.1415926
void cayley(int n,float x0,float y0,float len,int th)
{
float x1,y1,x2,y2,x3,y3;
int th1=20,th2=20;
float scale=0.7,dtor=PI/180,sl=scale*len;
if(n==1)return;
x1=x0+len*cos(th*dtor);
y1=y0-len*sin(th*dtor);
x2=x1+sl*cos((th+th1)*dtor);
y2=y1-sl*sin((th+th1)*dtor);
x3=x1+sl*cos((th-th2)*dtor);
y3=y1-sl*sin((th-th2)*dtor);
line(x0,y0,x1,y1);
line(x1,y1,x2,y2);
line(x1,y1,x3,y3);
cayley(n-1,x1,y1,sl,th+th1);
cayley(n-1,x1,y1,sl,th-th2);
}
main()
{
float x=320.0,y=470.0;
int th=90,len=120;
int gdriver=DETECT,gmode;
initgraph(&gdriver,&gmode,"");
setcolor(GREEN);
cayley(2,x,y,len,th);
getch();
cayley(3,x,y,len,th);
getch();
cayley(5,x,y,len,th);
getch();
cayley(10,x,y,len,th);
getch();
cayley(15,x,y,len,th);
getch();
closegraph();
}
2、KOCH曲线的生成过程是先作一条直线,然后在直线的中央作一个等边三角形;再在每一条线段的中央分别作一个等边三角形; 依照此法,无限制地进行下去,就形成了Koch曲线。下面是KOCH曲线的C语言代码。
#include "graphics.h"
#include "math.h"
float x=80,y=420;
int th=0,L=6;
float dtor=3.1415926/180;
void koch(int n)
{
float d;
d=L/3^n;
if(n==0)
{
moveto(x,y);
x+=d*cos(th*dtor);
y-=d*sin(th*dtor);
lineto(x,y);
return;
}
koch(n-1);
th+=60;
koch(n-1);
th-=120;
koch(n-1);
th+=60;
koch(n-1);
}
main()
{
int gdriver=DETECT,gmode;
initgraph(&gdriver,&gmode,"");
cleardevice();
setbkcolor(0);
setcolor(9);
line(80,60,560,60);
getch();
moveto(80,240);
lineto(240,240);
lineto(320,100);
lineto(400,240);
lineto(560,240);
getch();
settextstyle(2,0,5);
outtextxy(40,50,"(a)");
outtextxy(40,230,"(b)");
outtextxy(40,410,"(c)");
koch(5);
getch();
closegraph();
cleardevice();
}
3、Sierpinski三角形的生成过程是:首先作一个完全填充的三角形(二维);从中间移去一个三角形,然后再在剩下的三角形中分别移去一个三角形;不断地循环迭代。下面是Sierpinski三角形的C语言代码。
#include "graphics.h"
#include "math.h"
#include "stdlib.h"
#include "conio.h"
#include "time.h"
#define N 65535 /*迭代次数*/
/*=============================================================*/
main()
{ int GraphDriver=DETECT;
int GraphMode;
unsigned int k,mod;
double TempX,TempY,StartX,StartY;
initgraph(&GraphDriver,&GraphMode,"c:\\bc31\\bgi");
randomize();
/*===============================================================*/
/*Draw triangle 用迭代函数系(IFS)画三角形*/
/*==============================================================*/
setbkcolor(BLUE);
cleardevice();
TempX=(double)getmaxx();
TempY=(double)getmaxy();
StartX=TempX;
StartY=TempY;
for(k=1;k<N;k++)
{ TempX=TempX*0.5;
TempY=TempY*0.5;
mod=random(32766) % 3;
switch(mod)
{ case 0: break;
case 1: TempX+=(double)StartX*0.5;
break;
case 2: TempY+=(double)StartY*0.5;
}
putpixel((int)TempX,(int)TempY,YELLOW);
}
getch();
closegraph();
return 0;
}
4、Mandelbrot集是特指在复平面上经过下列平方变换后不发散复数值Z的集合,平方变换为
Z0=Z;
ZK=ZK-12+Z0; K=1,2,3,….N
即首先在复平面上选一点,然后计算变换位置Z2+Z。下一步,求变换位置的平方再加上初始Z值。重复此步骤直到可以确定变换是否发散。复平面上的收敛区域边界就是Mandelbrot集。
实现上述变换时,先在复平面上选一个窗口,然后将窗口上的位置映射到选定的屏幕视口中颜色编码的象素位置。变换式(即上面的公式)根据复平面上相应点的偏差率来选择象素颜色。复数大于2时,自平方算法下的结果将很快发散。因此,重复迭代Z时,,若复数的模大于2时就停止迭代。同时,迭代的次数通常取100和1000之间的某个值。根据迭代次数的多少,选择不同的颜色映射值。
实现Mandelbrot集算法时,可以把集合主要部分包含在下列复平面区域中:
-2.25<=Re(Z)<=0.75
-1.25<=Im(Z)<=1.25
通过选择更小的窗口或放大所选区域的图示,可以发现一些集合边界上的细节。
#include"graphics.h"
typedef struct {float x,y;}ComplexNum;
complexNum complexSquare(complexNum z)
{
complexNum zSquare;
zSquare.x=z.x*z.x-z.y*z.y;
zSquare.y=2*z.x*z.y;
return zSquare;
}
int mandelSqTransf(complexNum z0,int maxIter)
{
complexNum z=z0;
GLint count =0;
/*quit when z*z>4 */
while ((z.x*z.x+z.y*z.y<=4.0) && (count <maxIter)){
z=complexSquare(z);
z.x+=z0.x;
z.y+=z0.y;
count++;
}
return count;
}
void mandelbrot(int nx,int maxIter,,float realmin,float realmax,float imagmin,float imagmax)
{
float realInc=(realmax-realmin)/nx;
float imagInc=(imagmax-imagmin)/ny;
ComplexNum z;
int x,y;
int cnt;
for(x=0,z.x=realmin;x<nx;x++,z.x+=realInc)
for(y=0.z.y=imagmin;y<ny;y++,z.y+=imagInc){
cnt=iterate(z.maxIter);
if(cnt=maxIter)
putpixel(x,y,BLACK);
else
putpixel(x,y,cnt);
}
}
实验八 交互式技术
一、实验学时 2学时
二、实验类型 设计型实验
三、实验目的和要求
了解常用的交互式绘图技术,掌握简单的橡皮筋技术和菜单技术。
四、实验内容
1、下面的代码使用OpenGL函数实现直线的橡皮筋技术绘制。请修改代码,实现矩形的橡皮筋技术。
提示:1)已知绘制矩形的函数是glRecti(GLint x1,GLint y1, GLint x2,GLint y2)。当然同学们也可以编写绘制矩形的代码。
2)代码说明
第一个说明:鼠标的运动。在主函数中有一函数glutMotionFunc()是运动回调函数。只要鼠标移动了与系统有关的少量位置,就会产生事件。它的通常用法就是在按下鼠标键的同时移动鼠标画曲线。其函数原型是:
void glutMotionFunc ( void ( *f ) ( int x , int y ) ) //(x,y)代表鼠标位置
第二个说明:转换鼠标回调函数所返回的 y 值。因为鼠标回调函数的值是以屏幕坐标的形式给出,屏幕坐标系的原点为在屏幕左上角。而裁剪窗口使用的值和几何关系指定在世界坐标系下,其原点位于屏幕右下角。所以可以采用窗口高度 hh 减去鼠标得到的 y 值,得到准确的Y坐标值。
#include <GL/glut.h>
int i;
int j;
GLint hh;
int xstart,ystart,xend,yend;
void mousemove(int xmove,int ymove)
{
glEnable(GL_COLOR_LOGIC_OP);
glLogicOp(GL_XOR);
glBegin(GL_LINES);
glVertex2i(xstart,ystart);
glVertex2i(xend,yend);
glEnd();
xend=xmove;
yend=hh-ymove;
glBegin(GL_LINES);
glVertex2i(xstart,ystart);
glVertex2i(xend,yend);
glEnd();
glFlush();
}
void mouseud (int btn,int state,int x,int y)
{
if (btn==GLUT_LEFT_BUTTON && state == GLUT_DOWN)
{
xstart = x;
ystart = hh - y;
xend=xstart;
yend=ystart;
}
else
if(btn==GLUT_LEFT_BUTTON && state == GLUT_UP)
{
xend =x;
yend =hh-y;
glDisable(GL_COLOR_LOGIC_OP);
glBegin(GL_LINES);
glVertex2i(xstart,ystart);
glVertex2i(xend,yend);
glEnd();
glFlush();
}
}
void reshape(int w, int h)
{
glViewport(0,0,w,h);
glMatrixMode(GL_PROJECTION);
glLoadIdentity();
gluOrtho2D(0.0,(GLfloat)w,0.0,(GLfloat)h);
hh=h;
glMatrixMode(GL_MODELVIEW);
glLoadIdentity();
glClear(GL_COLOR_BUFFER_BIT);
}
void init(void)
{
glClearColor(0.0,0.0,0.0,0.0);
}
void display(void)
{
glColor3f(1.0,0.0,0.0);
glFlush();
}
void main(int argc, char **argv)
{
glutInit(&argc,argv);
glutInitDisplayMode (GLUT_SINGLE| GLUT_RGB);
init();
glutInitWindowPosition(100,100);
glutInitWindowSize(500,500);
glutCreateWindow("橡皮筋方式绘直线");
glutDisplayFunc(display);
glutMotionFunc(mousemove);
glutMouseFunc(mouseud);
glutReshapeFunc(reshape);
glutMainLoop();
}
2、菜单是交互式操作中非常好用的一种技术,GLUT提供了菜单这个窗口小组件技术。定义一个菜单至少有2个步骤。第一步,确定菜单中有哪些菜单项,即菜单中要显示哪些字符串。第二步,把特定的动作与行为“绑定”在一起。当用户松开将弹出一个菜单的鼠标键时,鼠标所在那一行的标识符就会传递给菜单回调函数。
1) 顶级菜单由glutCreateMenu()创建,要为这个函数指定菜单回调函数的名称。其函数原型如下:
void glutCreateMenu ( void (*f) ( int value) ) //该函数为所创建菜单返回一个独一无二的标识符。
2)菜单项由glutAddMenuEntry()添加到当前菜单。每个菜单项由两个部分组成:为这个菜单项显示的字串和选择这个菜单项时返回的值。其原型如下:
void glutAddMenuEntry ( char *name, int value)
3)最后,通过glutAttachMenu()把菜单附加给一个鼠标键。其原型如下:
void glutAttachMenu ( int button ) //button一般指GLUT_RIGHT_BUTTON,GLUT_LEFT_BUTTON。
4)子菜单
子菜单的名称在其父菜单中以菜单项的形式显示。
Void glutAddSubMenu ( char *name, int menu ) //添加一个名称为name的子菜单项,name将作为当前菜单中的下一项显示。Menu的值是创建子菜单时返回的子菜单标识符。
注意:要创建子菜单的话,必须建立在主菜单前,以便能在建立主菜单时它的标识符传递给glutAddMenu()。
下面是一个创建菜单的代码。请修改代码,请创建一个标题为“Color”的第三项菜单,并由该菜单弹出三个下拉菜单:一个将三角形顶点变红色,一个将三角形顶点变蓝色,一个将三角形顶点颜色变绿色。
提示:1)创建一个回调函数void colorSubMenu (GLint colorOption),让产生子菜单的glutCreateMenu()函数调用。
2)令Glint subMenu = glutCreateMenu (colorSubMenu)。
2)函数glutAddSubMenu ( char *name, int menu )放在函数glutAddMenuEntry ("Color-Interpolation Fill", 2);后面,此时menu参数用subMenu替代。
源码如下:
#include <GL/glut.h>
GLsizei winWidth = 400, winHeight = 400; // Initial Display-window size.
GLfloat red = 1.0, green = 1.0, blue = 1.0; // Initial triangle color: white.
GLenum fillMode = GL_SMOOTH; // Initial polygon fill: color interpolation.
void init (void)
{
glClearColor (0.6, 0.6, 0.6, 1.0); // Set display-window color to gray.
glMatrixMode (GL_PROJECTION);
gluOrtho2D (0.0, 300.0, 0.0, 300.0);
}
void fillOption (GLint selectedOption)
{
switch (selectedOption) {
case 1: fillMode = GL_FLAT; break; // Flat surface rendering.
case 2: fillMode = GL_SMOOTH; break; // Gouraud rendering.
}
glutPostRedisplay ( );
}
void displayTriangle (void)
{
glClear (GL_COLOR_BUFFER_BIT);
glShadeModel (fillMode); // Set fill method for triangle.
glColor3f (red, green, blue); // Set color for first two vertices.
glBegin (GL_TRIANGLES);
glVertex2i (280, 20);
glVertex2i (160, 280);
glColor3f (red, 0.0, 0.0); // Set color of last vertex to red.
glVertex2i (20, 100);
glEnd ( );
glFlush ( );
}
void reshapeFcn (GLint newWidth, GLint newHeight)
{
glViewport (0, 0, newWidth, newHeight);
glMatrixMode (GL_PROJECTION);
glLoadIdentity ( );
gluOrtho2D (0.0, (GLfloat) newWidth, 0.0, (GLfloat )newHeight);
displayTriangle ( );
glFlush ( );
}
void main (int argc, char **argv)
{
glutInit (&argc, argv);
glutInitDisplayMode (GLUT_SINGLE | GLUT_RGB);
glutInitWindowPosition (200, 200);
glutInitWindowSize (winWidth, winHeight);
glutCreateWindow ("Menu Example");
init ( );
glutDisplayFunc (displayTriangle);
glutCreateMenu (fillOption); // Create pop-up menu.
glutAddMenuEntry ("Solid-Color Fill", 1);
glutAddMenuEntry ("Color-Interpolation Fill", 2);
/* Select a menu option using the right mouse button. */
glutAttachMenu (GLUT_RIGHT_BUTTON);
glutReshapeFunc (reshapeFcn);
glutMainLoop ( );
}
实验九 真实感图形的绘制
一、实验学时 2学时
二、实验类型 设计型实验
三、实验目的和要求
了解OpenGL的光照模型,掌握消除隐藏面的基本方法;学会创建光源,选择光照模型。
四、实验内容
编写一个显示一个球面的程序,并能过交互交它们阴影化。可使用滑动条或固定选择项的菜单,调整或选择光照和材质参数。