广州大学学生实验报告
开课学院及实验室:计算机科学与工程实验室 年 月 日

(***报告只能为文字和图片,老师评语将添加到此处,学生请勿作答***)
一、实验目的
(1)进一步深入理解路由协议的配置;
(2)掌握全网使用多种路由协议的配置方法。
二、实验内容
配置静态路由、RIP路由和OSPF路由,实现不同网络的互通。
三、实验原理
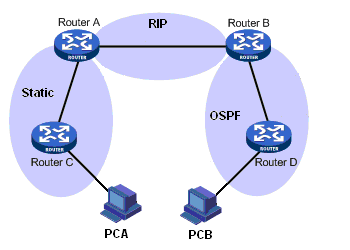
(1)Router A和Router C之间配置静态路由,Router A和Router B之间启动RIP, Router B和Router D之间运行OFPF。
(2)配置完成后,每台路由器都应学到所有网段的路由。
四、实验设备
(1)对照总拓扑图及实验拓扑图,确定实验台组网交换机、路由器及端口,画出实验组网图;
(2)查阅路由器电子手册, 了解网络运行多种路由协议时,如何让不同路由协议交换路由信息,以及路由引入的配置方法和配置命令;
(3)确定实验的IP编址方案
五、实验要求
2.5.6 实验流程
(1)按照实验组网图启用实验所需端口;
(2)按IP编址方案,为路由器配置IP地址;
(3)在Router C上配置缺省路由,在Router A上配置静态路由和RIP路由,在Router B上配置RIP路由和OSPF路由,在Router D上配置OSPF路由;
(4)在Router A和Router B上配置路由引入。
2.5.7 实验验证
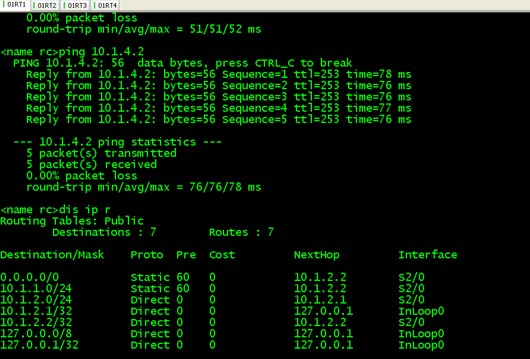
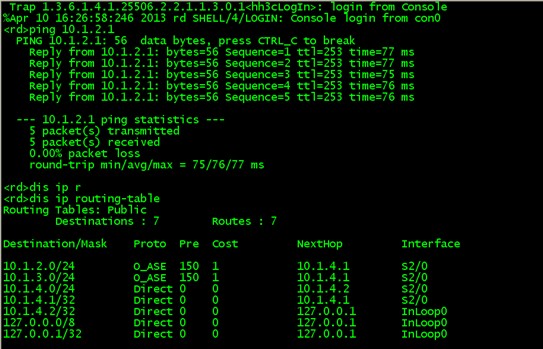
(1)在各路由器上检查路由表
(2)配置PC的网络参数,在PC上验证互通性。
七、总结心得
拓扑图


第二篇:程风雷MPLS_VPN PE-CE路由协议 OSPF和 BGP重分发实验报告
MPLS_VPN PE-CE路由协议 OSPF和 BGP重分发实验报告
班级:1307D 姓名:程风雷 日期:14/9/24
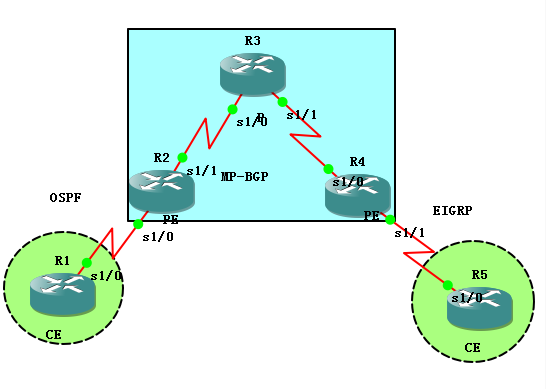
实验所需拓扑图:
实验要求:
1:分配相应的IP地址
2:在ISP内部以ospf做基础并配置mpls
3:R2和R4使用MP-BGP建立回环口邻居
4:R2和R4建立vrf
在R2建立vrf 命名为A RD为2:2 RT为234:23/234:24
在R4建立vrf 命名为B RD为4:4 RT为234:23/234:24
5:R1与R2起OSPF协议 R4与R5起EIGRP路由协议
6:为使R1和R5之间回环口相互通信 做虚拟的重分发
实验步骤:
1:分配相应的IP地址
在R1上配置物理口和回环口ip地址
R1(config)#inter s1/0
R1(config-if)#ip add 12.1.1.1 255.255.255.0
R1(config-if)#no sh
R1(config)#inter loopback 0
R1(config-if)#ip add 1.1.1.1 255.255.255.255
R1(config-if)#no sh
在R2上配置物理口和回环口ip地址
R2(config)#inter s1/1
R2(config-if)#ip add 23.1.1.1 255.255.255.0
R2(config-if)#no sh
R2(config)#inter loop 0
R2(config-if)#ip add 2.2.2.2 255.255.255.255
R2(config-if)#no sh
在R3上配置物理口和回环口ip地址
R3(config)#inter s1/0
R3(config-if)#ip add 23.1.1.2 255.255.255.0
R3(config-if)#no sh
R3(config)#inter s1/1
R3(config-if)#ip add 34.1.1.1 255.255.255.0
R3(config-if)#no sh
R3(config)#inter loop 0
R3(config-if)#ip add 3.3.3.3 255.255.255.255
R3(config-if)#no sh
在R4上配置物理口和回环口ip地址
R4(config)#inter s1/0
R4(config-if)#ip add 34.1.1.2 255.255.255.0
R4(config-if)#no sh
R4(config)#inter loop 0
R4(config-if)#ip add 4.4.4.4 255.255.255.255
R4(config-if)#no sh
在R5上配置物理口和回环口ip地址
R5(config)#inter s1/0
R5(config-if)#ip add 45.1.1.2 255.255.255.0
R5(config-if)#no sh
R5(config)#inter loop 0
R5(config-if)#ip add 5.5.5.5 255.255.255.255
R5(config-if)#no sh
2:在ISP内部以ospf做基础并配置mpls
在R2上宣告ospf 110
R2(config)#router ospf 110
R2(config-router)#net 2.2.2.2 0.0.0.0 a 0
R2(config-router)#net 23.1.1.0 0.0.0.255 a 0
在R3上宣告ospf 110
R3(config)#router ospf 110
R3(config-router)#net 34.1.1.0 0.0.0.255 a 0
R3(config-router)#net 23.1.1.0 0.0.0.255 a 0
R3(config-router)#net 3.3.3.3 0.0.0.0 a 0
在R4上宣告ospf 110
R4(config)#router ospf 110
R4(config-router)#net 34.1.1.0 0.0.0.255 a 0
R4(config-router)#net 4.4.4.4 0.0.0.0 a 0
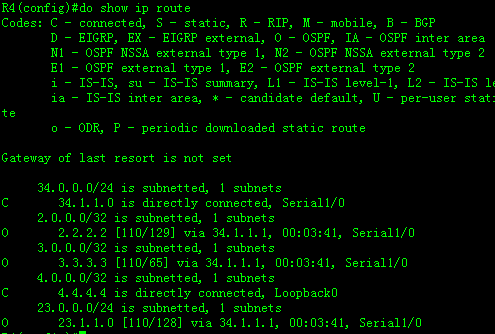
在R2上查看一下ospf路由条目 mpls-vpn内部基础协议配置成功
在R2上开启mpls
R2(config)#ip cef 开启Cisco快速交换
R2(config)#mpls ip 开启mpls协议
R2(config)#mpls label protocol ldp 定义标签分发协议ldp
R2(config)#mpls label range 20## 2999定义标签范围
R2(config)#mpls ldp router-id loopback 0 force强制loopback口建立ldp的邻居
R2(config)#inter s1/1
R2(config-if)#mpls ip 在接口宣告mpls
在R3上开启mpls
R3(config)#ip cef
R3(config)#mpls ip
R3(config)#mpls label protocol ldp
R3(config)#mpls label range 3000 3999
R3(config)#mpls ldp router-id loopback 0 force
R3(config)#inter s1/0
R3(config-if)#mpls ip
R3(config-if)#inter s1/1
R3(config-if)#mpls ip
在R4上开启mpls
R4(config)#ip cef
R4(config)#mpls ip
R4(config)#mpls label protocol ldp
R4(config)#mpls label range 4000 4999
R4(config)#mpls ldp router-id loopback 0 force
R4(config)#inter s1/0
R4(config-if)#mpls ip
3:R2和R4使用MP-BGP建立回环口邻居
R2和R4建立mp-bgp关系
R2(config)#router bgp 234
R2(config-router)#bgp router-id 2.2.2.2
R2(config-router)#neighbor 4.4.4.4 remote-as 234
R2(config-router)#nei 4.4.4.4 update-source loopback 0
R2(config-router)#no bgp default ipv4-unicast
R2(config-router)#address-family vpnv4 unicast
R2(config-router-af)#neighbor 4.4.4.4 activate
R2(config-router-af)#neighbor 4.4.4.4 send-community both
R4和R2建立mp-bgp关系
R4(config)#router bgp 234
R4(config-router)#bgp router-id 4.4.4.4
R4(config-router)#neighbor 2.2.2.2 remote-as 234
R4(config-router)#neighbor 2.2.2.2 update-source loopback 0
R4(config-router)#no bgp default ipv4-unicast
R4(config-router)#address-family vpnv4 unicast
R4(config-router-af)#neighbor 2.2.2.2 activate
R4(config-router-af)#neighbor 2.2.2.2 send-community both
4:R2和R4建立vrf
在R2建立vrf 命名为A RD为2:2 RT为234:23/234:24
R2(config)#ip vrf A
R2(config-vrf)#rd 2:2
R2(config-vrf)#route-target import 234:23
R2(config-vrf)#route-target export 234:24
R2(config)#inter s1/0
R2(config-if)#ip vrf forwarding A
R2(config-if)#ip add 12.1.1.2 255.255.255.0
R2(config-if)#no sh
在R4建立vrf 命名为B RD为4:4 RT为234:23/234:24
R4(config)#ip vrf B
R4(config-vrf)#rd 4:4
R4(config-vrf)#route-target import 234:24
R4(config-vrf)#route-target export 234:23
R4(config)#inter s1/1
R4(config-if)#ip vrf forwarding B
R4(config-if)#ip add 45.1.1.1 255.255.255.0
R4(config-if)#no sh
5:R1与R2起OSPF协议 R4与R5起EIGRP路由协议
R1(config)#router ospf 1
R1(config-router)#net 12.1.1.0 0.0.0.255 a 0
R1(config-router)#net 1.1.1.1 0.0.0.0 a 0
在R2配置ospf协议
R2(config)#router ospf 1 vrf A
R2(config-router)#net 12.1.1.0 0.0.0.255 a 0
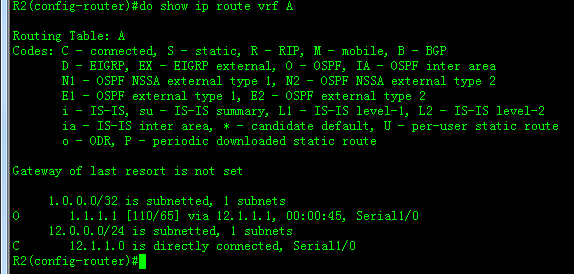
查看一下R2的虚拟路由表 学习到R1的回环口ip
R4与R5起EIGRP路由协议
R5(config)#router eigrp 90
R5(config-router)#network 5.5.5.5 0.0.0.0
R5(config-router)#network 45.1.1.0 0.0.0.255
R5(config-router)#no auto-summary
在R4配置eigrp虚拟路由条目
R4(config)#router eigrp 90
R4(config-router)#address-family ipv4 vrf B 进入R4的地址簇
R4(config-router-af)#autonomous-system 90 指定EIGRP的AS号90
R4(config-router-af)#no auto-summary
R4(config-router-af)#network 45.1.1.0 0.0.0.255 宣告网段
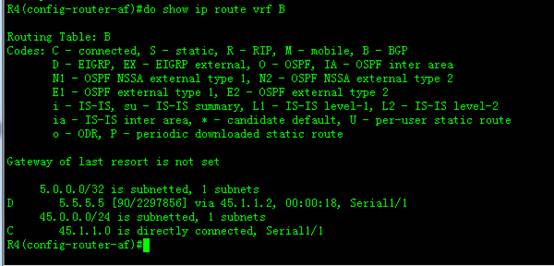
查看一下R4的虚拟路由表 学习到R5的回环口ip
6:为使R1和R5之间回环口相互通信 做虚拟的重分发
在R2上把BGP重分发到 OSPF
R2(config)#router ospf 1 vrf A
R2(config-router)#redistribute bgp 234 subnets
在R2上把OSPF 重分发到 BGP
R2(config)#router bgp 234
R2(config-router)#address-family ipv4 vrf A
R2(config-router-af)#redistribute ospf 1 vrf A 注意所宣告的虚拟区域
在R4上把BGP重分发到 EIGRP 注意5个K值
R4(config)#router eigrp 90
R4(config-router)#address-family ipv4 vrf B
R4(config-router-af)#autonomous-system 90
R4(config-router-af)#redistribute bgp 234 metric 10000 100 255 1 1500
在R4上把EIGRP 重分发到 BGP
R4(config)#router bgp 234
R4(config-router)#address-family ipv4 vrf B
R4(config-router-af)#redistribute eigrp 90
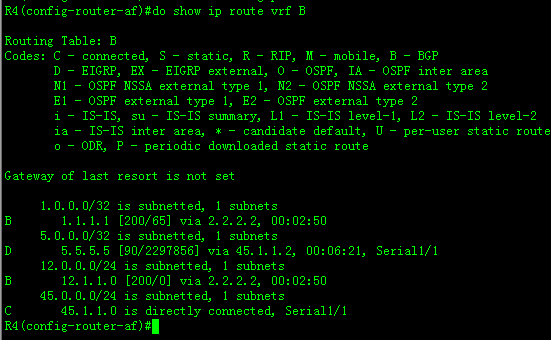
查看一下R4和R2的虚拟路由表
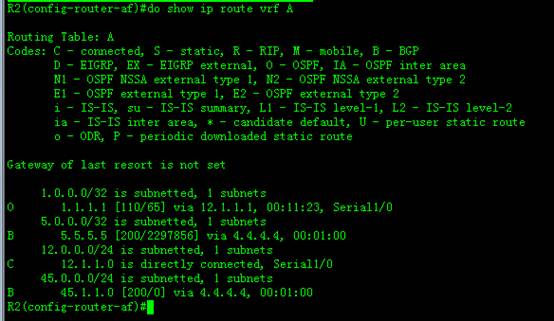
R1可以和R5回环口通信

R5可以和R1回环口通信

实验完成 CE之间可以相互通信