大学物理演示实验观后感
电子信息工程 专业 学生 柳 咏 学号 1204451148
今天上午我们很高兴的到理学院参观了大学物理演示实验室,尽管天气很冷,但是我们的热情很高,毕竟这对我们来说是一个全新的领域,是我们之前从未接触过的东西。在老师的带领下,我们参观并亲自操作了一些实验。在这次的演示实验课中,我见到了一些很新奇的仪器和实验,一个个奇妙的实验吸引了我们的注意力,通过奇妙的物理现象感受了伟大的自然科学的奥妙。给我印象深刻地有以下几个实验。
一. 锥体上滚
在演示实验室,老师首先给我们演示的是锥体上滚实验。其实验原理是:能量最低原理指出:物体或系统的能量总是自然趋向最低状态。本实验中在低端的两根导轨间距小,锥体停在此处重心被抬高了;相反,在高端两根导轨较为分开,锥体在此处下陷,重心实际上降低了。实验现象仍然符合能量最低原理,其核心在于刚体在重力场中的平衡问题,而自由运动的物体在重力的作用下总是平衡在重力势能极小的位置。
通过这个实验,我们知道了有时候现象和本质完全相反。
二.电磁炮
接着我们又做了电磁炮的实验。电磁炮是利用电磁力代替火药爆炸力来加速弹丸的电磁发射系统,它主要有电源、高速开关、加速装置和炮弹组成。
根据通电线圈磁场的相互作用原理,加速线圈固定在炮管中,当它通入交变电流时,产生的交变磁场就会在线圈中产生感应电流,感应电流的磁场与加速线圈电流的磁场相互作用,使弹丸加速运动并发射出去。
我们将炮弹放入炮管中距尾部25cm左右,按下启动按钮发射了炮弹。虽然炮弹的射程很小,但我们都觉得很奇妙,做的很开心。
三.会飞的碗
会飞的碗是用来展示流体力学和空气动力学中的有关伯努利定理的知识。碗之所以会悬浮在空中,是由于伯努利定理造成的,因为在质量均匀的气流中,其流动速度越大,压力就越小;而其流动的速度越小,其压力越大。气流冲击着碗,不让它落下。碗若跳出气流,周围的空气就会把它推回到气流里,因为周围的空气速度小,压力大,而气流里的空气速度大,压力小,压力差使碗可以稳定的悬浮于空中。
我们对这个都很干兴趣,觉得十分有趣,所以我们都做了这个实验。
四.辉光球
随后我们看到的一个球形仪器称为辉光球。辉光球又称为电离子魔幻球。它的外观为直径约15cm的高强度玻璃球壳,球内充有稀薄的惰性气体(如氩气等),玻璃球中央有一个黑色球状电极。球的底部有一块震荡电路板,通过电源变换器,将12V低压直流电转变为高压高频电压加在电极上。
通电后,震荡电路产生高频电压电场,由于球内稀薄气体受到高频电场的电离作用而光芒四射,产生神秘色彩。由于电极上电压很高,故所发生的光是一些辐射状的辉光,绚丽多彩,光芒四射,在黑暗中非常好看。
五.激光琴
激光琴是演示光电效应的装置。它是一种没有琴弦的琴,代替琴弦的是激光束,对应着光敏电阻,手指“轻弹”光束。当用手指遮住光束时,遮断光路,改变了光敏电阻的电阻值,产生跳变的电压信号。这个电压信号就触发相应的电路开始工作,从而产生一个具有固定频率的电信号。电信号经过电子合成器处理放大后,由扬声器发出相应音符的声音,就像弹奏不同琴键发出的不同音符的声音一样,十分有趣,引人入胜。
虽然我们都不懂音乐,但这并不妨碍我们演示实验的热情。我们把手伸到激光束下,遮住光束,然后快速的移动着手指,“悦耳动听”的琴声便萦绕在演示实验室中,我们玩的乐此不疲。
六.静电跳球
静电跳球是通过小球在静电场的作用下上下跳动,演示同性电荷相斥、异性电荷相吸的原理。带电荷量为q的小金属球在电场强度为E的电场中受到电场力
为F=qE,若电场力的方向是竖直向上,在F>mg时,电场力可以克服重力做功使它向上运动。在实验室的装置是在水平方向设置两个相互平行有一定间距d的导体平板。在两板之间放入一些用锡箔团成的小球,它们既轻且有导电,把两板与静电起电机的正负极相连,使两极板分别带正、负电荷,这时小球也带有与上下极板同性的电荷。同性电荷相斥、异性电荷相吸,小金属球在电场力的作用下在容器内做周而复始的上下运动。
在这短短的一次物理演示实验中,我学到了许多在平时学习中学习不到的东西,收获很大。老师演示的一个个物理实验,奇妙的现象让我们感受到伟大的自然科学的奥妙,可以说这次的演示实验让我对物理学的认识有了进一步的提高。以前我们普遍认为大学物理抽象难懂、深奥复杂、枯燥乏味。物理演示实验能够将抽象、深奥的物理知识转变为具体、简单的趣味内容, 使模糊、枯燥、复杂难懂的内容变得清晰、生动、津津有味。另外, 物理演示实验能把我们在生产、生活中看到的和听到的现象, 通过实验手段再现出来。实物演示真实、直观, 能给人身临其境之感,极大地调动学习的积极性, 主动性以及激发创造的潜能。
老师让负责操作的同学明确注意事项后,亲自动手操作,使我们具有获得成功的自豪感, 并培养了我们的自信心和学习兴趣。
虽然说演示实验的过程是简单的,但它的意义绝非如此。我们学习的知识重在应用,对大学生来说,演示实验不仅开动了我们思考的马达,也让我们更好地把物理知识运用到了实际现象的分析中去,使我们不但对大自然产生了以前没有的敬畏和尊重,也有了对大自然探究的好奇心,我想这是一个人做学问最最重要的一点。因此我想在我们平时的学习中,要带着一种崇敬的心情和责任感,认认真真地学习,踏踏实实地学习,只有这样,我们才能真正学会一门课,学好一门课。此外,我觉得我们不能将眼光仅仅定位在事物的表面,不能被眼镜所欺骗,要认真的分析,理解,找出事物背后的真理;不仅在物理,生活中更应如此,只有这样我们才能成为一个完美的人,我想这也是为什么大纲上要安排这样一个演示实验的目的所在。
20xx年12月13日
第二篇:北邮大学物理演示实验报告
The Report Of the College Physics Experiment
Experiment 1:
optical lever mirror method to measure Young's modulus of the metal
Purpose:
1. Master the principle of measuring the small length changes with optical lever mirror.
2.Learn how to eliminate the systematic errors with symmetric measurement.
3.Learn how to estimate the errors to each measured value in accordance with the actual situation.
4.Train to deal data with different methods and construction.
Theory:
Objects should engender deformation more or less by the external force. It is the elastic deformation which will disappear promptly after withdrawing the external force when the force is no more than a certain limits. The objects will restore a restituted internal stress after occurring elastic deformation.
 There is a section S, length L0 of the equably rod- like (wire-like) material, when it stretched by the pulling force F, it elongates
 , stress is measured as the force per unit cross sectional area of
 ; and strain
is the increase in length of unit length of .
.
According to Hook’s Law, the strain rod-like (wire-like) material burdened is proportional to the burdened stress: 
Fig. 1 the optical lever
Where Y is the coefficient depended on the characterization of the materials .The modulus is then Fig. 1 the optical lever
known as Young’s modulus (Y). and hence:
 (1)
(1)
This experiment is to measure the Young’s modulus of a kind of model steel, in which F can be determined by the calculated weight of weight, sectional area S can be get by calculating the diameter of the wire measured with micrometer screw gouge,  can be measured by conventional measurement apparatus such as meter and so on. But is difficult to measure accurately for its small length change used ordinary apparatus. So we choose amplification——“optical lever mirror” to measure this small change. The optical lever mirror physical diagram is Fig. 1

Fig.2 the principle of optical lever mirror
Fig.2 is the principle chart of measuring the tiny length change by optical lever mirror. The left curled object is the optical lever mirror, M is a reflector, b is the so- called short – optical lever mirror arm length, O is fixed- side of b-side, the other side b will rise or fall when the measured object elongating or shortening, and change the direction of normal line of M. The original wire length is, from the right adjusted telescope we can see the reading of scale imagine of M of , while the steel is elongated, from the telescope we can see the reading of scale imagine of M:
  . In this way, the tiny wire elongation is, the corresponding angle change of the optical lever mirror is
 , and the reading change of scale imagine of M is
 . Be reversible by the optical path that light lever angle should be
  . Using the geometric method in Fig.2 we can get:
 (2)
(2)
 (3)
(3)
Hence  (4)
(4)
Where , equivalent to the displacement of the long arm of optical lever mirror.
  is the magnification of optical lever mirror, as D >> b, so
 n >> L, that means we get linear amplification of the small amount, and enhance the measurement accuracy of
 .
.
This measurement is known as amplification. This amplification has a wide range of applications in designing all kinds of testing equipment for its advantage of stable performance, high precision, linear amplification and so on.
Taking into account the wire by the external force there is a lag effect of flexibility, as to say that the steel can’t be due immediately to the elongated length of  (
( ) when it is elongated, but only to the elongation of
  . Similarly, the steel can’t be reduced to the length of Li when once the stretching force of the wire has been reduced, but only reduced to
 . Therefore the measured length of the wire by the experiment is not the actual elongated or contracted length. In order to eliminate the systematic errors by the lag effect of flexibility, the measurement should be included a symmetrical measurement process of increasing the tensile strength and reducing the tensile strength. To the experiment, we can get this to increase or reduce the weights, we can take average amount of the stretching of wire as long as increase or reduce a corresponding weight to eliminate the effects of lagged volume. That is:

Procedure:
(1)Attach 2kg hanger for weights to end of the wire to remove any irregularities. Adjust the three foot screws under the Young’s modulus chassis, and observe the standard ruler on the platform at the same time until the middle of the platform is at the level of state.
(2)Regulate the location of the optical lever mirror. Take the optical lever mirror on the platform, the two front feet on the cross- platform, the rear foot on the cylindrical casing of the lower end of the fixed wire (the rear foot must be placed on the edge of the metal casing, but not on the location of the gap),and let the mirror of optical lever mirror to be basic vertical or slight angle, as shown in Fig. 1.
(3)Adjust the telescope. Place the telescope about 2m away from the optical lever mirror. Loose the fixed screw of telescope and move up or down to let the mirror of optical lever mirror and the telescope are on the same height. Take aim at the mirror of optical lever mirror along the tube axis above the telescope. Shift the fixed position of the telescope until we can see the scale imagine from the optical lever mirror. And then observe from the eyepiece. Adjust the eyepiece to see the cross wire clearly and finally revolve the focusing hand wheel to flexible the telescope in the tube until we can see the ruler scale clearly from the telescope.
(4)Observe the stretch change. Attach 2kg hanger for weights to the end of the wire as the beginning, and take the telescope reading of . Load the measured wire with successive kilogram weights, taking the telescope reading after each addition——
 . Unload kilogram by kilogram, and read the telescope at each stage——
 .
.
Note: Add or subtract the weight lightly to avoid a relatively large vibration. After adding or subtracting the weight, the wire will have a scalable micro-vibration, and we should read after the steel gradually becoming stable.
(5)Measure the distance b from the front foot to the rear foot of optical lever mirror. Rent the 3 feet of the optical lever mirror in white paper. Draw the connection of the two front feet and then measure the vertical distance from the rear foot to the line with the vernier scale.
(6)Measure the diameter of the wire at several points about 3-5 times along its length and find a mean value. This measurement must be done carefully with a micrometer screw-gauge and note the zero error each time.
(7)Use meter ruler to measure the distance D from the plane mirror to the scale.
(8)Use meter ruler to measure the original length of wire.
(9)Notes
①The wire must be clamped tightly at the both side, at one hand to reduce the system error, and at the other hand to avoid falling down to damage the test devices.
②Don’t move the telescope and the table in the measuring and reading process, or you must start measuring again.
③Keep the measured wire straight so as to avoid misusing the measuring process for the elongation, resulting in measurement error.
④Keeping the weight should be 1kg and don’t touch the mirror in the measuring progress.
⑤You must adjust the telescope in a certain scope to avoid damaging it.
Data and the results
KG △x=0.05 CM
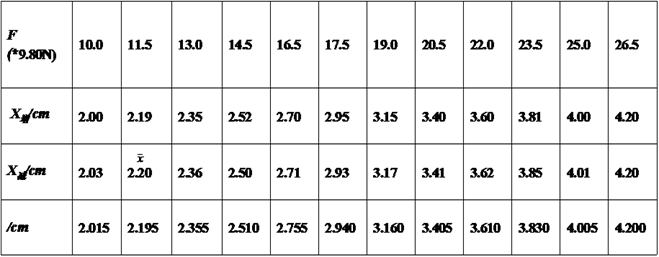
镜尺距(he distance from the ruler to the mirror)
D =150 mm ; △x仪 = 0.05 CM
The wire length:

The diameter of the wire:
First record=0.02 mm ; △d仪=0.004 mm

光杠杆常数 b=85.17 mm ;△b仪=0.002 mm
graphical method:

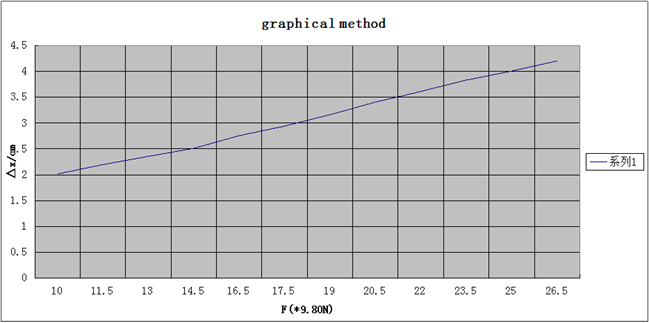
The discuss of this experiment and my experiment:
After this experiment I know that we should use plot to obtain the value of Y in this experiment.Eliminating the systematic errors in the experiment is also very important.I think that I have learned how to eliminate the systematic errors with symmetric measurement.I also have learned that how to estimate the errors to each measured value in accordance with the actual situation.To deal data with different methods and construction is the purpose that we must get.