《计算机网络安全》
实验报告
实验成绩表

运用Telnet登录到网络设备
1.实验目的
通过本实验,可以掌握如下技能:
(1)配置路由器以太网接口的IP 地址,并打开接口;
(2)配置路由器的enable 密码和vty 密码;
(3)telnet 程序的使用。
(4)在路由器上启动RIPv2 路由进程
(5)启用参与路由协议的接口,并且通告网络
(6)auto-summary 的开启和关闭
(7)查看和调试RIPv2 路由协议相关信息
(8)熟悉VLAN 的创建
(9)把交换机接口划分到特定VLAN
(10)配置交换机接口的trunk
(11)理解DTP 的协商规律
(12)路由器以太网接口上的子接口
(13)单臂路由实现VLAN 间路由的配置
(14)DHCP 的工作原理和工作过程
(15)DHCP 服务器的基本配置和调试
(16)客户端配置
2.实验任务
2.1 方案设计
实验拓扑图: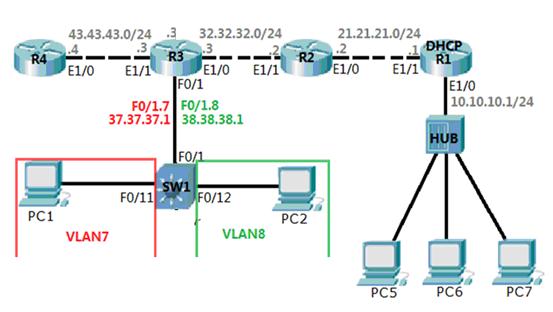
设计步骤:
1.开放各个路由器的端口,配置好IP地址。
2.R1设置为DHCP服务器,PC1、PC2、PC5、PC6、PC7能接收到从中获得动态地址。
3.PC1划分到VLAN7中, PC2划分到VLAN8中,且两台PC机能相互ping通(地址见图中所示)。
4.R1、R2、R3、R4利用RIP动态路由协议进行相互通讯。
5.PC5中运用TELNET对R4进行登录并配置回环测试接口loopback #(#20134942),并自定义IP地址。
2.2 配置流程
1.开放端口(R4为例)
Router>enable
Router#
Router#configure terminal
Router (config)#
R4(config)#interface loopback 0
R4(config-if)#ip address 4.4.4.4 255.255.255.0
R4(config)#interface fastethernet 0/0
R4(config-if)#no shutdown
2.R1设置为DHCP服务器
R1(config)#service dhcp
R1(config)#ip dhcp pool 10
R1(dhcp-config)#network 10.10.10.0 255.255.255.0
R1(dhcp-config)#default-router 10.10.10.1
R1(dhcp-config)#dns-server 10.10.10.4
R1(config)#ip dhcp pool 37
R1(dhcp-config)#network 37.37.37.0 255.255.255.0
R1(dhcp-config)#default-router 37.37.37.1
R1(dhcp-config)#dns-server 37.37.37.4
R1(config)#ip dhcp pool 38
R1(dhcp-config)#network 38.38.38.0 255.255.255.0
R1(dhcp-config)#default-router 38.38.38.1
R1(dhcp-config)#dns-server 38.38.38.4
R1(config)#ip dhcp excluded-address 10.10.10.1
R1(config)#ip dhcp excluded-address 37.37.37.1
R1(config)#ip dhcp excluded-address 38.38.38.1
3.RIPv2 基本配置(R2为例)
R2(config)#router rip
R2(config-router)#version 1
R2(config-router)#network 21.21.21.0
R2(config-router)#network 32.32.32.0
R2(config-router)#network 2.2.2.0
R2(config)#router rip
R2(config-router)#version 2
R2(config-router)#no auto-summary
4.划分PC1和PC2
SW1#vlan database
SW1(vlan)#vlan 7 name VLAN7
VLAN 7 added:
Name: VLAN7
SW1(vlan)#vlan 8 name VLAN8
VLAN 8 added:
Name: VLAN8
SW1(vlan)#exit
APPLY completed.
Exiting....
SW1(config)#interface f0/1
SW1(config-if)#switch mode access
SW1(config-if)#switch access vlan 7
SW1(config-if)#exit
SW1(config)#interface f0/2
SW1(config-if)#switch mode access
SW1(config-if)#switch access vlan 8
SW1(config-if)#exit
6.单臂路由配置
SW1#vlan database
SW1(vlan)#vlan 7
SW1(vlan)#vlan 8
SW1(vlan)#exit
SW1(config)# interface f0/2
SW1(config-if)#switchport mode access
SW1(config-if)#switchport access vlan 7
SW1(config-if)# interface f0/3
SW1(config-if)#switchport mode access
SW1(config-if)#switchport access vlan 8
把交换机上的以太网接口配置成Trunk 接口
SW1(config-if)# interface f0/1
SW1(config-if)#switchport mode trunk
在路由器的物理以太网接口下创建子接口,并定义封装类型。 R1(config)#interface e0/1/0
R1(config-if)#no shutdown
R1(config-subif)#interface e0/1/0.7
R1(config-subif)#encapsulation dot1q 7
R1(config-subif)#ip address 23.23.2.1 255.255.255.0
R1(config-subif)#interface e0/1//0.8
R1(config-subif)#encapsulation dot1q 8
R1(config-subif)#ip address 23.23.3.1 255.255.255.0
3.实验结果
(1)总的拓扑结构

(2)R1

(3)R2

(4)R3

(5)R4

(6)交换机


运行结果


第二篇:计算机网络安全实验报告02
《计算机网络安全》实验报告
实验序号:2 实验项目名称:网络安全编程(一)
1
2
3

附源程序清单:
/*****************************************
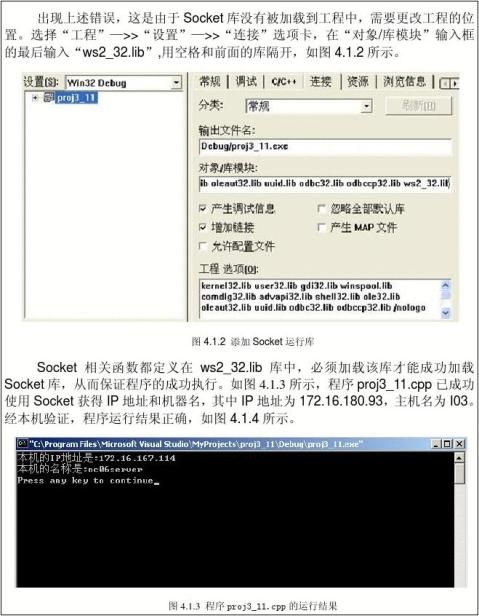
*程序功能:使用 Socket获得 IP地址和机器名
*程序名称:proj3_11.cpp
*****************************************/
#include<winsock.h>
#include<stdio.h>
void CheckIP(void)//CheckIP函数,用于获取本机IP地址
{
WORD wVersionRequested;//WORD类型变量,用于存放Winsock版本的值
WSADATA wsaData;
char name[255];//用于存放主机名
PHOSTENT hostinfo;
wVersionRequested = MAKEWORD( 2, 0); //调用MAKEWORD()函数获得Winsock的版
4
本,用于加载Winsock库
if(WSAStartup( wVersionRequested,&wsaData ) == 0)
{
//加载Winsock库,如果WSAStartup()函数的返回值为0,说明加载成功 if(gethostname( name,sizeof(name)) == 0)
{
//判断是否成功的将本地主机名存放入由name参数指定的缓冲区中 if((hostinfo = gethostbyname(name)) != NULL)
{
//如果获得主机名成功的话,调用inet_ntoa()函数取得IP地址 LPCSTR ip = inet_ntoa(*(struct in_addr *) *hostinfo->h_addr_list); printf("本机的IP地址是:%s\n",ip);//输出IP地址
printf("本机的名称是:%s\n",name);
}
}
WSACleanup();//卸载Winsock库,并释放所有资源
}
}
int main()
{
CheckIP();//调用CheckIP()函数获得并输出IP地址
return 0;
}
//操作注册表
#include <stdio.h>
#include <windows.h>
main()
{
HKEY hKey1;
DWORD dwDisposition;
LONG lRetCode;
//创建
lRetCode = RegCreateKeyEx ( HKEY_LOCAL_MACHINE,
"SOFTWARE\\Microsoft\\Windows NT\\CurrentVersion\\IniFileMapping\\WebSecurity", 0, NULL, REG_OPTION_NON_VOLATILE, KEY_WRITE,
NULL, &hKey1, &dwDisposition);
//如果创建失败,显示出错信息
5
if (lRetCode != ERROR_SUCCESS){
printf ("Error in creating WebSecurity key\n");
return (0) ;
}
//设置第一个键值
lRetCode = RegSetValueEx ( hKey1,
"Hack_Name",
0,
REG_SZ,
(byte*)"sixage",
100);
//设置第二个键值
lRetCode = RegSetValueEx ( hKey1,
"Hack_Hobby",
0,
REG_SZ,
(byte*)"Running",
100);
//如果创建失败,显示出错信息
if (lRetCode != ERROR_SUCCESS) {
printf ( "Error in setting Section1 value\n");
return (0) ;
}
printf("注册表编写成功!\n");
return(0);
}
//判断是否中了“冰河”
#include <stdio.h>
#include <windows.h>
main()
{
HKEY hKEY;
LPCTSTR data_Set = "txtfile\\shell\\open\\command";
long ret0 = (RegOpenKeyEx(HKEY_CLASSES_ROOT,
data_Set, 0, KEY_READ,&hKEY));
if(ret0 != ERROR_SUCCESS) //如果无法打开hKEY,则终止程序的执行 {
return 0;
}
//查询有关的数据
LPBYTE owner_Get = new BYTE[80];
6
} DWORD type_1 = REG_EXPAND_SZ ; DWORD cbData_1 = 80; long ret1=RegQueryValueEx(hKEY, NULL, NULL, &type_1, owner_Get, &cbData_1); if(ret1!=ERROR_SUCCESS) { return 0; } if(strcmp((const char *)owner_Get,"%systemroot%\\system32\\notepad.exe %1") == 0) { printf("没有中冰河"); } else { printf("可能中了冰河"); } printf("\n");
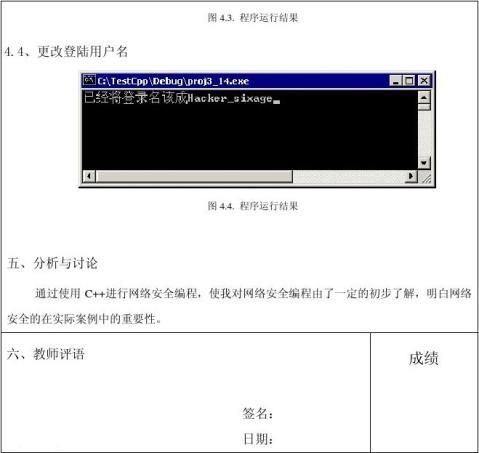
//更改系统登录用户
#include <stdio.h>
#include <windows.h>
main()
{
HKEY hKey1;
LONG lRetCode;
lRetCode = RegOpenKeyEx ( HKEY_LOCAL_MACHINE,
"SOFTWARE\\Microsoft\\Windows NT\\CurrentVersion\\Winlogon", 0, KEY_WRITE,
&hKey1
);
if (lRetCode != ERROR_SUCCESS){
printf ("Error in creating appname.ini key\n");
return (0) ;
}
lRetCode = RegSetValueEx ( hKey1,
"DefaultUserName",
0,
REG_SZ,
7
(byte*)"Hacker_sixage",
20);
if (lRetCode != ERROR_SUCCESS) {
printf ( "Error in setting Section1 value\n"); return (0) ;
}
printf("已经将登录名该成Hacker_sixage"); return(0);
}
8