西华大学计算机系实验报告


一、提交文档(认真仔细阅读!不符合要求者,拒收)
用RAR压缩软件,将下列文件压缩为一个RAR文件提交,命名为:
学号_姓名_实验1_实验文档.RAR
1. 本实验报告,命名为:学号_姓名_实验1_实验报告.DOC
2. 源代码文件(CPP文件),包括自编的头文件。
3. 可执行程序(EXE文件)。
注1:除上述文件外,其余文件不得放入。
注2:上述文件放在同一个文件夹里,不得建立子文件夹。
注3:本实验报告模板所有格式(包括版面、字体、间距等等)不得更改!
二、实验环境
1. 操作系统:windows 7
2. 编程软件:visual studio 2008
三、实验内容
l 流程图(Word 绘图工具绘制符合规范的流程图,禁止贴图片)
l 源程序
l 结果图
四、实验总结
心得体会(包括实验过程中的重要问题及解决办法,实验收获等)
实验建议(若无,删除此行)
第二篇:计算机图形学实验报告
1、planet程序:
#include <GL/glut.h>
#include <stdlib.h>
static int year = 0, day = 0;
void init(void)
{
glClearColor (0.0, 0.0, 0.0, 0.0);
glShadeModel (GL_FLAT);
}
void display(void)
{
glClear (GL_COLOR_BUFFER_BIT);
glColor3f (1.0, 1.0, 1.0);
glPushMatrix();
glRotatef ((GLfloat) year, 0.0, 1.0, 0.0); glutWireSphere(1.0, 20, 16); /* draw sun */
glRotatef ((GLfloat) year, 0.0, 1.0, 0.0); glTranslatef (2.0, 0.0, 0.0);
glRotatef ((GLfloat) day, 0.0, 1.0, 0.0);
glutWireSphere(0.2, 10, 8); /* draw smaller planet */
glRotatef ((GLfloat) day, 0.0, 1.0, 0.0); glTranslatef (-4.0, 0.0, 0.0);
glutWireSphere(0.2, 10, 8); /* draw smaller planet */ glPopMatrix();
glutSwapBuffers();
}
void reshape (int w, int h)
{
glViewport (0, 0, (GLsizei) w, (GLsizei) h); glMatrixMode (GL_PROJECTION);
glLoadIdentity ();
gluPerspective(60.0, (GLfloat) w/(GLfloat) h, 1.0, 20.0); glMatrixMode(GL_MODELVIEW);
glLoadIdentity();
gluLookAt (0.0, 0.0, 5.0, 0.0, 0.0, 0.0, 0.0, 1.0, 0.0); }
void keyboard (unsigned char key, int x, int y)
{
switch (key) {
case 'd':
day = (day + 10) % 360;
glutPostRedisplay();
break;
case 'D':
day = (day - 10) % 360;
glutPostRedisplay();
break;
case 'y':
year = (year + 5) % 360;
glutPostRedisplay();
break;
case 'Y':
year = (year - 5) % 360;
glutPostRedisplay();
break;
case 27:
exit(0);
break;
default:
break;
}
}
int main(int argc, char** argv)
{
glutInit(&argc, argv);
glutInitDisplayMode (GLUT_DOUBLE | GLUT_RGB); glutInitWindowSize (500, 500);
glutInitWindowPosition (100, 100);
glutCreateWindow (argv[0]);
init ();
glutDisplayFunc(display);
glutReshapeFunc(reshape);
glutKeyboardFunc(keyboard);
glutMainLoop();
return 0;
}
2、robot程序: #include <GL/glut.h>
#include <stdlib.h>
static int shoulder = 0, elbow = 0, finger=0; void init(void)
{
glClearColor (0.0, 0.0, 0.0, 0.0); glShadeModel (GL_FLAT);
}
void display(void)
{
glClear (GL_COLOR_BUFFER_BIT); glPushMatrix();
glTranslatef (-1.0, 0.0, 0.0); //胳膊转 glRotatef ((GLfloat) shoulder, 0.0, 0.0, 1.0); glTranslatef (1.0, 0.0, 0.0);
glPushMatrix();
glScalef (2.0, 0.4, 1.0);
glutWireCube (1.0);
glPopMatrix();
glTranslatef (1.0, 0.0, 0.0); //轴心平移 glRotatef ((GLfloat) elbow, 0.0, 0.0, 1.0);//手关节转 glTranslatef (1.0, 0.0, 0.0);
glPushMatrix();
glScalef (2.0, 0.4, 1.0);
glutWireCube (1.0);
glPopMatrix();
glTranslatef (0.7, 0.0, 0.0); //轴心平移 glRotatef ((GLfloat) finger, 0.0, 0.0, 1.0);//手指转 glTranslatef (0.7, 0.0, 0.0);
glPushMatrix();
glScalef (0.6, 0.1, 0.1);
glutWireCube (1.0);
glPopMatrix();
glPopMatrix();
glutSwapBuffers();
}
void reshape (int w, int h)
{
glViewport (0, 0, (GLsizei) w, (GLsizei) h);
glMatrixMode (GL_PROJECTION);
glLoadIdentity ();
gluPerspective(65.0, (GLfloat) w/(GLfloat) h, 1.0, 20.0); glMatrixMode(GL_MODELVIEW);
glLoadIdentity();
glTranslatef (0.0, 0.0, -5.0);
}
void keyboard (unsigned char key, int x, int y)
{
switch (key) {
case 's':
shoulder = (shoulder + 5) % 360;
glutPostRedisplay();
break;
case 'S':
shoulder = (shoulder - 5) % 360;
glutPostRedisplay();
break;
case 'e':
elbow = (elbow + 5) % 360;
glutPostRedisplay();
break;
case 'E':
elbow = (elbow - 5) % 360;
glutPostRedisplay();
break;
case 'f':
finger = (finger + 5) % 45;
glutPostRedisplay();
break;
case 'F':
finger= (finger - 5) % 45;
glutPostRedisplay();
break;
case 27:
exit(0);
break;
default:
break;
}
}
int main(int argc, char** argv)
{
glutInit(&argc, argv);
glutInitDisplayMode (GLUT_DOUBLE | GLUT_RGB); glutInitWindowSize (500, 500);
glutInitWindowPosition (100, 100);
glutCreateWindow (argv[0]);
init ();
glutDisplayFunc(display);
glutReshapeFunc(reshape);
glutKeyboardFunc(keyboard);
glutMainLoop();
return 0;
}
第三篇:计算机图形学实验报告
福建农林大学计算机与信息学院
实验报告

20##年 11 月19 日
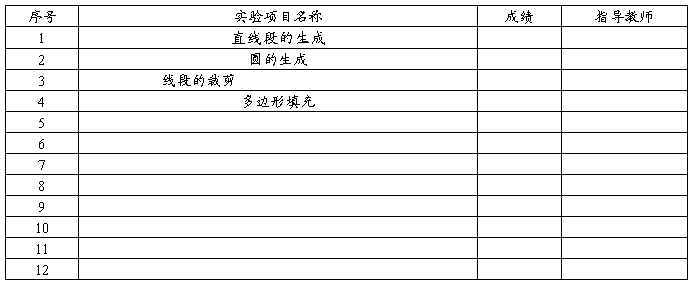
实验项目列表
福建农林大学计算机与信息学院实验报告
实验名称:直线段的生成
一、 实验目的和要求:
1. 理解各种画线算法的原理,并主要掌握DDA算法,中点画线算法,Bresenham算法。
2.能够根据画线算法的原理编写出相应的画线算法(这里列出两种算法),并能正确的显示出所要画的线段。
二.实验内容和原理:
1.DDA 算法:
1)原理:直接利用计算x轴上的增量 或y轴的增量
 的线段扫描转换算法。
2)内容:1若线段的斜率m的绝对值小于等于1,则在单位x间隔( )取样,计算每个y的值,即
2若线段的斜率m的绝对值大于1,则在单位y间隔(=1)取样,计算每个x的值,即
2. Bresenham算法:
1)原理:利用线段上的点和上下相邻像素点间距离的对比来选择合适的像素点。
2)内容:1定义线段上的某一点到下像素点的距离为的d1,到上像素点的距离为d2,定义
 ,并求出
,并求出 的值
的值
2根据相应的 的值来选取点。即的值大于0,则取上像素点,且
 ;若的值小于0,则取下像素点,且
 ;
;
3.中点画线算法:
1)原理:计算中点在直线的上方还是下方来选择相应的像素点。
2)内容:1计算线段方程相应的变量x,y对应的系数,且
2 < 0 , 取上像素点,且
 ;>0 ,取下像素点,且
三.实验环境
⑴ 硬件:PC机;
⑵软件:Windows操作系统、Visual C++ 6.0 。
四.算法描述及实验步骤
(1)DDA算法代码:
#include<math.h>
#include<graphics.h>
#include<conio.h>
#include<stdio.h>
# define ROUND(a)((int)(a + 0.5))
void DDA()
{
int ya = 100,xa = 200,xb = 300,yb = 180;
int steps,k,x,y,dx,dy;
float xIncrement , yIncrement;
x = xa;
y =ya;
dx = xb - xa;
dy = yb - ya;
if( abs(dx)>abs(dy))
{
steps = abs(dx);
}
else
{
steps = abs(dy);
}
xIncrement = dx/(float)steps;
yIncrement = dy/(float)steps;
putpixel(ROUND(x),ROUND(y),GREEN);
while(x<=xb)
{
putpixel(ROUND(x += xIncrement ),ROUND(y += yIncrement),WHITE);
}
}
void main()
{
int gdriver,gmode;
gdriver = DETECT;
gmode = 0;
initgraph( &gdriver,&gmode,"");
DDA();
getch();
closegraph();
}
五 调试过程
编译过程无错误

六.运行结果
(1)DDA算法结果:

七 总结
通过这次的dda画线算法画一条直线,我更加熟悉了各种算法的原理。对于各种算法也有了一个大体的概念!
福建农林大学计算机与信息学院实验报告
实验名称:中点圆的生成
一.实验目的和要求:
1.正确描述出中点画圆算法的原理。
2. 掌握中点画圆算法的原理,正确的编写出算法并掌握。
3.能够对代码理解并且掌握并成功的画出理想的圆。
二.实验内容和原理:
1)原理:
根据中点与圆的位置关系来选择上下像素点。中点在圆内则取上点,在圆外则取下点。
2)内容: 初始化 = 1.25 – r , 对于任意的p,<0,则取上点,且
 否则取下点,
 ,成功画出1/8圆为止,利用对称性画出其他剩下的圆部分即可。
三.实验环境
⑴ 硬件:PC机;
⑵软件:Windows操作系统、TurboC 3 。
四.算法描述及实验步骤
源代码;
#include"stdio.h"
#include"conio.h"
#include"graphics.h"
void Breseham_Cirrcle(int xc,int yc,int r,int color)
{
int x,y,d1,d2,direction,d;
x=0;y=r;
d=2*(1-r);
while(y>=0)
{
putpixel(xc+x,yc+y,color);
putpixel(xc-x,yc+y,color);
putpixel(xc-x,yc-y,color);
putpixel(xc+x,yc-y,color);
if(d<0)
{
d1=2*(d+y)-1;
if(d1<=0)direction=1;
else direction=2;
}
else if(d>0)
{
d2=2*(d-x)-1;
if(d2<=0)direction = 2;
else direction=3;
}
else direction=3;
switch (direction)
{
case 1:x++;d+=2*x+1;break;
case 2:x++;y--;d+=2*(x-y+1);break;
case 3:y--;d+=-2*y+1;break;
}
}
}
int main()
{
int i,gdriver,gmode;
gdriver=DETECT;
initgraph(&gdriver,&gmode,"C:\\TurboC3\\bgi");
Breseham_Cirrcle(180,200,100,30);
getch();
closegraph();
return 0;
}五 调试过程
调试过程无错误
六.运行结果

七 总结
通过本次实验我了解以及熟悉了中点划圆算法的原理,通过算法能够顺利的画出圆形。不过对于算法和程序还是不是很熟,还需要进一步的加强!!
福建农林大学计算机与信息学院实验报告
实验名称:直线段的裁剪
一. 实验目的和要求:
1) 认识什么是边框,如何在边框中裁剪一条直线
2) 了解并掌握在一个在一个边框中裁剪直线段的原理。
3) 正确的裁剪出符合要求的直线段。
二.实验内容和原理:
1)实验原理:采用区域编码来求直线段与窗口的交点,从而裁剪出在窗口中的那部分线段。
2)实验内容:
1对条直线段的两个端点p1, p2分别进行编码code1,code2 。
2 code1 |code2 = 0,则保留直线段,对其进行显示。
3 code1 &code2  0,对直线段进行放弃。
4上述两个条件不成立则对直线段和窗口求交点。
三.实验环境
⑴ 硬件:PC机;
⑵软件:Windows操作系统、Visual C++ 6.0 。
四.算法描述及实验步骤
1)算法描述:
1输入直线段的两端点p1(x1,y1), p2(x2,y2)以及窗口的四条边界坐标wyt,wyb,wxl,wxr;
2对p1,p2进行编码,p1的编码为code1,p2的编码为code2.
3 code1 |code2 = 0,对直线段应保留,转6,否则,若code1 &code2 0,对直线段可放弃,转7;当上述条件均不满足时,转4.
4确保p1在窗口外部;若p1在窗口内部,则交换p1和p2的坐标值和编码值
5按左右上下的顺序求出直线段和窗口边界的交点,并利用该交点的坐标值替换p1的坐标值。也即在交点S处把线段一分为二,并去掉p1S这一段。
6用直线扫描转换算法画出当前的直线段p1 p2。
(2)源代码:
#include "stdio.h"
#include <graphics.h>
#include <conio.h>
#include <math.h>
//按照上下右左的顺序对方向进行编码
#define LEFT 1
#define RIGHT 2
#define TOP 8
#define BOTTOM 4
struct point
{
double x, y;
};
//颜色设计
int boundaryColor = WHITE;
int backColor = BLACK;
int fillColor = GREEN;
int left, right, top, bottom;
//打印直线
void printLine(point begin, point end, int color)
{
setcolor(color);
int x1,y1,x2,y2;
x1 = begin.x + 0.5;
y1 = begin.y + 0.5;
x2 = end.x + 0.5;
y2 = end.y + 0.5;
line(x1,y1,x2,y2);
}
//初始化画板
void init()
{
int gdriver,gmode;
gdriver = DETECT;
gmode = 0;
setbkcolor(backColor);
initgraph(&gdriver, &gmode, "");
}
void inputBoundary()
{
freopen("k:\\line.in","r",stdin);
scanf("%d%d%d%d", &top, &bottom, &left, &right);
setcolor(boundaryColor);
rectangle(left, top, right, bottom);
}
int code(point p)
{
int c = 0;
if(p.x < left)
c += LEFT;
else if(p.x > right)
c += RIGHT;
if(p.y < top)
c += TOP;
else if(p.y > bottom)
c += BOTTOM;
return c;
}
double gety(point begin, point end, int type)
{
return begin.y +
(end.y - begin.y) * (type - begin.x) / (end.x - begin.x);
}
double getx(point begin, point end, int type)
{
return begin.x +
(end.x - begin.x) * (type - begin.y) / (end.y - begin.y);
}
void cohen(point begin, point end)
{
int beginCode = code(begin);
int endCode = code(end);
while(beginCode | endCode)
{
if((beginCode & endCode) != 0)
{
return;
}
int c;
if(beginCode != 0)
c = beginCode;
else
c = endCode;
point tmp;
if(c & LEFT)
{
tmp.y = gety(begin, end, left);
tmp.x = left;
}
else if(c & RIGHT)
{
tmp.y = gety(begin, end ,right);
tmp.x = right;
}
else if(c & TOP)
{
tmp.x =getx(begin, end, top);
tmp.y = top;
}
else if(c & BOTTOM)
{
tmp.x = getx(begin, end, bottom);
tmp.y = bottom;
}
if(beginCode != 0)
{
begin = tmp;
beginCode = code(begin);
}
else
{
end = tmp;
endCode = code(end);
}
}
printLine(begin, end, fillColor);
}
void DDD(point begin, point end)
{
if(fabs(begin.x - end.x) < 0.1)
return;
int beginCode = code(begin);
int endCode = code(end);
if((beginCode | endCode) == 0)
{
printLine(begin, end, fillColor);
return;
}
if(beginCode & endCode)
{
return;
}
point mid;
mid.x = (begin.x + end.x) / 2;
mid.y = (begin.y + end.y) / 2;
DDD(begin,mid);
DDD(mid,end);
}
void test()
{
init();
inputBoundary();
point begin,end;
while(scanf("%lf%lf%lf%lf",&begin.x, &begin.y, &end.x, &end.y) == 4)
{
printf("裁剪前:\n");
printLine(begin, end, WHITE);
getch();
printf("裁剪后:\n");
cohen(begin, end);
getch();
}
}
int main()
{
test();
return 0;
}
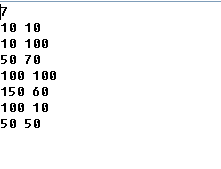
(3)输入文件

五 调试过程
调试过程无错误
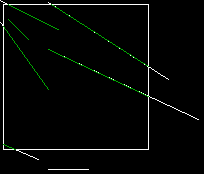
六.运行结果
剪裁前的:

剪裁后的:
七.总结
通过本次实验我学会了如何在边框中剪裁出一条直线,掌握了从边框中剪裁一条直线的原理。
福建农林大学计算机与信息学院实验报告
实验名称:多边形的填充
一 .实验要求和目的
1)认识多边形扫描转换,认识并掌握逐点判断算法,扫描线算法,边界标志算法等的实现及优缺点。
2)理解什么是四连通区域和八连通区域。理解并掌握一种多边形填充的原来及其实现。
二.实验内容和原理:
扫描线种子填充算法:
1)原理:给定种子点 时,首先填充种子点所在扫描线上的位于给定区域的一个区段,然后确定与这一区域相连通的上下扫描线上位于给定区域内的区段,并保存下来,直到填充结束。
三.实验环境
⑴ 硬件:PC机;
⑵软件:Windows操作系统、Visual C++ 6.0 。
四.算法描述及实验步骤
1)算法描述
1 将栈置空,将种子点入栈
2 如果栈是空的则结束,否则取栈顶元素,并且以 作为当前的扫描线
③ 填充并确定种子点所在的区段:从种子点出发,沿着当前扫描线像左右两个方向填充,直到边界,然后分别标记 。
。
④确定新的种子点,在区间[]中检查与当前扫描线上下两条扫描线上的像素,如果存在非边界,未填充的像素,则把每一个区间的最右像素作为种子点压入栈中,返回第2步。
(2)源代码:
#include<stdio.h>
#include<stdlib.h>
#include<graphics.h>
#include<conio.h>
struct point
{
int x,y;
}stack[500];
int top;
int oldColor = BLACK;
int newColor = WHITE;
int boundaryColor = WHITE;
struct polygon
{
int num;
point vertex[10];
};
void printLine(point a,point b,int color);
void init();
polygon inputPolygon();
void printPolygon(polygon p);
void printLine(point a,point b,int color)
{
setcolor(color);
line(a.x,a.y,b.x,b.y);
}
void init()
{
int gdriver,gmode;
gdriver = DETECT;
gmode = 0;
initgraph(&gdriver, &gmode, "");
}
void printPolygon(polygon p)
{
int i;
for(i = 1; i < p.num; i++)
{
printLine(p.vertex[i],p.vertex[i + 1],boundaryColor);
}
printLine(p.vertex[1],p.vertex[p.num],boundaryColor);
}
polygon inputPolygon()
{
polygon p;
int i;
printf("input polygon edge number\n");
scanf("%d",&p.num);
printf("input all vertex one by one\n");
for(i = 1; i <= p.num; i++)
{
scanf("%d%d",&p.vertex[i].x,&p.vertex[i].y);
}
return p;
}
int fillLeft(point pt)
{
pt.x;
while(getpixel(pt.x,pt.y) == oldColor)
{
putpixel(pt.x,pt.y,newColor);
pt.x--;
}
return pt.x + 1;
}
int fillRight(point pt)
{
pt.x++;
while(getpixel(pt.x,pt.y) == oldColor)
{
putpixel(pt.x,pt.y,newColor);
pt.x++;
}
return pt.x - 1;
}
void findSeed(point stack[],point pt,int xr)
{
bool scanNeedFill = false;
int x = pt.x;
int y = pt.y;
while(x <= xr)
{
while(getpixel(x,y) == oldColor)
{
scanNeedFill = true;
x++;
}
if(scanNeedFill == true)
{
pt.x = x - 1;
pt.y = y;
stack[++top] = pt;
scanNeedFill = false;
}
while(getpixel(x,y) != oldColor && x <= xr)
x++;
}
}
void scanLineFill(int x, int y)
{
int xl ,xr ,i;
bool scanNeedFill;
point pt,tmp;
top = 0;
pt.x = x;
pt.y = y;
//入栈①
stack[++top] = pt;
while(top) //②
{
pt = stack[top--];
xl = fillLeft(pt);
xr = fillRight(pt);
tmp.x = xl;
tmp.y = pt.y + 1;
findSeed(stack,tmp,xr);
tmp.y = pt.y - 1;
findSeed(stack,tmp,xr);
}
}
void main()
{
init();
freopen("k:\\graph.in","r",stdin);
printPolygon(inputPolygon());
getch();
scanLineFill(50, 60);
getch();
}
(3)输入文件:
五.编译过程
编译过程无错误
六.实验结果
初始图形:

上半部颜色填充:


下半部颜色填充:


七.总结
通过本次实验我掌握了扫描线种子填充算法,掌握了逐点判断算法,扫描线算法,边界标志算法等的实现及优缺点。