“施露白微笑工作室”创始人名噪华中牙医界的美白女王杜宇博士20##年与国际私人牙医连锁“维特恩齿科”携手,并整合来自欧美和韩国的齿科博士、教授等全球顶尖美牙技术专家,开创华中地区首家“五星级会所式专业私人牙医机构”维特恩私人牙医会所,全套引进包括华中首台芬兰产全数字化CT的齿科先进设备,率先采用欧盟齿科标准,会所式诊疗环境、菜单式专家预约、1对1私人诊疗、建立私人口腔档案等服务举措,在延续施露白美白奇迹的同时,再次颠覆传统牙科服务理念,首次为美白客户提供更全面完善的美牙方案,在华中区掀起专业贴身的高端齿科诊疗私密服务尊荣新理念。
施露白完美搭配惊艳妆容
迎圣诞新年入会有礼
施露白英国皇家御用牙齿美白权威科技携手维特恩全球高端私人牙医品牌,2012岁末浓情巨献,重磅推出圣诞限量惊艳容妆大礼活动,凡12月11日-20日加入“维特恩-施露白”皓齿会籍均可获赠价值2080元的牙齿美白养护SPA与Guerlain娇兰彩妆。
特别提示:请您务必来电预约您的诊疗时间!
我们拥有目前最舒适专业的牙椅,但为了确保您享受到国际一流齿科的服务,轻松接受舒适的牙齿美白治疗,请原谅我们一天只接待不超过10位客人到店。所以,务必请您先来电跟您的专属咨询师预约安排您的诊疗时间,也省去您的等待之忧!
联手国际私人牙医连锁“维特恩齿科” 施露白2012重磅升级
“牙本质美白+隐形贴面”掀起美牙新风尚
完美解决四环素牙反复着色、牙齿表面不平整光洁等问题,
完美实现“立即白、健康白、持久白”
英国专业牙齿美白机构“施露白微笑工作室”武汉专门店风行五载,重磅升级,再掀江城牙齿美白新浪潮。
20##年,全新升级的施露白携手国际私人牙医连锁机构“维特恩齿科”,正式成为维特恩齿科旗下美容齿科王牌合作品牌,并结合国际先进的“全无损原生态隐形钻石贴面”技术,为四环素牙等顽固性牙齿着色及牙釉质缺损等问题找到了牙齿美白的完美解决方案。
全新的维特恩完美美牙方案共分两步:
第一步:
英国皇家施露白女王级御用美白
解决牙齿着色问题
英国施露白“热光无痛快速牙本质美白”技术,经过欧盟CE认证,拥有6项国际专利,其有效性和安全性已经获得全球最高权威牙科联合会IADR认证,并不断与欧洲最新牙齿美白科技保持同步更新,立即白、健康白、持久白的1小时快速无痛神奇美白,解决全球牙医公认的美白效果、持久性、敏感等三大难题,显著改善四环素牙、氟斑牙、黄牙着色问题,为欧美明星政要之美牙首选,在中国已经逾万名尊贵客户亲身验证。
第二步:
全无损原生态隐形钻石贴面
解决牙齿表面缺损与光滑平整问题
无痛,无损,快速。仅有传统贴面厚度的1/10(0.1-0.2mm),与隐形眼镜相差无几。不磨牙,零伤害,薄如蝉翼的造型轻巧美观,轻松遮盖传统贴面不易遮盖的较深度牙齿异色。超级强韧的材质、独一无二的抗折裂性能,精度更高,性能稳定,生物相容性极佳,成为国际明星追捧的最新美牙标杆。


美白前 美白后
第二篇:“日文版Buffalo WZR-HP-G300NH ”刷DD-WRT、OpenWRT及其他原厂中文版本、欧版、美版的完美方案
本文的版权属于Kevin Cave
“日文版Buffalo WZR-HP-G300NH ”刷DD-WRT、
OpenWRT及其他原厂中文版本、欧版、美版的完美方案
针对“日文版Buffalo WZR-HP-G300NH ”路由器不能刷中文版本、欧版、美洲版,不能刷DD-WRT、不能刷OpenWRT,来自UK的Kevin Cave通过实践,解析其原因,20xx年底即已经给出了完善解决方案!
掌握了本教程,可以一窥U-Boot的精髓,针对其他的Buffalo系列路由不能“自由刷”的问题也许可以举一反三,诸君自行尝试吧!
转发此文的目的,主要是因为国外的网站打开比较困难,放到这里方便大家随时查看,以便对照操作!
原文在这儿:
http://scarygliders.net/2010/02/23/hacking-around-the-japanese-buffalo-wzr-hp-g300n/
本文的版权毫无疑问属于Kevin Cave
Hacking around the Japanese Buffalo WZR-HP-G300NH
By Kevin Cave, on February 23rd, 2010
(2010-12-09 Now unstuck this page because I plan to overwrite with Openwrt – will publish a writeup about this).
UPDATE 2010-09-17 : look in comments for serial port pinouts?
UPDATE 2010-10-02 : A reader of this site has discovered what to set in the environment variables which tells the Japanese firmware to accept ANY alternate firmware upgrade! Thanks to “Zgembo”! See comments for details.
Please note before embarking on this adventure;
1) Opening your router’s casing instantly makes your warranty go *POFF*.
2) This is a reasonably technical article – if you don’t know how to solder cables to motherboards, don’t know how to set up a tftp server, don’t know what a terminal emulator is, can’t google to find out – then this article is not for you – it’s for people who are able to do what I’ve done and can understand what is going on. However, if you wish
本文的版权属于Kevin Cave
to learn, and know you will be capable of finding out how those tasks above are done, read on 8)
3) I take absolutely NO responsibility for any harm you may do to your hardware. None. Zip. Nada. What I outline here worked for me and still does. If you managed to burn down your house, or melt the Arctic ice cap, or flood your continent with the oceans, or any other disaster, then it was your fault for trying this and not mine. I didn’t ask you to, and this is for information purposes only for those interested.
So impressed was I with the specifications of this router that I just had to get it – even before I knew whether I could run alternate firmware on it or not – but I assumed that I would be able to. So having returned home with prized router in hand I proceeded to unpack it, plug it in and set it up.
I’m from the UK, but I now live and work in Japan. I’ve been studying Japanese for more than 2 years but I’m really not that cut out to learn the language – too many other interesting things to do – like tinker with shiny new hardware for example.
So the router powers up, and I get to its configuration page. Ugh. Default Buffalo firmware (of course). Not only that, it’s in Japanese (it being the Japanese model of course) but not only that no option to set it to English. How considerate – not.
Question to the router manufacturers? WHY IS YOUR STOCK FIRMWARE ALWAYS SO AWFUL!?!?! Ok, lets see if there’s dd-wrt support for it yet. Oh, a .tftp binary has been released for this model! Good. Oh it’s still a Work In Progress release (i.e. may contain many
show-stopping bugs) but what the heck I’ll just upgrade the thing anyway because surely anything is better than the dreck which is lurking inside this router!
Downloaded, ok let’s follow the upgrade instructions – which are to power the router off, configure an ethernet port to 192.168.11.2, then run tftp, prepare that to send the image to 192.168.11.1, power up the router, send the image and them WHAMMO you have a nice shiny router with dd-wrt running on it and all my problems are over!
THINK AGAIN! “Hmm. This firmware is not installing. How? annoying.” After the umpteenth time performing this operation, it was time to go onto the dd-wrt forums and start asking questions. After about a week of that, and getting very little progress (I was still giving the Japanese Bufallo firmware blank stares), it was Time To Take Matters Into My Own Hands. So, here’s the skinny on this Japanese model router. OK first thing I need is a serial console – how do I do that? There’s no serial interface on the unit I can simply plug into and go. There is however a serial interface on the motherboard – but its TTL level (3.3 volts) so I’d need to either build a TTL-serial converter circuit OR, and this is the nifty thing – I could by a conveniently available USB to TTL serial cable. Which has all the necessary electronics packed into the USB head, and the other end has 5 wires which I can use to solder onto the relevent motherboard connections.
本文的版权属于Kevin Cave
That was that problem solved. So, armed with Ubuntu, a USB-TTL serial cable wired to the motherboard, and my knowledge, I decided to have a poke around the unit?
Preamble and prerequisite:
This section describes what I found out about why dd-wrt would not install on the Japanese WZR-HP-G300N. The sections after this one describe in detail how to get to the u-boot console and get the firmware installed. Note that since Brainslayer of dd-wrt has been working on the Japanese models, he has now been able to produce dd-wrt images which can be upgraded from the Buffalo web interface. This article is for those who like me, like tinkering at the console of these devices – or who have managed to somehow brick their router and who’s only way of getting the firmware installed is by using this method. What you will need to do is have your own tftp server ready with the various firmware images you wish to transfer to the router for upgrading/testing/hacking.
A week or so ago a dd-wrt image for a WIP version for the WZR-HP-G300NH was available for download. Many WZR users could use this to upgrade their non-JP WZR’s via tftp. I and others could not on our JP models.
Buffalo Japan seems to have altered the version of u-boot they provide on the JP WZR’s so that even though it’ll TFTP an image file down from your PC or laptop, it’ll just jump straight to the existing firmware after at that and boot that up. Obviously to prevent nasty people like me from using non-Buffalo firmware 8)
During my tinkering, I managed to get into the u-boot console prompt and could experiment with the image files I had – Buffalo images and the dd-wrt image.
Via u-boot, I could use its tftpboot command to transfer a firmware image from a tftp server to a temp area of the unit’s memory, 0x81f00000. Using u-boot’s iminfo command I could then see what u-boot thought of the image – good or bad – and found something interesting. u-boot thought the dd-wrt image mentioned above had a bad magic number: ar7100> tftpboot 81f00000 dd-wrt-wzrg300nh-firmware-ORIG.tftp
Trying eth0
eth0 is duplex
ag7100_check_link: _100BASET
Using eth0 device
TFTP from server 192.168.11.2; our IP address is 192.168.11.1
Filename ‘dd-wrt-wzrg300nh-firmware-ORIG.tftp’.
本文的版权属于Kevin Cave
Load address: 0x81f00000
Loading: ################################################################# ################################################################# ################################################################# ################################################################# ################################################################# ################################################################# ################################################################# ################################################################# ################################################################# ################################################################# ################################################################# ################################################################# ################################################################# ################################################################# ################################################################# ################################################################# ################################################################# ################################################################# ################################################################# ################################################################# ################################################################# ################################################################# ################################################################# ################################################################# ################################################################# ################################################################# ################################################################# ################################################################# ################################################################# ################################################################# ################################################################# ################################################################# ################################################# done
Bytes transferred = 10895392 (a64020 hex)
ar7100> iminfo
## Checking Image at 81f00000 ? Bad Magic Number
ar7100>
本文的版权属于Kevin Cave
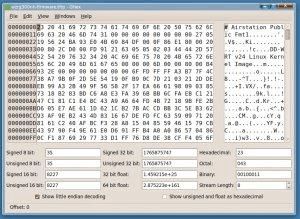
dd-wrt tftp image file opened in Ghex
“Interesting.”, I thought. “Why would that be?”, I wondered. A bit of googling later and I found the answer. The problem is u-boot is looking for a sequence of bytes at the beginning of the file – the magic number – but in this case is not finding it. So I open up the dd-wrt tftp image file with a hex editor (Ghex on ubuntu)?

Magic number appears after the blurred out tex
The dd-wrt tftp image has a header in front of this magic number which is confusing u-boot. The sequence of bytes of the Magic Number is : 27 05 19 56, which on that dd-wrt is located at offset 0×20. I have blurred out the sequence of bytes before the magic number in the hext image:
本文的版权属于Kevin Cave
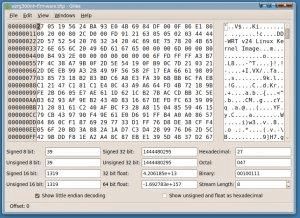
End result of removing the bytes before the magic number.
Using the hex editor place the cursor over the 2 of the 27 and use Backspace to remove all the bytes before that sequence:
Save the file under a new filename. Now I have a dd-wrt image file which has the magic number right at the start of the file. I transferred the edited image from my tftp server and verified the image: ar7100> iminfo
## Checking Image at 81f00000 ?
Image Name: DD-WRT v24 Linux Kernel Image
Created: 2010-02-03 14:14:55 UTC
Image Type: MIPS Linux Kernel Image (lzma compressed)
Data Size: 1017569 Bytes = 993.7 kB
Load Address: 80002000
Entry Point: 802cd000
Verifying Checksum ? OK
ar7100>
This looks much better! So now we have a dd-wrt image file which looks good – keep that file for later – we’ll need it.
To summarise, basically, if you want the Buffalo Japan-provided u-boot loader to recognise your firmware image of choice, the firmware image needs to start with the magic number sequence mentioned above in order for the firmware image to be recognised. This works for that dd-wrt image AND also the OpenWRT images they’re now producing for the WZR-HP-G300NH. OK, here’s the main procedure, now that we have an image file which the JP u-boot will use:
1) Serial console required
本文的版权属于Kevin Cave
Wire up a serial terminal to the WZR’s motherboard using a USB<—>TTL 3.3V serial cable. This gains you access to the serial console of the WZR where you can perform the magic. These cables can be bought from somewhere like RS Components. There are also cellphone cables available which do the same thing. Google is your friend.
2) Terminal emulator and u-boot console command prompt
From the terminal emulator of your choice (I’m using minicom configured for /dev/ttyUSB0 at 115200,8,N,1), watch the console messages as you power the WZR on. The power up sequence looks like this: BUFFALO U-BOOT Ver 1.02
AP83–539 (ar9100) U-boot 0.0.12
64 MB
Memory Test (address line)
Memory Test start(0×00000000) end(0×04000000) size(67108864)
Data line test start:0×00000000 pattern 0×00000001 0×00000003 0×00000007 0x0000000F 0×00000005 0×00000015 0×00000055 0xAAAAAAAA
Address line test start:0×00000000 len:0×4000000 pattern 0xAAAAAAAA 0×55555555 Fill test patnum:5
fill Pattern 5555AAAA Writing? Reading?
fill Pattern AAAA5555 Writing? Reading?
fill Pattern 0000FFFF Writing? Reading?
fill Pattern FFFF0000 Writing? Reading?
fill Pattern AAAAAAAA Writing? Reading?
Top of RAM usable for U-Boot at: 84000000
Reserving 250k for U-Boot at: 83fc0000
Reserving 256k for malloc() at: 83f80000
本文的版权属于Kevin Cave
Reserving 44 Bytes for Board Info at: 83f7ffd4
Reserving 36 Bytes for Global Data at: 83f7ffb0
Reserving 128k for boot params() at: 83f5ffb0
Stack Pointer at: 83f5ff98
Now running in RAM – U-Boot at: 83fc0000 Dev ID2:2222
Name: AMD-SPANSION Flash id: 0x1227E, Size: 33554432 bytes.
Flash: 32 MB In: serial Out: serial Err: serial
Memory Test uboot use 83F5FFB0 – 84000000
Memory Test start(80000000) end(83F00000) size(03F00000) Pattern 00000000 Writing? Reading?
Memory Test OK
### buf_ver=[1.02] U-Boot Ver.=[1.02]
### build_date(env)=[Feb 16 2009 - 10:47:08] build_date(bin)=[Feb 16 2009 - 10:47:08] ag7100_enet_initialize?
: cfg1 0xf cfg2 0×7114
rtl8366sr_phy_setup eth
Unit=0 Realtek 8366SR
switch ID 0×8366 Realtek
Greeen Ethernet Setup
eth0: 02:aa:bb:cc:dd:1a
eth0 up : cfg1 0xf cfg2 0×7114
eth1: 02:aa:bb:cc:dd:1a
eth1 up
eth0 02:AA:BB:CC:DD:1A
, eth1 02:AA:BB:CC:DD:1A
Trying eth0
本文的版权属于Kevin Cave
eth0 is duplex
ag7100_check_link: _100BASET dup 1 speed 100
CFG_PLL_FREQ=5
CFG_HZ=bebc200
cpu pll=1050 eth pll=1032
eth0 clk pll=13000a44
eth0 mii=12
eth0 cfg1=f
eth0 cfg2=7115 eth0 fcfg_0=1d1f00
eth0 fcfg_1=7ff0000
eth0 fcfg_2=fff
eth0 fcfg_3=780008
eth0 fcfg_4=3ffff
eth0 fcfg_5=3ffff
3) Quickly interrupt u-boot at the tftp stage
It is when you see the following that you must press CTRL-C!!
tftp server(receive) go, waiting:4[sec]
Trying eth1 eth1 link down FAIL
Trying eth0 eth0 is duplex
ag7100_check_link: _100BASET
本文的版权属于Kevin Cave Load address: 0x81f00000
Then you’ll get this: Abort no file was loaded.
### main_loop entered: bootdelay=4
### main_loop: bootcmd=”bootm 0x81f00000″ Hit any key to stop autoboot: 0
Hit CTRL-C again at this point! The router will then stop the boot sequence and enter the u-boot console, which is where you have complete control over what you can do with the router :)
ar7100>
While we’re at the u-boot console prompt, let’s take a look at the u-boot environment variables, because that gives us a lot of useful information about how Buffalo has configured this router. We do this by using the printenvcommand as shown below? ar7100> printenv
bootargs=console=ttyS0,115200 root=31:03 rootfstype=jffs2 init=/sbin/init
mtdparts=ar9100-nor0:256k(u-boot),128k(u-boot-env),1024k(uImag)
bootdelay=4
baudrate=115200
ethaddr=02:AA:BB:CC:DD:1A
tmp_ram=81F00000
tmp_bottom=83F00000
fw_eaddr=BE060000 BFFDFFFF
uboot_eaddr=BE000000 BE03FFFF
u_fw=erase $fw_eaddr; cp.b $fileaddr BE060000 $filesize; bootm BE060000;
ut_fw=tftp $tmp_ram firmware.bin; erase $fw_eaddr; cp.b $fileaddr BE060000 $filesize; bootm BE060000;
ut_uboot=tftp $tmp_ram u-boot.bin; protect off $uboot_eaddr; erase $uboot_eaddr; cp.b $fileaddr BE000000 $filesize;
本文的版权属于Kevin Cave
melco_id=RD_BB08009
hw_rev=0
tftp_wait=4
uboot_ethaddr=02:AA:BB:CC:DD:1A
DEF-p_wireless_ath0_11bg-authmode=psk DEF-p_wireless_ath0_11bg-crypto=tkip+aes
DEF-p_wireless_ath0_11bg-authmode_ex=mixed-psk custom_id=0
buf_ver=1.02
build_date=Feb 16 2009 – 10:47:08
pincode=51560850
DEF-p_wireless_ath0_11bg-wpapsk=0bm5ujdb4d884 buf_crc=22625AFC
mtdids=nor0=ar9100-nor0
bootcmd=bootm 0x81f00000
region=JP
bootm=0xbe060000
ipaddr=192.168.1.99
serverip=192.168.1.9
stdin=serial
stdout=serial
stderr=serial
loadaddr=81F00000
ethact=eth0
Environment size: 1160/131068 bytes
本文的版权属于Kevin Cave ar7100>
Note a couple of things about the about listing of the u-boot environment variables? ipaddr=192.168.1.99
serverip=192.168.1.9
The DEFAULT values for these are ipaddr=192.168.11.1 and serverip=192.168.11.2. Those are for when u-boot tries to get a firmware image via tftp as outlined on the dd-wrt web pages. They’re also used for when you’re telling u-boot to tftp an image from your tftp server. I changed those values using the following command sequence: ar7100> setenv ipaddr 192.168.1.99
ar7100> setenv serverip 192.168.1.9
ar7100>
I then made those changes permanent with: ar7100> saveenv
Saving Environment to Flash?
Protect off BE040000 ? BE05FFFF
Un-Protecting sectors 2..2 in bank 1
Un-Protected 1 sectors
Erasing Flash?
Erase Flash from 0xbe040000 to 0xbe05ffff in Bank # 1 First 0×2 last 0×2
100%
Erased 1 sectors
Writing to Flash?
100%
done
Protecting sectors 2..2 in bank 1
Protected 1 sectors
ar7100>
本文的版权属于Kevin Cave
Also,
bootm=0xbe060000
Memory location be060000 is where the WZR has its firmware it boots from permanently stored. tmp_ram=81F00000
tmp_bottom=83F00000
fw_eaddr=BE060000 BFFDFFFF
tmp_ram is where u-boot will download tftp’d images to. fw_eaddr is the area of flash memory which u-boot will erase before copying any tftp’ed images to.
4) Transfer the edited dd-wrt file from your tftp server to WZR temporary memory area
You need to set up a tftp server on your PC to do this. It’s not difficult to do and again search Google on how to do this. Google really is your friend ;) I named my dd-wrt image “wzrg300nh-firmwareM.tftp” in my example. (M == modified). ar7100> tftpboot 81f00000 wzrg300nh-firmwareM.tftp
Trying eth0
eth0 is duplex
ag7100_check_link: _100BASET
Using eth0 device TFTP from server 192.168.11.2; our IP address is 192.168.11.1 Filename ‘wzrg300nh-firmwareM.tftp’.
Load address: 0x81f00000
Loading: #################################################################
#################################################################
#################################################################
#################################################################
#################################################################
本文的版权属于Kevin Cave
#################################################################
################################################################# #################################################################
#################################################################
#################################################################
#################################################################
#################################################################
#################################################################
#################################################################
#################################################################
#################################################################
#################################################################
#################################################################
#################################################################
#################################################################
#################################################################
#################################################################
#################################################################
################################################# done Bytes transferred = 10895360 (a64000 hex)
Take a note of where it says:
Bytes transferred = 10895360 (a64000 hex)
It will be a different number if the image size is different. You need that hex number for the copy procedure. VERIFY YOUR IMAGE!
ar7100> iminfo
## Checking Image at 81f00000 ?
Image Name: DD-WRT v24 Linux Kernel Image
Created: 2010-02-03 14:14:55 UTC
Image Type: MIPS Linux Kernel Image (lzma compressed)
本文的版权属于Kevin Cave
Data Size: 1017569 Bytes = 993.7 kB
Load Address: 80002000
Entry Point: 802cd000
Verifying Checksum ? OK
ar7100>
If you see anything other than the above then you either transferred the wrong image or your have not corectly edited the image so that the header starts at the begining of the file. If so, then either transfer the image once more or re-edit an original dd-wrt tftp image file to make this the case, and then perform the tftp transfer once more.
5) Erase firmware area.
Before we copy, we need to clear the area of flash memory where the firmware is stored. This is done by the following:
ar7100> erase BE060000 BFFDFFFF This will wipe the area of flash memory. It will take a few minutes to do so be patient. Erase Flash from 0xbe060000 to 0xbffdffff in Bank # 1 First 0×3 last 0xfe
100%
Erased 252 sectors
ar7100>
Also, this will not wipe the flash memory where u-boot resides so don’t worry :)
6) Copy new firmware to the
firmware area
The next step is to copy that area of memory to where the default booting firmware is stored. Okay, so, we know we have downloaded the image to memory location 0x81f0000. On this model I have, the stored firmware resides at0xbe060000. I know this by looking at the u-boot environment variables which we did above by using the “printenv” command. Now we need to copy the tftp’ed image from the temporary area to the permanent firmware area. So, in my
本文的版权属于Kevin Cave
case, I need to copy a64000 bytes of memory from temporary ram area 81f0000 to the firmware storage area be060000
. ar7100> cp.b 81f00000 be060000 a64000
Copy to Flash?
Copy 10895360 byte to Flash?
100%
done
ar7100>
Again this will take a few minutes to complete.
7) Reboot into your new firmware The moment you’ve been waiting for!
ar7100> bootm BE060000
And if you have done everything correctly you’ll get something like this: ## Booting image at be060000 ?
Image Name: DD-WRT v24 Linux Kernel Image
Created: 2010-02-03 14:14:55 UTC
Image Type: MIPS Linux Kernel Image (lzma compressed)
Data Size: 1017569 Bytes = 993.7 kB
Load Address: 80002000
Entry Point: 802cd000
Verifying Checksum ? OK
Uncompressing Kernel Image ? OK
No initrd
## Transferring control to Linux (at address 802cd000) ?
## Giving linux memsize in bytes, 67108864
Starting kernel ?
Linux version 2.6.24.111 (root@dd-wrt) (gcc version 4.3.3 (GCC) ) #665 Wed Feb 3 15:00:08 CET 2010
flash_size passed from bootloader = 32
CPU revision is: 00019374
本文的版权属于Kevin Cave
booting platform Atheros AR9132 rev 2 (0xb9)
Determined physical RAM map:
memory: 04000000 @ 00000000 (usable)
Built 1 zonelists in Zone order. Total pages: 16256
Kernel command line: console=ttyS0,115200 root=1f02 rootfstype=squashfs
noinitrd init=/sbin/init
Primary instruction cache 64kB, physically tagged, 4-way, linesize 32 bytes.
Primary data cache 32kB, 4-way, linesize 32 bytes.
Synthesized TLB refill handler (20 instructions).
Synthesized TLB load handler fastpath (32 instructions).
Synthesized TLB store handler fastpath (32 instructions).
Synthesized TLB modify handler fastpath (31 instructions).
Cache parity protection disabled
PID hash table entries: 256 (order: 8, 1024 bytes)
Using 200.000 MHz high precision timer.
Dentry cache hash table entries: 8192 (order: 3, 32768 bytes)
Inode-cache hash table entries: 4096 (order: 2, 16384 bytes)
Memory: 61524k/65536k available (2347k kernel code, 3956k reserved, 508k data, 124k init, 0k highmem)
Mount-cache hash table entries: 512
NET: Registered protocol family 16
SCSI subsystem initialized
usbcore: registered new interface driver usbfs
usbcore: registered new interface driver hub
usbcore: registered new device driver usb
NET: Registered protocol family 2
Time: MIPS clocksource has been installed.
IP route cache hash table entries: 1024 (order: 0, 4096 bytes)
TCP established hash table entries: 2048 (order: 2, 16384 bytes)
TCP bind hash table entries: 2048 (order: 1, 8192 bytes)
TCP: Hash tables configured (established 2048 bind 2048)
TCP reno registered
gpio_proc: module loaded and /proc/gpio/ created
AR7100 GPIOC major 0
devfs: 2004-01-31 Richard Gooch (rgooch@atnf.csiro.au)
devfs: boot_options: 0×1
squashfs: version 3.0 (2006/03/15) Phillip Lougher
io scheduler noop registered
io scheduler deadline registered (default)
Serial: 8250/16550 driver $Revision: 1.90 $ 1 ports, IRQ sharing disabled
serial8250.0: ttyS0 at MMIO 0×0 (irq = 19) is a 16550A
console [ttyS0] enabled
PPP generic driver version 2.4.2
PPP Deflate Compression module registered
本文的版权属于Kevin Cave
PPP BSD Compression module registered
MPPE/MPPC encryption/compression module registered
NET: Registered protocol family 24
PPPoL2TP kernel driver, V1.0
IMQ starting with 2 devices?
IMQ driver loaded successfully.
Hooking IMQ before NAT on PREROUTING.
Hooking IMQ after NAT on POSTROUTING.
tun: Universal TUN/TAP device driver, 1.6
tun: (C) 1999-2004 Max Krasnyansky <maxk@qualcomm.com>
AG7100: Length per segment 1536
AG7100: Max segments per packet 1
AG7100: Max tx descriptor count 100
AG7100: Max rx descriptor count 252
AG7100: fifo cfg 3 00780008
rtl_chip_type_select:RTL8366SR
AG7100CHH: Mac address for unit 0
AG7100CHH: ff:ff:ff:ff:ff:ff
rtl_chip_type_select:RTL8366SR
AG7100CHH: Mac address for unit 1
AG7100CHH: ff:ff:ff:ff:ff:ff
FLASH ID: AMD-SPANSION SIZE: (32 MB)
scanning for root partition
found squashfs at 159000
Creating 7 MTD partitions on “ar9100-nor0″:
0×00000000-0×00060000 : “RedBoot”
0×00060000-0×01fc0000 : “linux”
0×00159000-0×00ae0000 : “rootfs”
mtd: partition “rootfs” doesn’t start on an erase block boundary — force read-only 0×00ae0000-0×01fc0000 : “ddwrt”
0×01fc0000-0×01fe0000 : “nvram”
0×01fe0000-0×02000000 : “board_config”
0×00000000-0×02000000 : “fullflash”
usbmon: debugfs is not available
ar71xx-ehci ar71xx-ehci.0: Atheros AR91xx built-in EHCI controller
ar71xx-ehci ar71xx-ehci.0: new USB bus registered, assigned bus number 1
ar71xx-ehci ar71xx-ehci.0: irq 3, io mem 0×1b000000
ar71xx-ehci ar71xx-ehci.0: USB 2.0 started, EHCI 1.00, driver 10 Dec 2004
usb usb1: configuration #1 chosen from 1 choice
hub 1-0:1.0: USB hub found
hub 1-0:1.0: 1 port detected
Initializing USB Mass Storage driver?
usbcore: registered new interface driver usb-storage
USB Mass Storage support registered.
本文的版权属于Kevin Cave
usbcore: registered new interface driver usbserial
drivers/usb/serial/usb-serial.c: USB Serial Driver core
Software Watchdog Timer: 0.07 initialized. soft_noboot=0 soft_margin=60 sec (nowayout= 0) GACT probability on
Mirror/redirect action on
Simple TC action Loaded
u32 classifier
Actions configured
Netfilter messages via NETLINK v0.30.
nf_conntrack version 0.5.0 (1024 buckets, 4096 max)
ctnetlink v0.93: registering with nfnetlink.
IPv4 over IPv4 tunneling driver
GRE over IPv4 tunneling driver
ip_tables: (C) 2000-2006 Netfilter Core Team
IPP2P v0.8.2 loading
ClusterIP Version 0.8 loaded successfully
TCP bic registered
TCP cubic registered
TCP westwood registered
TCP highspeed registered
TCP hybla registered
TCP htcp registered
TCP vegas registered
TCP scalable registered
NET: Registered protocol family 1
NET: Registered protocol family 17
Welcome to PF_RING 3.2.1
(C) 2004-06 L.Deri <deri@ntop.org>
NET: Registered protocol family 27
PF_RING: bucket length 128 bytes
PF_RING: ring slots 4096
PF_RING: sample rate 1 [1=no sampling]
PF_RING: capture TX No [RX only]
PF_RING: transparent mode Yes
PF_RING initialized correctly.
PF_RING: registered /proc/net/pf_ring/
802.1Q VLAN Support v1.8 Ben Greear <greearb@candelatech.com>
All bugs added by David S. Miller <davem@redhat.com>
decode 1f02
VFS: Mounted root (squashfs filesystem) readonly.
Mounted devfs on /dev
Freeing unused kernel memory: 124k freed
start service
starting Architecture code for ap83
本文的版权属于Kevin Cave
load ATH Ethernet Driver
configure eth0 to 00:1d:73:8f:4d:31
configure eth1 to 00:1d:73:8f:4d:31
ag7100_ring_alloc Allocated 1200 at 0×81104800
ag7100_ring_alloc Allocated 3024 at 0×803e3000
AG7100: cfg1 0×2f cfg2 0×7014
rtl8366sr_phy_setup ethUnit=0
Realtek 8366SR switch ID 0×8366
SP1000
phyUnit=0 is link
phyUnit=1 is lostlink
phyUnit=2 is lostlink
phyUnit=3 is lostlink
AG7100: unit 0 phy is up?RGMii 1000Mbps full duplex
AG7100: pll reg 0×18050014: 0×1e000100 AG7100: cfg_1: 0×7ff0000 AG7100: cfg_2: 0xfff
AG7100: cfg_3: 0×7803ff
AG7100: cfg_4: 0xffff
AG7100: cfg_5: 0xfefef
AG7100: done cfg2 0×7215 ifctl 0×0 miictrl 0×22
Writing 4
ag7100_ring_alloc Allocated 1200 at 0×83d2b000
ag7100_ring_alloc Allocated 3024 at 0×83c8f000
AG7100: cfg1 0×3f cfg2 0×7014
rtl8366sr_phy_setup ethUnit=1
phyUnit=4 is lostlink
Writing 6
load ATH 802.11 a/b/g Driver
load ATH 802.11n Driver
ath_mimo_hal: module license ‘Proprietary’ taints kernel.
ath_mimo_hal: 0.9.17.1 (AR5416, REGOPS_FUNC)
ath_ahb: 0.9.4.5 (Atheros/multi-bss)
ath_dfs: Version 2.0.0
Copyright (c) 2005-2006 Atheros Communications, Inc. All Rights Reserved wlan: 0.8.4.2 (Atheros/multi-bss)
wlan: mac acl policy registered
ath_rate_atheros: Version 2.0.1
Copyright (c) 2001-2004 Atheros Communications, Inc, All Rights Reserved ar5416CheckEepromDef: Read Magic = 0xFFFF
EEPROM being read from flash @0xbfff1000
need_swap = False.
Howl Revision ID 0xb9
dfs_init_radar_filters: dfs->dfs_rinfo.rn_numradars: 0
1Mbps 2Mbps 5.5Mbps 11Mbps
本文的版权属于Kevin Cave
1Mbps 2Mbps 5.5Mbps 11Mbps 6Mbps 9Mbps 12Mbps 18Mbps 24Mbps 36Mbps 48Mbps 54Mbps 1Mbps 2Mbps 5.5Mbps 11Mbps 6Mbps 9Mbps 12Mbps 18Mbps 24Mbps 36Mbps 48Mbps 54Mbps 0,1,2,3,4,5,6,7,8,9,10,11,12,13,14,15
1Mbps 2Mbps 5.5Mbps 11Mbps 6Mbps 9Mbps 12Mbps 18Mbps 24Mbps 36Mbps 48Mbps 54Mbps 0,1,2,3,4,5,6,7,8,9,10,11,12,13,14,15
1Mbps 2Mbps 5.5Mbps 11Mbps 6Mbps 9Mbps 12Mbps 18Mbps 24Mbps 36Mbps 48Mbps 54Mbps 0,1,2,3,4,5,6,7,8,9,10,11,12,13,14,15
wifi0: mac 20.0 phy 10.2 radio 13.0
wifi0: Use hw queue 1 for WME_AC_BE traffic
wifi0: Use hw queue 0 for WME_AC_BK traffic
wifi0: Use hw queue 2 for WME_AC_VI traffic
wifi0: Use hw queue 3 for WME_AC_VO traffic
wifi0: Use hw queue 8 for CAB traffic
wifi0: Use hw queue 9 for beacons
wifi0: Use hw queue 7 for UAPSD
wifi0: Atheros AR9100 WiSoC: mem=0xb80c0000, irq=2
br0: Dropping NETIF_F_UFO since no NETIF_F_HW_CSUM feature.
device br0 entered promiscuous mode
ag7100_ring_free Freeing at 0×81104800
ag7100_ring_free Freeing at 0×803e3000
ag7100_ring_alloc Allocated 1200 at 0×83d2b800
ag7100_ring_alloc Allocated 3024 at 0×803e3000
AG7100: cfg1 0×2f cfg2 0×7215
rtl8366sr_phy_setup ethUnit=0
phyUnit=0 is link
phyUnit=1 is lostlink
phyUnit=2 is lostlink
phyUnit=3 is lostlink
AG7100: unit 0 phy is up?RGMii 1000Mbps full duplex
AG7100: pll reg 0×18050014: 0×1e000100 AG7100: cfg_1: 0×7ff0000
AG7100: cfg_2: 0xfff
AG7100: cfg_3: 0×7803ff
AG7100: cfg_4: 0xffff
AG7100: cfg_5: 0xfefef
AG7100: done cfg2 0×7215 ifctl 0×0 miictrl 0×22
Writing 4
ag7100_ring_free Freeing at 0×83d2b800
ag7100_ring_free Freeing at 0×803e3000
ag7100_ring_alloc Allocated 1200 at 0×83cf3800
ag7100_ring_alloc Allocated 3024 at 0×803e3000
AG7100: cfg1 0×2f cfg2 0×7215
rtl8366sr_phy_setup ethUnit=0
phyUnit=0 is link
phyUnit=1 is lostlink
本文的版权属于Kevin Cave
phyUnit=2 is lostlink
phyUnit=3 is lostlink
AG7100: unit 0 phy is up?RGMii 1000Mbps full duplex
AG7100: pll reg 0×18050014: 0×1e000100 AG7100: cfg_1: 0×7ff0000 AG7100: cfg_2: 0xfff
AG7100: cfg_3: 0×7803ff
AG7100: cfg_4: 0xffff
AG7100: cfg_5: 0xfefef
AG7100: done cfg2 0×7215 ifctl 0×0 miictrl 0×22
Writing 4
device eth0 entered promiscuous mode
sh: ead: not found
sh: can’t create /proc/sys/dev/wifi0/pollingmode: nonexistent directory sh: can’t create /proc/sys/dev/wifi0/maxvaps: nonexistent directory ath_numswbaperbc = 4(1)adj=51200
ath0
Invalid command : maxassoc
Invalid command : wdssep
device ath0 entered promiscuous mode
br0: port 2(ath0) entering learning state
br0: port 1(eth0) entering learning state
device br0 left promiscuous mode
device br0 entered promiscuous mode
device br0 left promiscuous mode
device br0 entered promiscuous mode
Ethernet Channel Bonding Driver: v3.1.3 (June 13, 2007)
bonding: MII link monitoring set to 100 ms
alarmpacket: bind: No such file or directory
device eth1 entered promiscuous mode
device eth1 left promiscuous mode
br0: topology change detected, propagating
br0: port 2(ath0) entering forwarding state
br0: topology change detected, propagating
br0: port 1(eth0) entering forwarding state
SIOCGIFFLAGS: No such device
SIOCGIFFLAGS: No such device
SIOCGIFFLAGS: No such device
SIOCGIFFLAGS: No such device
SIOCGIFFLAGS: No such device
SIOCGIFFLAGS: No such device
SIOCGIFFLAGS: No such device
nvram was changed, needs commit, waiting 10 sec.
etherip: Ethernet over IPv4 tunneling driver
The Milkfish Router Services
本文的版权属于Kevin Cave
ERROR: Necessary service setting not found: milkfish_username – aborting.
The Milkfish Router Services
Restoring SIP ddsubscriber database from NVRAM?
Empty.
The Milkfish Router Services
Restoring SIP ddaliases database from NVRAM?
Empty.
Freeing node: 00:1d:73:8f:4d:31
ic->ic_cwm.cw_width :0, ic->ic_cwm.cw_extoffset: 0
And there you have it. You had bricked your Japanese WZR-HP-G300N and now you have managed to install DD-wrt using the tftp image and a few u-boot commands. This procedure will also work for other firmware, like OpenWRT (And it the X-WRT project which makes a web front-end to OpenWRT). I hope this has been helpful!
Rate This Article
Rating: 9.1/10 (12 votes cast)
Hacking around the Japanese Buffalo WZR-HP-G300NH, 9.1 out of 10 based on 12 ratings Share the knowledge :
本文的版权属于Kevin Cave
Related posts:

79 comments to Hacking around the Japanese Buffalo WZR-HP-G300NH ? yaiba
2010/02/23 at 18:25 · Reply
Thanks you, it’s very helpful.
I have a question. How do you find the Magic Number 27 05 19 56?
All tftp firmware should begin with this?
o admin
2010/02/24 at 06:44 · Reply
I don’t know the exact meaning of your question, but I found that magic number mentioned in a dd-wrt post after a google search. Also, hex editors have a search function. I’m going to try and find out what that number is – my guess is it’s an ELF header, perhaps.
Lastly, I’m pretty sure al firmware images should have this – it’s just that the Buffalo ones are encrypted. ? Zgembo 2010/02/23 at 23:41 · Reply
hello there,
thanks for the guide on this, it may come handy? btw, have you tried changing “region=JP” parameter and checking if it would accept stock english firmware?
Could you please post serial cable pinouts for this board?
Regards,
Z
? Zgembo
本文的版权属于Kevin Cave
2010/02/24 at 13:05 · Reply
thanks for the useful information,
i was wondering if changing region code to english would enable flashing to english stock firmware?
btw, could you post serial pinouts for this board? ? admin
2010/02/25 at 07:24 · Reply
Zgembo :
thanks for the useful information,
i was wondering if changing region code to english would enable flashing to english stock firmware? btw, could you post serial pinouts for this board?
Sorry for my slow replies – I’ve been incapacitated due to an abcess and have been in a huge amount of pain for the last few days – this morning’s been the first time I’ve been pain-free so I’m all :D this morning ;)
You can change the region code. I changed it to US in order to try to convince the buffalo firmware to install the US version at one point, and yes it accepted the Bufallo US
version, BUT, it semi-bricked the unit in that yes, it would boot up, but the web pages became unavailable – which is why I had to hack deeper into the router and figure out how to get dd-wrt (or even OpenWRT) working on the thing :)
Serial port pinout:
pin1 : VCC +3.3V
pin2 : GND
pin3 : TX
pin4 : RX
NOTE you only need to connect up GND, TX, and RX – leave the Vcc unconnected – the serial circuitry on board is already powered from the motherboard. On your terminal emulator you’ll need to set it to 115200,8,N,1 with no hardware or software flow control.
Hope this helps.
? yaiba
2010/02/26 at 03:14 · Reply
admin :
Zgembo :
thanks for the useful information,
本文的版权属于Kevin Cave
i was wondering if changing region code to english would enable flashing to english stock firmware?
btw, could you post serial pinouts for this board?
Sorry for my slow replies – I’ve been incapacitated due to an abcess and have been in a huge amount of pain for the last few days – this morning’s been the first time I’ve been pain-free so I’m all this morning
You can change the region code. I changed it to US in order to try to convince the buffalo firmware to install the US version at one point, and yes it accepted the buffallo US version, BUT, it semi-bricked the unit in that yes it would boot up but the web pages became unavailable – which is why I had to hack deeper into the router and figure out how to get dd-wrt (or even OpenWRT) working on the thing
Serial port pinout:
pin1 : VCC +3.3V
pin2 : GND
pin3 : TX
pin4 : RX
NOTE you only need to connect up GND, TX, and RX – leave the Vcc unconnected – the serial circuitry on board is already powered from the motherboartd. On your terminal emulator you’ll need to set it to 115200,8,N,1 with no hardware or software flow control. Hope this helps. I changed region code from JP to EU (or US) and succeed flash to english stock firmware by using the revert firmware EU from BrainSlayer (dd-wrt).
I removed all the bytes before the Magic Number and used the psyphah’s method above. Now, i’m using english firmware EU 1.72. Use firmware dd-wrt, i have problem with PPPoE, i can’t access to internet.
? Zgembo
2010/03/07 at 15:50 · Reply
admin :
Zgembo :
thanks for the useful information,
i was wondering if changing region code to english would enable flashing to english stock firmware?
btw, could you post serial pinouts for this board?
Sorry for my slow replies – I’ve been incapacitated due to an abcess and have been in a huge amount of pain for the last few days – this morning’s been the first time I’ve been pain-free so I’m all this morning
You can change the region code. I changed it to US in order to try to convince the buffalo firmware to install the US version at one point, and yes it accepted the buffallo US version, BUT, it semi-bricked the unit in that yes it would boot up but the web pages became unavailable – which is why I had to hack deeper into the router and figure out how to get
本文的版权属于Kevin Cave
dd-wrt (or even OpenWRT) working on the thing
Serial port pinout:
pin1 : VCC +3.3V
pin2 : GND
pin3 : TX
pin4 : RX
NOTE you only need to connect up GND, TX, and RX – leave the Vcc unconnected – the serial circuitry on board is already powered from the motherboartd. On your terminal emulator you’ll need to set it to 115200,8,N,1 with no hardware or software flow control. Hope this helps.
Thanks for the useful info again. I needed this just in case something goes wrong, but fortunately it never did. I got my WZR-HP-G300NH via rakuten, but from cheapest shop for 8.000円, and i think they were selling Taiwanese version of the router, which came
preinstalled with english, and with Chinese-style power adapter, strange indeed. I flashed OpenWRT (Kamikaze r19704 built from source) immediately without even being aware of JP version problems, and it worked like charm since first day. ? Alison
2010/03/21 at 13:45 · Reply
When you were hacking around the insides of the router, did you see if the leads to the wireless antennae were on connectors or soldered to the board?
With the stock “ear/flap” antennae on my WZR-HP-G300NH, my upstairs desktop’s wireless adapter (a D-link DWL-G120) cannot see the network, whereas it can see my old Linksys WAP54G with a $15 set of high-gain antennae attached. If the WZR-HP-G300NH’s antenna leads are on connectors rather than soldered, I was thinking I could mod RP-TNC pigtails in and attach my old antennae. But I’m not willing to void the warranty just to check. ? admin
2010/03/22 at 10:19 · Reply
Alison :
When you were hacking around the insides of the router, did you see if the leads to the wireless antennae were on connectors or soldered to the board?
With the stock “ear/flap” antennae on my WZR-HP-G300NH, my upstairs desktop’s wireless adapter (a D-link DWL-G120) cannot see the network, whereas it can see my old Linksys WAP54G with a $15 set of high-gain antennae attached. If the WZR-HP-G300NH’s antenna leads are on connectors rather than soldered, I was thinking I could mod RP-TNC pigtails in and attach my old antennae. But I’m not willing to void the warranty just to check.
Hi, Yes the antennae are connected via a connector rather than soldered to the board – at least on MY unit anyway. I seem to recall there being pictures of the board some had taken
本文的版权属于Kevin Cave
I’m not at home right now but what I”ll do is take some pictures of the motherboard and either make a new post or add them to this one as an update.
Regards. ? John
2010/04/19 at 16:39 · Reply
Hi,
Thank you very much for your blog post about WZR-HP-G300N. I’ve read through this blog post few times. Currently, I have an Japanese version of WZR-HP-G300N, it won’t accept the stock US/EU firmware. May I ask your expertise which is the best way that I can have the EU/US stock firmware installed on it? (I really don’t want to go for DD-WRT since it doesn’t have NAS feature and I’m waiting for June 2010 release about Buffalo DD-WRT firmware). Looking forward to your soon replies and instructions.
Thanks and rgds,
(moved comment to this article from the About page)
Reply : Hi, thanks? to be honest, I think it’s better to be patient in your case and wait for the new buffalo dd-wrt-based firmware. I tried changing the firmware from .jp to .us and got a semi-bricked WZR (which was the reason I set about hacking it in the first place ;) ) ? hakka
2010/04/23 at 00:14 · Reply
pleas tell me.how to changed region code from JP to EU (or US) on U-BOOT.thanks all. ? admin
2010/04/23 at 09:31 · Reply
hakka :
pleas tell me.how to changed region code from JP to EU (or US) on U-BOOT.thanks all. Hi.
If you look at the article you’ll see the environment variable called region. In the .jp models it’s set to JP , so you would use the setenv command to change that to be US. However, do this at your own risk, and remember to save the changes otherwise after a reboot of the router you will lose them – everything you need to learn about how to do this is in the article :)
Regards.
本文的版权属于Kevin Cave
? Yngwie
2010/04/27 at 16:03 · Reply
Hi hakka,
I just modified my region=AP to EU since they locked the 3G support in AP region machine. After I changed region code, 3G feature is unlocked.
If your routor is Japanese version, you might need to flash to DDWRT first, and using the revert firmware after the region changed, since there is no multi-language support for Japan domestic version.
The process brief as below,
1. Connect the serial console cable between computer and routor
2. Power on the routor
3. Establish the serial data link using hyper terminal ( if you using windows system like me)
4. Power off the routor then power again.
5. Watch out the terminal window for the “tftp wait for 4 sec.” press “Ctrl-C” twice
6. setenv region=eu
saveenv
Please refre to the post above for the connection cable detail, you can modified from CA-42 or purchase from RS, DigiKey whatever. If your computer is still have the serial port, you can just using 3 wire to connect GND, RX, TX to the routor.
Hope this helps.
Regards,
Yngwie
o Mike
2010/05/10 at 02:00 · Reply
It seems like everything it’s OK with this region change, except the fact that it will not recognize the stock firmwares / upgrade.
? Yngwie
2010/05/11 at 03:57 · Reply
Hi Mike,
To change the region will not affect to the firmware upgrade.
Please console into your routor again and perform as below,
printenv (check is there any region listed)
If not,
本文的版权属于Kevin Cave
setenv EU
saveenv
This should setup up EU as your region in your routor.
Thanks.
Regards,
Yngwie
? Yngwie 2010/05/11 at 04:01 · Reply
Hi Mike,
Sorry, correct the command as below
setenv region EU
saveenv
Regards,
Yngwie
? Mike 2010/05/11 at 04:47 · Reply
Yes, It’s working, I’ve just upgraded with the new 1.74 EU / not beta .
Thanks for your help ! ? Vuhothang
2010/04/28 at 17:04 · Reply
Please help me!
I/m using Com1 9pin to connect router 3 wire Rx, Tx, GND.
In my Terminal screen only have symbol like this link picture of
screen /albums/b319/vuhothang/HeberTerminal.jpg i have press CTRL+C blind .
Now my Router will boot only cable console connected anh PC Poweron.
When i unplug console cable my router only Red DIAG, i can’t ping or do anything. when i plug console cable i will and i can use router.
I have hard reset 30/30/30 when router can use.
Now i not yet change region from JP to EU.
Please help me!
o Yngwie
2010/04/29 at 19:33 · Reply
本文的版权属于Kevin Cave
Hi Vuhothang,
Sorry to hear that, as I review my previous post, I forget to mention about the serial to TTL circuit on the serial port connection and such carelessness mis-leaded you to take the action which damage your routor.
Actually the logic high/low definition between serial and TTL are different, thus we need a convertor to transform in between. I am so sorry .
Your routor looks already damaged since it only operate with your PC also power on. My appology to my carelessness on posted the reply.
Regards,
Yngwie ? admin
2010/04/28 at 22:03 · Reply
Vuhothang posted the following on April 28, 2010 at 5:04 pm. – Edit
Please help me!
I/m using Com1 9pin to connect router 3 wire Rx, Tx, GND. In my Terminal screen only have symbol like this link picture of
screen /albums/b319/vuhothang/HeberTerminal.jpg
i have press CTRL+C blind .
Now my Router will boot only cable console connected anh PC Poweron.
When i unplug console cable my router only Red DIAG, i can’t ping or do anything. when i plug console cable i will and i can use router.
I have hard reset 30/30/30 when router can use.
Now i not yet change region from JP to EU.
Please help me!
Er, Vuhotang, did you just say you wired straight from your 9-pin serial interface on your PC to the WZR motherboard?
Oh dear.
Did you read where I mentioned you need a USB SERIAL< -->TTL Serial cable? The motherboard’s serial interface works at TTL signal levels. You’ve probably done your WZR some damage, unfortunately.
? vuhothang
2010/05/01 at 16:43 · Reply
Dear!
Now my Router bricked, it cycle light red diag 15″ and four led (wifi, ser, router, diag) blink.
本文的版权属于Kevin Cave
But now i can upload firmware in unbunto via tftp tool with original fimware.
i will buy Nokia DKU-5 to connect Rx, Tx, GND. i want read u-boot log.
I will infor for you later.
Thanks! ? Vuhothang
2010/05/05 at 13:32 · Reply
Dear Yngwie!
I was buy a DKU-5 Cable, i can console into WZR. I was do step-by-step tutorials of you. Now my Router running normal.
Thanks! ? Ta Xuan Truong
2010/05/09 at 21:27 · Reply
This topic very helpful for me?
May I donate a little for you via PayPal address?
Thank you. ?
2010/05/29 at 10:39 · Reply
Hi Mike,
Sorry, correct the command as below
setenv region EU
saveenv
Regards,
Yngwie
? nkphuongxp
2010/09/14 at 19:04 · Reply
Hi everyone!
I’m converting my Japanese WZR-HP-G300NH to EU but currently I’m having a trouble. This is the first time I open the router and see its motherboard. I have prepared a DKU-5 cable and known its pinouts (Tx, Rx & GND) but poor me I don’t know how to connect the cable
本文的版权属于Kevin Cave
to WZR motherboard in order to console the router. I though it would be like some other router that having some text (Rx, Tx, GND) on the board.
Could someone show me where I could connect the cable on the WZR motherboard. Here are some pics of the router:
o nkphuongxp
2010/09/14 at 19:07 · Reply
/albums/l48/nkphuongxp/wzr.jpg
/albums/l48/nkphuongxp/wzr2.jpg
/albums/l48/nkphuongxp/wzr3.jpg ? nkphuongxp 2010/09/14 at 19:09 · Reply
/albums/l48/nkphuongxp/wzr.jpg
/albums/l48/nkphuongxp/wzr2.jpg
/albums/l48/nkphuongxp/wzr3.jpg
o Kevin Cave
2010/09/15 at 11:01
· Reply
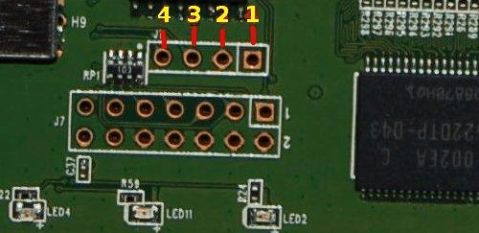
In your very blurry picture “wzr3.jpg”, the serial port is the one called J1 (if I remember correctly).
I have found a clearer picture of the port, and have corrected the pin numbers in yellow?
Pinout as follows:
pin1 : VCC +3.3V – LEAVE UNCONNECTED.
pin2 : GND
pin3 : TX
pin4 : RX
本文的版权属于Kevin Cave
NOTE you only need to connect up GND, TX, and RX – leave the Vcc unconnected – the serial circuitry on board is already powered from the motherboard.
On your terminal emulator you’ll need to set it to 115200,8,N,1 with no hardware or software flow control.
Regards,
KC. ? Zgembo
2010/10/02 at 22:17 · Reply
an update:
I got myself Japanese WZR-HP-G300NH, and ran into same problems. Messing a bit with the u-boot console and comparing boot variables with non-Japanese WZR-HP-G300NH, i found out an interesting setting, simply typing:
ar7100> setenv accept_open_rt_fmt 1
ar7100> saveenv
Will enable flashing any compatible firmware via TFTP! Tested with OpenWRT 10.03, here are the u-boot logs BEFORE:
tftp server(receive) go, waiting:4[sec]
Trying eth1
eth1 link down
FAIL
Trying eth0
eth0 is duplex
ag7100_check_link: _100BASET
Load address: 0x81f00000
$$$$$$$$$$$$$$$$$$$$$$$$$$$$$$$$$$$$$$$$$$$$$$$$$$$$$$$$$$$$$$$$$ $$$$$$$$$$$$$$$$$$$$$$$$$$$$$$$$$$$$$$$$$$$$$$$$$$$$$$$$$$$$$$$$$ $$$$$$$$$$$$$$$$$$$$$$$$$$$$$$$$$$$$$$$$$$$$$$$$$$$$$$$$$$$$$$$$$ $$$$$$$$$$$$$$$$$$$$$$$$$$$$$$$$$$$$$$$$$$$$$$$$$$$$$$$$$$$$$$$$$ $$$$$$$$$$$$$$$$$$$$$$$$$$$$$$$$$$$$$$$$$$$$$$$$$$$$$$$$$$$$$$$$$ $$$$$$$$$$$$$$$$$$$$$$$$$$$$$$$$$$$$$$$$$$$$$$$$$$$$$$$$$$$$$$$$$ $$$$$$$$$$$$$$$$$$$$$$$$$$$$$$$$$$$$$$$$$$$$$$$$$$$$$$$$$$$$$$$$$ $$$$$$$$$$$$$$$$$$$$$$$$$$$$$$$$
tftp server done
Bytes transferred = 2490400 (260020 hex)
## Booting image at be060000 ...
Image Name: MIPS OpenWrt Linux-2.6.32.10
Created: 2010-04-06 13:03:43 UTC
本文的版权属于Kevin Cave
Image Type: MIPS Linux Kernel Image (lzma compressed)
Data Size: 883587 Bytes = 862.9 kB
Load Address: 80060000 Entry Point: 80060000
Verifying Checksum ... OK Uncompressing Kernel Image ... OK
No initrd
## Transferring control to Linux (at address 80060000) ...
## Giving linux memsize in bytes, 67108864
Starting kernel ...
and AFTER setting accept_open_rt_fmt to 1:
tftp server(receive) go, waiting:4[sec]
Trying eth1
eth1 link down
FAIL
Trying eth0
eth0 is duplex
ag7100_check_link: _100BASET
Load address: 0x81f00000
$$$$$$$$$$$$$$$$$$$$$$$$$$$$$$$$$$$$$$$$$$$$$$$$$$$$$$$$$$$$$$$$$ $$$$$$$$$$$$$$$$$$$$$$$$$$$$$$$$$$$$$$$$$$$$$$$$$$$$$$$$$$$$$$$$$ $$$$$$$$$$$$$$$$$$$$$$$$$$$$$$$$$$$$$$$$$$$$$$$$$$$$$$$$$$$$$$$$$ $$$$$$$$$$$$$$$$$$$$$$$$$$$$$$$$$$$$$$$$$$$$$$$$$$$$$$$$$$$$$$$$$ $$$$$$$$$$$$$$$$$$$$$$$$$$$$$$$$$$$$$$$$$$$$$$$$$$$$$$$$$$$$$$$$$ $$$$$$$$$$$$$$$$$$$$$$$$$$$$$$$$$$$$$$$$$$$$$$$$$$$$$$$$$$$$$$$$$ $$$$$$$$$$$$$$$$$$$$$$$$$$$$$$$$$$$$$$$$$$$$$$$$$$$$$$$$$$$$$$$$$ $$$$$$$$$$$$$$$$$$$$$$$$$$$$$$$$
tftp server done
Bytes transferred = 2490400 (260020 hex)
Airstation Public header
Recv fw image [2490368] bytes, now writing...
Erase Flash from 0xbe060000 to 0xbe2bffff in Bank # 1 First 0x3 last 0x15 100%
Erased 19 sectors
Copy to Flash...
Copy 2490368 byte to Flash...
o admin
2010/10/03 at 08:51 · Reply
Wow haha!
本文的版权属于Kevin Cave
That. Is. Fantastic!
Is it really that simple?
Well done Zgembo. I’ll probably make a follow-up entry based on this.
Regards,
Kevin. ? 2010/11/01 at 23:23 · Reply
Hi,
I have this router and am trying to get it working. (Well actually I ordered the N and it came as an H, I don’t know if that makes it an NH or a different animal.) You site is extremely helpful, but I can7t seem to view the comments. When I click on them at the side I get an empty page.
Checking the DD-wrt forums all the link relating to the files have been removed, and I can’t seem to find the information/firmwares I need to get this router operational. I think the comments here would be extremely helpful. I am using firefox on an Ubuntu laptop. Anything special I need to do to see the comments?
Cheers,
Steve
o admin
2010/11/02 at 10:40 · Reply
Hi Steve,
There seemed to be a problem with one of the plugins I was using. Sorry about that – and thanks for pointing it out!
Hopefully this new comments plugin will work nicely ;)
Regards,
Kev.
? Steve
2010/11/05 at 14:08 · Reply
Yup! The comments are working great now.
So, it seems I do have a different router. It is a WZR-HP-AG300H.
本文的版权属于Kevin Cave
I received my cable yesterday after work and was up to all hours of the night fiddling with it. The pinouts are different than what is here, but I was able to find the right combination (I’ll post it later — at work right now). A nice trick is that the ground on the board will show all other voltages as positive, so once you have the ground figured out then you have a 50/50 chance of getting the TX/RX right (I of course got it wrong?twice ;) ) The big issue is that Uboot seems locked. I tried your procedure and have been totally unable to get the boot sequence to abort. I can TFTP a file over, but it also seems to be ignored. I have been googling like mad but can’t seem to find any information regarding this. I am getting ready to start trying voodoo and was hoping that before that someone will point out something completely obvious that solves the mystery of the locked uboot!
Cheers,
Steve
o Kevin Cave
2011/08/26 at 11:30 · Reply
Steve, I found instructions
at http://dd-wrt.com/wiki/index.php/Buffalo_WZR-HP-AG300H
Regards
Kev.
o Dogu 2011/08/30 at 21:00 · Reply
Hi Steve -
I’m working on the same model router that you have (WZR-HP-AG300H). Can you let me know what pinout connections are working for you with your TTL cable?
Thanks in advance.
? tbd
2010/11/22 at 21:18 · Reply
Thanks for the great guide!
My router is a Japanese (A0 A1) with u-boot 1.02, not the popular (A0 A3).
The manual tftp-flash method introduced in this guide works on my router!
However, in my test, the simple “accept_open_rt_fmt” method does not work on u-boot 1.02. I guess it should work in later u-boot (> 1.02 at least).
And you can refer to the post in dd-wrt: /phpBB2/viewtopic.php?t=72251 Regards,
Tbd
本文的版权属于Kevin Cave
? hoangdinh
2011/04/15 at 22:41 · Reply
thank you verry much. Now i can unlock my 3G moden. change region from US to EU ? ali
2011/08/16 at 20:28 · Reply
i have DD-G300 N v2 bricked with DD-WRT V1 now i want to put original firmware i establish connection between router and PC via Serial port i can send fimware using hyper terminal kermit protocol router will receive and store in 0*80f00000 also i can copy it to flash but after booting it says EEprm error and i need to ctrl+c ant suggestion ? Dogu
2011/08/26 at 11:16 · Reply
Thanks for this great article and discussion thread. I too live in Tokyo and am trying to install English language firmware on my Buffalo WZR-HP-AG300H. Per your comment: ” I could by a conveniently available USB to TTL serial cable.”
Where did you find this cable in Tokyo? I live in Roppongi Hills and haven’t had any luck finding a store that carries these. ? Kevin Cave 2011/08/26 at 11:28 · Reply
Dogu
Thanks for this great article and discussion thread. I too live in Tokyo and am trying to install English language firmware on my Buffalo WZR-HP-AG300H. Per your comment: ” I could by a conveniently available USB to TTL serial cable.”
Where did you find this cable in Tokyo? I live in Roppongi Hills and haven’t had any luck finding a store that carries these.
Like or Dislike: 0 0
Dogu, thanks for the compliments :)
I bought the cable from the Japanese RS Components website at : /web/ I’m at work right now so can’t be more specific at that. I’ll try to post a link to the cable as soon as I can.
?
Dogu
本文的版权属于Kevin Cave
2011/08/26 at 16:35 · Reply
Thanks for the quick reply Kevin. If you have a chance to post more details, I’d certainly be grateful.
I browsed the RS Components online store and found that they carry several types of USB TTL serial cables, most of which are manufactured by FTDI (in the UK). Their site has a nice page outlining the types of USB TTL serial cables the produce:
/Products/Cables/USBTTLSerial.htm
Any direction on type of cable would be appreciated.
As I stated earlier, I’m going through the same process of hacking my Buffalo WZR-HP-AG300H so I can load the dd-wrt firmware and establish a VPN connection to my VPN provider in the US, thereby allowing all devices that connect to the router to appear as if they are coming from the US. This should let me access geo-restricted content on NetFlix, Pandora, HBO GO, Hulu+, etc.
I’m happy to share my findings, successes, and failures along the way with anyone interested, either in this posting or another forum (any suggestions?)
o Kevin Cave
2011/08/26 at 19:27 · Reply
Heya. Yes it’s the TTL-232R-3V3-WE that I got, and it works flawlessly.
Hope that helps!
Rgds
Kev.
? Dogu
2011/08/28 at 08:29 · Reply
Thanks Kevin, that’s just what I needed to know. Interesting that the RS site sells the “-WE” wire ended version of this cable for 160 yen more than the version with the 6 pin SIL connector.
Thanks again.
? Kevin Cave
2011/08/31 at 10:30 · Reply
Glad to be of help.
By the way feel free to register here and produce a writeup of your findings
if you wish.
? Alem Da Lenda
2011/09/29 at 23:33 · Reply
本文的版权属于Kevin Cave
Wow!!! I have one of those japanese models. I tried to install a EN or EUR firmware and the router just refuse to update, since the firmware wasnt the same region.
I will try this later. Just one question: My PC doesnt have a serial?so I was wondering if this adapter can be use
instead: /itm/USB-RS232-DB9-SERIAL-CABLE-ADAPTER-PDA-SATELLITE-/280746333674?pt=LH_DefaultDomain_0&hash=item415dc915ea
Thanks ? Kevin Cave
2011/09/30 at 05:40 · Reply
Alem Da Lenda Wow!!! I have one of those japanese models. I tried to install a EN or EUR firmware and the router just refuse to update, since the firmware wasnt the same region.
I will try this later. Just one question: My PC doesnt have a serial?so I was wondering if this adapter can be use
instead: /itm/USB-RS232-DB9-SERIAL-CABLE-ADAPTER-PDA-SATELLITE-/280746333674?pt=LH_DefaultDomain_0&hash=item415dc915ea Thanks
Hi Alem, no, you need a USB to TTL serial adapter like the one discussed about 3 replies above yours. See /Products/Cables/USBTTLSerial.htm and
specifically the cable type of TTL-232R-3V3-WE. Regards,
Kevin.
o Alem Da Lenda
2011/09/30 at 10:46 · Reply
Thanks Kevin
Out, I cant find that cable here?T_T
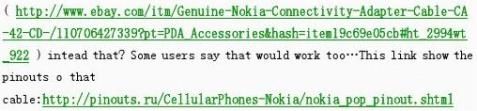
I was reading dd wrt forum. Can I use this one
( /itm/Genuine-Nokia-Connectivity-Adapter-Cable-CA-42-CD-/110706427339?pt=PDA_Accessories&hash=item19c69e05cb#ht_2994wt_922 ) intead that? Some users say that would work too?This link show the pinouts o that
cable: http://pinouts.ru/CellularPhones-Nokia/nokia_pop_pinout.shtml
? Kevin Cave
2011/09/30 at 15:13 · Reply
Thanks Kevin
Out, I cant find that cable here?T_T
I was reading dd wrt forum. Can I use this one
本文的版权属于Kevin Cave
Alem, hi again. I did some googling and that cable does seem to be mentioned a few times in relation to this model of router. The datasheet link you provided doesn’t say if it’s a 3.3V TTL-level cable – it’s very important you ensure that is the case, but yes that particular cable type is specifically mentioned, so I assume it would work – I’ve not used it myself though so, just be careful how you hook it up :)
Is it difficult for you to buy the cable from FTDi online? They do have an online store.
Regards
Kevin. ? Alem Da Lenda
2011/10/01 at 20:31 · Reply
Kevin Cave
Thanks Kevin
Out, I cant find that cable here?T_T
I was reading dd wrt forum. Can I use this one
( /itm/Genuine-Nokia-Connectivity-Adapter-Cable-CA-42-CD-/110706427339?pt=PDA_Accessories&hash=item19c69e05cb#ht_2994wt_922 ) intead that? Some users say that would work too?This link show the pinouts o that
cable:http://pinouts.ru/CellularPhones-Nokia/nokia_pop_pinout.shtml
Alem, hi again. I did some googling and that cable does seem to be mentioned a few times in relation to this model of router. The datasheet link you provided doesn’t say if it’s a 3.3V TTL-level cable – it’s very important you ensure that is the case, but yes that particular cable type is specifically mentioned, so I assume it would work – I’ve not used it myself though so, just be careful how you hook it up
Is it difficult for you to buy the cable from FTDi online? They do have an online store. Regards
Kevin.
Like or Dislike: 0 0
Hi Kevin
I will try to find one of those two cables (the nokia cable is more easy to find and cheaper).
3.3v is really necessary? the motherboard doesnt power on itself using the ac adapter? Sorry to bothering you with noob questions.
本文的版权属于Kevin Cave
? Kevin Cave
2011/10/02 at 15:33 · Reply
Hi Kevin
I will try to find one of those two cables (the nokia cable is more easy to find and cheaper).
3.3v is really necessary? the motherboard doesnt power on itself using the ac adapter? Sorry to bothering you with noob questions.
Alum,
3.3V stands for the TTL signal level of the circuitry of the router. The router, of course, should use its AC adapter when you are communicating with it via your cable and the terminal program you are using.
Please remember only to use the Rx, Tx, and GND of your cable. Do not connect any other wires – you could severely damage your router’s motherboard!
If you have a techie friend who’s into electronics I suggest you ask them to connect your cable, if you’re not sure how to do this yourself. You could just be saving yourself from owning an expensive brick :)
Regards
Kevin.
o Alem Da Lenda
2011/10/08 at 00:54 · Reply
Well, I’ll probably have to pay someone to do this, but that was my intention since I dont have any experience in welding things. Thanks
I’ll need to do till the step 3 right? When I use crtl+c, then I use the commands Zgembo says to let it accept any firmware?
Do I need install a linux distro (like ubuntu) to use the console or it have any windows (yeah?I know?; ) software that I can use instead?
Thanks again
? Kevin Cave
2011/10/10 at 14:38 · Reply
Alem Da Lenda
October 8, 2011 at 12:54 am
Well, I’ll probably have to pay someone to do this, but that was my
intention since I dont have any experience in welding things. Thanks
I’ll need to do till the step 3 right? When I use crtl+c, then I use the
commands Zgembo says to let it accept any firmware?
本文的版权属于Kevin Cave
Do I need install a linux distro (like ubuntu) to use the console or it
have any windows (yeah?I know?; ) software that I can use instead?
Thanks again
Yep you need to break into the bootup sequence using ctrl-c.
Actually you can download a Live CD version of linux which will boot straight off the CD/DVD and you can then use it as normal. Try for this. There are also terminal emulators available for Windows though at time of writing I can’t remember their names so search Google for that info.
Regards
Kevin. ? Garry
2011/11/15 at 07:40 · Reply
Great read. How can I load a JP firmware onto a US-bought WZR-HP-G300NH ? Trying to enable ipv6 so I can watch iptv programs and still have internet here in Japan.
Thanks
o Kevin Cave
2011/11/15 at 08:01 · Reply
You don’t need to install Japanese firmware to use your WZR in Japan. ? hakuch
2011/12/03 at 17:04 · Reply
thanks for the info. question – using this method for changing country code – can i load original English language firmware to Japanese model?
thanks ? Bob
2011/12/10 at 13:21 · Reply
You guys seem to have this unit well cracked!
Unfortunately for me the WCN-HP-GN I purchased here in Shanghai seems to also have a restriction on firmware region. I would love to get dd-wrt on this unit so that I could load an Open VPN package. No need for me to elaborate on the importance of a VPN here. Thanks for all of your hard work!
本文的版权属于Kevin Cave
? Andrey
2011/12/13 at 05:22 · Reply
Большое спасибо за статью. Очень помогла!
Полностью восстановил Buffalo WZR-HP-G300NH. Уже не верил в это?
? kiattivikrai
2012/02/29 at 14:06 · Reply
Great ! this page help me unbrick my whr-hp-G300N. My router lost the ipaddr and serverip environment and fail to connect the tftp.
Thank you
o
2012/02/29 at 16:09 · Reply
Glad it helped you out!
Regards
? Leo
2012/07/28 at 01:02 · Reply
I found this page and purchased a chip to enable the serial console, but it's possible to enable the telnet client on the router using a special mantenence
page http://your.router.ip.address/cgi-bin/cgi?req=frm&frm=py-db/55debug.html, with special username (bufpy) and password (otdpopy+<root password if any>)
as described here:
/toh/buffalo/wzr-hp-g300h#locked.u-boot.too.short.time.tftp.window
o Logus
2012/09/20 at 04:33 · Reply
Oh well, I was really unable to find one of those cables to do that mod?and then u came with this tip.. =D
Can anyone give me a help here?
I did enabled that telnet, connected to it using the windows 7 telnet client (cmd, telnet xxx.xxx.xx.x)
I was able to connect and then I typed "ubootenv -h" and that help list pop out.
本文的版权属于Kevin Cave
But really don't know what to do next?I tried :
# ubootenv setenv accept_open_rt_fmt 1 (it showed me that help list again)
# ubootenv set accept_open_rt_fmt 1 (I THINK it worked since it didn't showed that list again, and the # came right after that)
But after this I really don't know what to do?.
Any ideas?
? Logus 2012/09/25 at 01:33 · Reply
Well after the command " # ubootenv set accept_open_rt_fmt 1 ", when I typed " # ubootenv list " it showed to me that the line " accept_open_rt_fmt " is set to "1".
I tried to update the firmware using the web tool to the firmware 1.76 and ddwrt v24sp2-19484 (from buffalo official download page for this model) and both fail. Then I was able to transfer the file using tftp with linux liveusb (win7 didn't worked for me) but nothing happens after that. The router just boot normally? So am I still missing somenthing here?
I wasn't able to do the command " saveenv " so?is that really necessary?
When I tried to " ubootenv saveenv, ubootenv save or ubootenv sav" it didn't worked since it just showed me the help list for the command ubootenv? ? Blukenguyen
2012/12/03 at 23:53 · Reply
here my log what I need to do. I can't do Ctrl+C and it stuck there.
BUFFALO U-BOOT Ver 1.02
AP83–539 (ar9100) U-boot 0.0.12
64 MB
Memory Test (address line)
Memory Test start(0×00000000) end(0×04000000) size(67108864)
Data line test start:0×00000000 pattern 0×00000001 0×00000003 0×00000007 0x0000000F 0×00000005 0×00000015 0×00000055 0xAAAAAAAA
Address line test start:0×00000000 len:0×4000000 pattern 0xAAAAAAAA 0×55555555 Fill test patnum:5
fill Pattern 5555AAAA Writing? Reading?
fill Pattern AAAA5555 Writing? Reading?
fill Pattern 0000FFFF Writing? Reading?
fill Pattern FFFF0000 Writing? Reading?
fill Pattern AAAAAAAA Writing? Reading?
Top of RAM usable for U-Boot at: 84000000
Reserving 250k for U-Boot at: 83fc0000
Reserving 256k for malloc() at: 83f80000
Reserving 44 Bytes for Board Info at: 83f7ffd4
本文的版权属于Kevin Cave
Reserving 36 Bytes for Global Data at: 83f7ffb0
Reserving 128k for boot params() at: 83f5ffb0
Stack Pointer at: 83f5ff98
Now running in RAM – U-Boot at: 83fc0000
Dev ID2:2222
Name: AMD-SPANSION Flash id: 0x1227E, Size: 33554432 bytes.
Flash: 32 MB
In: serial
Out: serial
Err: serial
Memory Test
uboot use 83F5FFB0 – 84000000
Memory Test start(80000000) end(83F00000) size(03F00000)
Pattern 00000000 Writing? Reading?
Memory Test OK
### buf_ver=[1.02] U-Boot Ver.=[1.02]
### build_date(env)=[Feb 16 2009 - 10:47:08] build_date(bin)=[Feb 16 2009 - 10:47:08] ag7100_enet_initialize?
: cfg1 0xf cfg2 0×7114
rtl8366sr_phy_setup ethUnit=0
Realtek 8366SR switch ID 0×8366
Realtek Greeen Ethernet Setup
eth0: 02:aa:bb:cc:dd:1a
eth0 up
: cfg1 0xf cfg2 0×7114
eth1: 02:aa:bb:cc:dd:1a
eth1 up
eth0 02:AA:BB:CC:DD:1A
, eth1 02:AA:BB:CC:DD:1A
Trying eth0
eth0 is duplex
eth0 link down
FAIL
Trying eth1
eth1 link down
FAIL
tftp server(receive) go, waiting:1[sec]
Trying eth1
eth1 link down
FAIL
Trying eth0
eth0 is duplex
eth0 link down
本文的版权属于Kevin Cave
FAIL
Load address: 0x81f00000
TftpServer Timeout;
Trying eth0
eth0 is duplex
eth0 link down
FAIL
Trying eth1
eth1 link down
FAIL
no file was loaded.
## Booting image at be060000 ?
Bad Magic Number
# LED(0×2) Blink[2] (Please press ‘Ctrl+c’ to stop) ? Beau
2012/12/10 at 00:00 · Reply
Hey, bit off topic, I just bought an WZR-HP-G300NH second hand and found that the AC adaptor they provide was totally wrong, doesn't even fit. Now just having troulbe finding details about the orignal AC adaptor. Can anyone tell me the output voltage. I think it's 12v 2amps. Is that right? And just as important, if anyone tell tell me the pin type it has on the end?.I've read a few different things like 5.0mm x 3.0mm male DC plug. Just that 3.0mm sounds a bit large for the centre hole I see at the back of the device. Any info welcome. Thanks!
? tommiy
2013/01/02 at 04:44 · Reply
Accessed my WZR-HP-AG300H via the bufpy login. The changes are done directly by ubootenv which has set, get, del and list options. Setting a variable saves it permanently. ? Bob
2013/02/03 at 19:48 · Reply
Someone left very simple, explicit instructions here
-> /phpBB2/viewtopic.php?p=737509&sid=bbf9dafa3173a4d1f7cd3f7626497f25
? Yin
2013/05/26 at 08:25 · Reply
本文的版权属于Kevin Cave
I can’t break it with Ctrl+c also. Any comment? o 2013/05/28 at 08:35 · Reply
Yin,
I think I remember seeing that later versions of the Buffalo firmware have disabled breaking into the uboot prompt via ctrl-c.
Why not try downloading the images made by dd-wrt? They seem to be able to install fine now.
Regards.
? fernandoavc@gmail.com
2013/06/26 at 03:39 · Reply
Hey Kevin in my case I can’t do anything cause my router is bricked? I can’t use TFTP or any other way? Now that I was able to set the serial cable I can’t believe the u-boot is locked? it won’t accept any command or intervention? it keeps rebooting over and over again? please help :(
? 2013/06/26 at 19:30 · Reply
You appear to have the newer u-boot, which has a 1-second TFTP window (!) The only thing you can do is to download the buffalo “.enc” version of the firmware and try to TFTP that back on.
Read /toh/buffalo/wzr-hp-g300h#locked.u-boot.too.
short.time.tftp.window
It has some guidance on that. Other than that, I don’t know what else you could do.
Regards.
o fernandoavc@gmail.com
2013/06/26 at 02:44 · Reply
Have u had any luck? I can’t control-c the u-boot? Idk what to do? such a pitty throw it away?.
? Sissel
2013/07/05 at 22:10 · Reply
本文的版权属于Kevin Cave
Oh well?I have a Janapese WZR-HP-G300NH v1, A0 A0
I was using the official buffalo dd wrt 19484 (I changed it to accept any firmware using the “# ubootenv setenv accept_open_rt_fmt 1″ at the hidden maintenance page), then I tried to update to the latest dd wrt firmware using the web interface and it fail.
I didn’t reset the router (since I already did the same update before), and now it’s stuck doing the reboot cycle. (turns on, the red light stays for a while, reboot?)
I tried to tftp pretty much all the official buffalo firmwares from EU/US and JP even that old 1.60 (if I remember correctly, my router came up with the 1.65), all lan ports (I know it’s number 4 =D) and I did use both mac addresses: my router mac and 02:AA:BB:CC:DD:1A on windows 7 x64 with PumpKIN tftp and ubuntu 12.10.
It upload all fine but?nothing happens after that.
Reading a lot of foruns etc, I find out that I need to upload an .enc (encrypted?) firmware but brainslayer told to another user that we can use the 1.65 EU that he upload before. I did use that firmware too but still the same?
So I can tftp the firmware image just fine but my router doesn’t reflash the new firmware. Someone having the same problem or anyone can light some ideas for me?
To do this “tftp reflash” do I need the serial cable? Or that serial thing is just to read the u-boot log?
Thanks for reading this, sorry for my bad english and any help is welcome =) ? Ryouta
2013/07/09 at 04:29 · Reply
Hey, I have a Janapese WZR-HP-G300NH v1, A0 A0 too and I managed to unbrick it without changing the Region.
First, I pushed via TFTP with USB dongle, the MODIFIED DD-WRT firmware (Without the numbers before Magic Numbers –> 27 05 19 56). After waiting few minutes to boot, I had a working router but with some problems trying to connect to internet using PPPoE. Then decided to do an upgrade through the web interface using the UNMODIFIED DD-WRT firmware. After waiting few more minutes, I had a fully working router! :)
I uploaded these firmwares I’ve used to unbrick the router. Hope you guys can unbrick this great router as I did.
Here are the links of the firware and the USB converter I′ve used:
1- Modified DD-WRT firmware:
http://adf.ly/RkNWL
2- Unmodified DD-WRT firmware:
http://adf.ly/RkY3s
3- USB to TTL dongle:
http://dx.com/p/usb-to-uart-5-pin-cp2102-module-serial-converter-81872
It′s free shipping and takes 10~15 days to arrive but this thing worked like a charm.
本文的版权属于Kevin Cave
I′ll be here if you need some help :)
Regards o Sissel
2013/07/09 at 17:43 · Reply
Thanks for the tips.
But do I need access to uboot to perform this unbrick? Or can I follow those FAQ’s from OpenWRT and DD WRT wikis? They say I can just tftp the firmware using the Lan port 4, and use that mac address 02:AA:BB:CC:DD:1A. Which mac address have you used to tftp the firmware image?
I will download and give a try as soon I get home.
Thanks again Ryouta o Sissel
2013/07/09 at 18:07 · Reply
If I do really one of those cables, can I use this one? I can get one of these faster than importing from dx.
/products/954
It does already have the USBSerial conversion chip inside the usb connector. They use this cable to access the raspberry pi, arduinos, etc. ? 2013/07/09 at 19:15 · Reply
I don’t think that one would do. You need the one mentioned above, or one made by FTDI.
When you DO get one, do NOT connect the POWER wire – you don’t need it, as the router supplies the power to the circuitry itself. ? Sissel
2013/07/09 at 20:17 · Reply
I will try to recover this router when I get the cable that you mentioned above(TTL-232R-3V3-WE).
So the only thing I need after that is:
Use the putty, break the router boot sequence (ctrl + C) and and follow your instructions right?
Thank you all
? Sissel
2013/07/25 at 23:15 · Reply
本文的版权属于Kevin Cave
humm I was trying to make a post yesterday, but I was unable to create an account xD
I bought the usb to serial adapter, a generic one with a pl-2303hx chip and it worked perfectly with your tutorial.
I also used the Ryouta firmware mod to unbrick my router, but after reboot I could not webupdate to any dd wrt firmware. I downgrade to 1.65 EU (the one brainslayer provided at dd wrt forum) and then I update to buffalo's official 19484. I will test the newer version of dd wrt to see if solve some bugs that I found in 19484.
Thank you all!!! =D
? Sissel 2013/08/28 at 17:10 · Reply
Just one last thing:I tried openwrt,ddwrt and gargoyle.
Now I belive that gargoyle (1.5.10) is the most stable (openwrt attitude adjustment) firmware for this router.
The wifi is a little bit slower than ddwrt, but it’s stable. Also, the usb samba share and ftp are really fast to setup.
And since gargoyle is “basically” just a webui for openwrt, it’s also customizable and anyone can follow pretty much any guide made for openwrt. Openwrt (with luci webui) is the same, but it’s a little bit too complicated (for me) so it’s an option for those who want “more”.