如何修改Remote Desktop 默认端口
Remote Desktop默认端口是3389,如何修改呢?
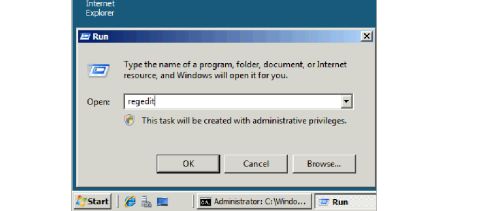
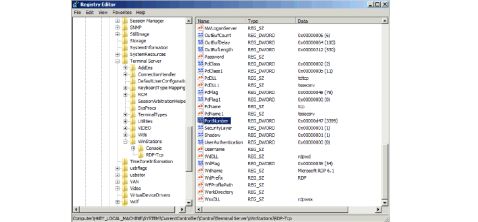
1.打开注册表
2.依次展开
HKEY_LOCAL_MACHINE\System\CurrentControlSet\Control\TerminalServer\WinStations\RDP-
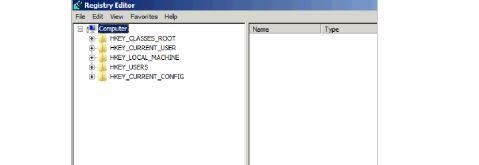
Tcp\
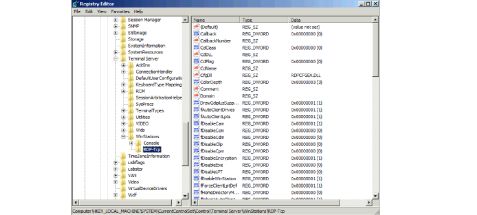
3.在右侧找到 PortNumber
4.双击修改

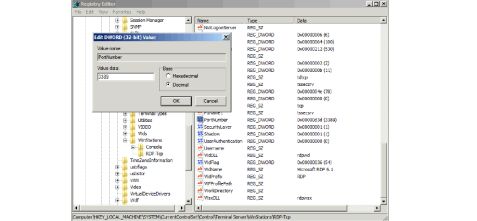

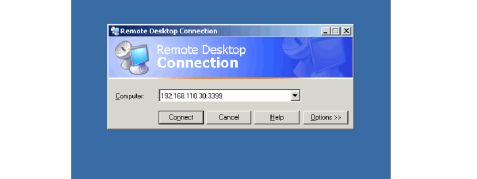
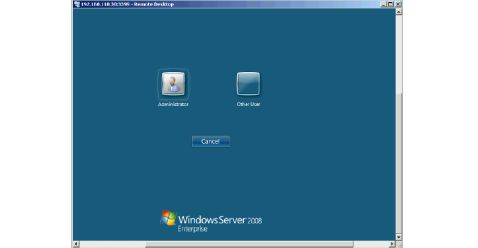
5.完成,现在用Remote Desktop去连接它!
第二篇:Remote Desktop LoadSimulation Tools User Guide
Microsoft Corporation
Remote Desktop Load Simulation Tools
User Guide
Hammad Butt
09
Table of Contents
Introduction ........................................................................................................... 3
Test Environment .................................................................................................. 3
Remote Desktop Load Simulation Tools ............................................................... 4
Test Control Infrastrucutre ........................................................................................... 4
Scenario execution tools .............................................................................................. 5
Simple Notepad scenario example ....................................................................... 6
Deployment ........................................................................................................... 8
Automatic Install of MSI package .......................................................................... 8
Preparation for running test .................................................................................. 9
Running the Test................................................................................................... 9
Running Configuration Scripts ............................................................................ 10
Running Muliple-Script Tests .............................................................................. 10
Advanced Test Settings ...................................................................................... 10
Monitoring the Test ............................................................................................. 11
Stopping the Test ................................................................................................ 12
Progression Entries ............................................................................................. 12
How to create a script for a custom scenario ...................................................... 14
RUIDCOM Functions and Properties .................................................................. 15
The Role of Sleep ............................................................................................... 20
Script Format ...................................................................................................... 21
Using Debug Mode to create scenario script ...................................................... 24
Test Results ........................................................................................................ 26
Controller Logs .......................................................................................................... 26
User Response Logs ................................................................................................. 26
Server Logs ............................................................................................................... 26
Troubleshooting and Debugging ......................................................................... 27
Introduction
The Remote Desktop Load Simulation toolset is used for server capacity planning and performance/scalability analysis.
In a server-based computing environment, all application execution and data processing occur on the server. Therefore it is extremely interesting to test the scalability and capacity of servers to determine how many client sessions a server can typically support under a variety of different scenarios. One of the most reliable ways to find out the number or users a server can support for a particular scenario is to log on a large number of users on the server simultaneously. The Remote Desktop Load Simulation tools provide the functionality which makes it possible to generate the required user load on the server.
Test Environment
A minimal test environment requires:
1. Target Remote Desktop Server
2. Client Workstations
3. Test Controller Host
Client workstation machines are used to create remote desktop connections to the Remote Desktop Server. Each client machine is used to create multiple Remote Desktop connections. The tools were tested for up to 50 connections per client machine. The maximum number of Remote Desktop connections one client machine can support will vary based on the machine hardware capabilities.
The Test Controller Host is the machine that runs the tool used to coordinate the test execution.
Ideally, the test setup should be on an isolated network so it is free of interference from other systems. Typically, infrastructure server(s) like Domain Controller/DHCP and Exchange/Web Server are required when running on a private network to provide basic networking services (DHCP, DNS, Active Directory etc.) – see Figure 1. It is possible though to run on a test setup which does not have any infrastructure servers. If infrastructure servers are used, one of them can also act as the Test Controller Host – so that there is no need for a dedicated machine for the Test Controller.
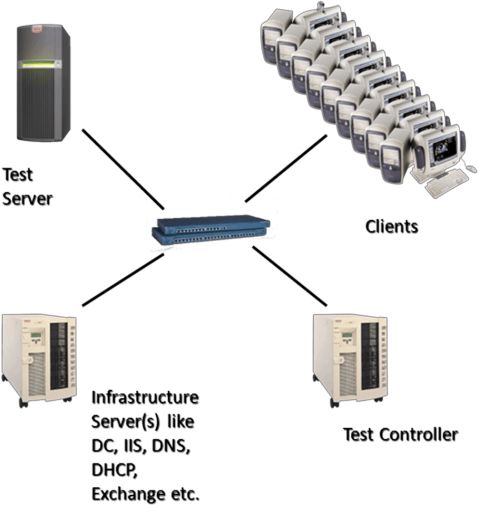
Figure 1
Remote Desktop Load Simulation Tools
Remote Desktop Load Simulation Tools provide the ability to easily create and control simulated loads on a remote desktop server. The suite includes the following automation tools:
Test Control Infrastructure
? Test Controller - RDLoadSimulationController.exe
?
? The RDLoadSimulationController tool is the central control point for the load simulation testing. It is typically installed on the test controller machine. RDLoadSimulationController controls all test parameters and defines the progression of the simulated user load. It also controls all custom actions that are executed at any point during the test process. It communicates with RDLoadSimulationClients and RDLoadSimulationServerAgent to synchronize and drive the client-server remote desktop automation. It commands the RDLoadSimulationClients to run scripts that load the remote desktop server at operator-specified intervals. Client Agent - RDLoadSimulationClient.exe The RDLoadSimulationClient tool controls the client side of the load simulation testing. RDLoadSimulationClient is typically installed on the test client computers. RDLoadSimulationClient receives commands from RDLoadSimulationController to run scripts that load the remote desktop server at operator specified intervals. It executes custom commands received from the RDLoadSimulationController and also sends the status of the executing scripts to the RDLoadSimulationController. RDLoadSimulationClient also performs desktop management on the test client computers. It creates a new desktop for each script that it launches and provides the means to navigate between all desktops. Server Agent - RDLoadSimulationServerAgent.exe
The RDLoadSimulationServerAgent tool runs on the target Remote Desktop server. It runs custom commands that are sent to it by the RDLoadSimulationController. It is also used by RDLoadSimulationController for test synchronization.
SwitchDesktop.exe
The SwitchDesktop tool runs on the test client computers. It runs inside each new desktop that is created on the client. Its only function is to provide a way to switch back to the default desktop where the RDLoadSimulationClient is running. ?
Scenario execution tools
? Script automation tool - RemoteUIControl.dll
RemoteUIControl.dll is a COM based tool which provides functionality for driving the client side load simulation. It exposes functionality for creating RDP connections to the server, as well as sending keyboard input to the remote desktop session. It synchronizes executions based on drawing events in the applications that are running inside the remote desktop session.
RUIDCOM.exe
RUIDCOM is a DCOM tool which is a wrapper around RemoteUIControl.dll. This tool exposes all the functionality of RemoteUIControl.dll. Test scripts use RUIDCOM instead of directly using RemoteUIControl.dll as it provides some extra functionality. RUIDCOM communicates with the RDLoadSimulationClient to report the status of a simulated user.
TSAccSessionAgent.exe
TSAccSessionAgent runs on the target remote desktop server. One instance of TSAccSessionAgent runs inside every remote desktop session that is created for a simulated test user. RemoteUIControl.dll on the client side communicates with TSAccSessionAgent to synchronize user input with drawing events in the applications that are running inside the remote desktop session. ? ?
Simple Notepad scenario example
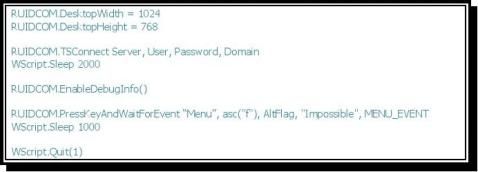
User scenarios can be implemented using Windows Script to control the RUIDCOM tool. Let?s take a simple user scenario and see what the script would look like. The scripting language used is VB Script.
The sample script below executes the following scenario.
? Connect to Remote Desktop Server
? Start notepad.exe
? Type some text
? Save a file

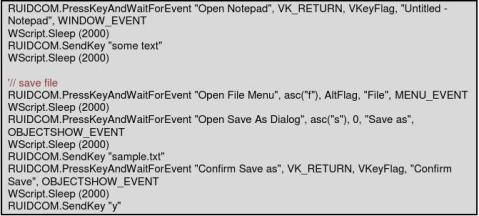
Note: The technique of starting applications (opening run dialog, typing application name, and pressing return) is fairly typical. Alternatively, the run dialog can be opened via the start menu.
The functions used in this script will be explained in detail in a later section of this document.
This script can be run for a single user from the command line as is. To use it with the full framework for running multiple users, the top section of the script (in Bold font) needs to be replaced with the template script header that is described in the section below.
Deployment
The binaries need to be distributed to 3 locations: Test CONTROLLER Host, CLIENT, and SERVER.
?
?
?
?
?
?
?
?
? Run the MSI package on CONTROLLER Select the Controller option in the wizard and go through the wizard. Run the MSI package on all CLIENT machines Select the Client option in the wizard and go through the wizard. Run the MSI package on SERVER machine Select the Server option in the wizard and go through the wizard. The scenario scripts can be placed anywhere on the CONTROLLER. Any custom tools/command-line scripts to be run on the server should be placed in the same location as the RDLoadSimulationServerAgent.exe tool – or a location which is in the PATH variable. The above is true for the client machines as well.
Note: The client and test server machines should be setup to auto-logon with administrator credentials when rebooted. The test framework client agent and server agent will automatically launch on reboot as their shortcuts have been placed in the startup menu. This way, it is ensured that when any client machine or the test server is rebooted, the test agents will connect to the test controller automatically. Also make sure that either the Firewall is disabled on all the machines, or the Controller and Agent tools are added to firewall exceptions.
Automatic Install of MSI package
The msi package can be installed silently using the following command (running as admin):
msiexec /i RDLoadSimulationTools_x86.msi /q /l*vx PerfToolsInstall.log ADDLOCAL=[Feature ID] CONTROLLER=[Controller Machine Name]
INSTALLDIR=[path of installation Directory]
INSTALLDIR can be optionally specified. The default install directory
is %ProgramFiles%\TSPerfTools
For a selection of features use ADDLOCAL=[Feature ID 1],[ Feature ID 2]
The available Feature IDs are
ControllerTools
ServerTools
ClientTools
Silent Uninstall of tools:
The msi package can be uninstalled silently using the following command:
msiexec /uninstall RDLoadSimulationTools_x86.msi /q /l*vx PerfToolsUninst.log
Preparation for running Test
The following tasks need to be performed to prepare the test environment for running the test.
? User Accounts
Test user accounts have to be created. The user accounts can be created as domain accounts if the test server is joined to a domain. They can also be created as the local user accounts on the test server
? Server Configuration
The target test server has to be prepared for the test. Perform the following tasks on the test server:
o Install the Remote Desktop Session Host Role
o Add test users to the Remote Desktop Users group
o Install any applications required by the scenario
o Perform custom configuration for scenario applications
o Copy any template files that the scenario requires
o Create and configure any performance counter logs that need to be run during the test
Running the Test
1.
2.
3.
4.
5. Start RDLoadSimulationController.exe Reboot the client machines to get Client Agent ready to handle controller requests. Reboot the test server to get Server Agent ready to handle controller requests. On the controller press Configure button. Enter test settings in the ?General? tab: enter user password and domain name. If the test server is not joined to a domain enter the server name in the 'Domain Name' field.
6. Click ?Test Progression? Tab: enter test progression values and click ?Update List? button. Example: user range: 1 – 30; group size: 10; interval between users: 30; interval between groups: 300; Speed Factor: 1. These settings will launch user 1 to 30, in groups of 10 users with specified intervals. The progression values are described in detail in the ?? section below. Multiple entries can be made to this list. This is useful when a non-uniform load generation is desired. For example, the first list entry can define the progression from user 1 to user 30. The second entry can define it from user 31 to user 60 with different user and group intervals.
7. Click ?Scripts? tab: click the ?Add Scripts? button.
8. Enter a friendly name to the ?Friendly Script name? edit box. Example: Test
9. Enter the full file path in the ?File Path? edit box. Example: C:\scripts\Test.vbs - Alternatively use the Browse button to select a script file.
10. Enter any optional script parameters in the ?Parameters? edit box.
11. Other settings in this dialog are currently disabled. Click OK button.
12. Multiple scripts can be added to the ?Available Scripts? list. Now select the scripts that are desired to be run in this test and add them to the ?Selected Scripts? list. This list can have multiple scripts as well so that each user will run a list of scripts – one after the other – instead of running only one script. This is described in detail in the section.
13. Click OK.
14. Enter target server name in ?Target Server? edit box.
15. Click Launch Test after the Server Agent has connected to the controller.
Note: After entering all settings, it is useful to click the ?Save Config? button. This will save all the test configuration settings into an INI file (format is Server-Script.ini). This file can later be
provided to RDLoadSimulationController.exe as an argument. In that case, all the settings will be restored to the controller. If you already have an INI file specifying the test configuration, running the test becomes much simpler. The procedure is below.
1) Run RDLoadSimulationController.exe [Config.ini]
2) Reboot Clients or Start RDLoadSimulationClient.exe [ControllerMachine] on the clients
3) Reboot Remote Desktop Server or Start RDLoadSimulationServerAgent.exe
[ControllerMachine] on the server
4) Click Launch Test after the Server Agent has connected to the controller
The INI file can be manually created or edited. All settings in the INI file are described in the document “RDLoadSimulation Test Controller User Interface Reference”
Running Configuration Scripts
Some scenarios require custom configuration on a per user basis. There may be applications in the scenario which need to be configured by each user that needs to run for the test. For making these types of configuration changes, custom configuration scripts have to be run against the test server before the actual scenario can be run. The configuration scripts are run in the same way as any other test scripts.
In case there is no custom configuration required for the scenario, it is still recommended that a logon script should be run for all users before the actual scenario. This script should just logon the user and then logoff. The benefit of doing this is that it will make sure the test users have a profile created on the test server. When the actual test is run, the user profiles will not be created during the test. This will make the test results very repeatable.
Running Multiple-Script Tests
When Selecting the script to be run for the test (from the Available Scripts List), it is possible to select multiple scripts to be run for the test. The simulated users will run each script in the 'Selected Scripts' list one after the other. For example consider the case when the scripts selected are TestScript1, TestScript2, and TestScript3. Each user will first run TestScript1, Once this script is finished for a particular user, the user will then proceed to running TestScript2. Finally it will run TestScript3. A sample scenario where this kind of multiple-script method can be used is "Logon" script, "Open Apps" script, and "Run Apps" script.
Note: Scripts that are used in a Multiple-Script test have a special requirement. They must use the function EndScript() exposed by the RUIDCOM tool at the end of the script.
Advanced Test Settings
There are many advanced settings configurable through the controller Config settings dialog or the configuration INI file. For example, it is possible to reboot the server/client machines before the test runs and custom commands can be run on the server at any time during the test. All of these settings are described in detail in the document “RDLoadSimulation Test Controller User Interface Reference”. An important point is that to be able to use the reboot options, a "Reboot.cmd" script should be located in the working directory of the server/client agent or a location which is in the PATH variable of the machine. The Reboot.cmd script should reboot the machine.
Monitoring the Test
The RDLoadSimulationController tool has a list which shows all users that are launched. This list will show the user name, the client machine on which it is running, the name of the script being executed, and the status of the script/user. If a script goes idle because of some problem, this will be reflected in the script status. To see a list of all idle users click the ?Show Idle Users? button.
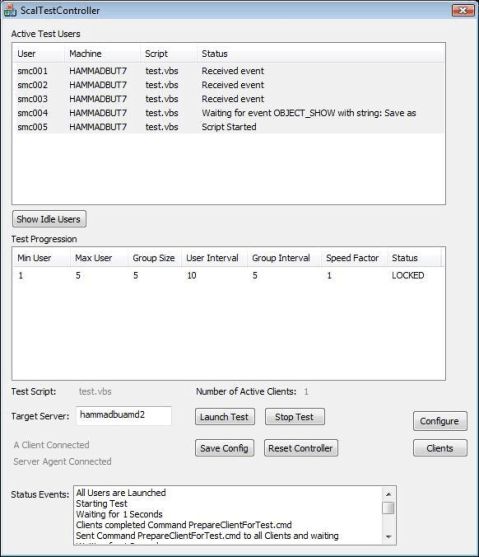
Figure 2
There is a ?Status ?Events? list in the main dialog of the RDLoadSimulationController tool. This list shows status events and what the controller tool is doing. The RDLoadSimulationController also produces a couple of logs for each test that contain a lot of useful information. These logs are described in detail in the '' section below.
On the client machines, the RDLoadSimulationClient.exe tool will create a new desktop for each user that is launched. To view that user, double-click the user name in the user list. This will switch to the desired desktop. To switch back, click the button on the SwitchDesktop app which runs in each desktop. Another way to switch back to the default desktop is by pressing the right CTRL key.
Stopping the Test
When a test is considered to be ended depends on a setting called Test End Mode. The following Test End Modes can be selected for a test
- Stay Alive: In this case, it is assumed that the test doesn?t end and more users can be added
to the test when all users have been launched.
- Users Finished: Test is only considered finished when all the scripts report back to the
controller that they are finished (done using the EndScript method explained below).
- Users Launched: Test is considered finished when all the scripts have been launched.
- Users Launched and Timeout: Test is considered finished when all the scripts have been
launched and Timeout minutes have elapsed after the last user was launched.
.
For some test end modes, the test will stop automatically when the end conditions are met. However, if the test needs to be stopped before its scheduled end, or it if the test end mode is STAY ALIVE, the test can be manually stopped in the following way.
1. click the ?Stop Progression? button
2. click ?Reset Test? button
3. from the server, logoff all test users
Progression Entries
The use of the progression list allows us to launch users at different rates through the test. The test will start using the first entry in the list and then it will move to the next entry. Here is description of the various fields in a single progression entry.
? Min User: The index of the first user to be launched.
? Max User: The index of the last user to be launched. For example, if Max User is 100 and
Min User is 1, a total of 100 users will be launched.
? Group Size: The number of users in a group.
? User Interval: The number of seconds that the controller waits before starting the next
user within the group
? Group Interval: The number of seconds that the controller waits before starting the next
group of users
? Speed Factor: Speed Factor is intended to specify how fast the scripts will be run. The
scripts should run at the normal speed when the speed factor is set to 1. They should run at double speed when speed factor is 2 – and so on. The script must make use of the speed factor to adjust the speed of the scenario execution.
Note: This is how the speed factor is supposed to be used. The Controller passes this value to the script on the client machine and it is up to the script how it uses the speed factor. It is recommended that any sleeps in the scenario should be adjusted based on the speed factor and typing rate should also be adjusted accordingly.
How to create a script for a custom scenario
To automate a user scenario, the toolset requires scripts that run the user scenario. All such scripts will use RUIDCOM object to access the functionality it exposes. The scripts need to be written to accept the following argument format:
Script –u:[User Name] -p:[Password] -s:[Server Name] -d:[Domain Name] -e:[Exchange Server] -f:[Speed Factor] -a:[Optional Arguments] –x:[Script Index]
The meaning of the script arguments will become clearer in the “Script format” section below.
A typical script is mostly driven in the following manner:
1. Create RUIDCOM object
2. Set connection properties
3. Connect to Remote Desktop Server using RDP client
4. Loop
4.1. Send keyboard input
4.2. Wait for a server UI event in response to the input
4.3. Sleep for a small amount of time
4.4. Send keyboard input
4.5. …(Keep running users scenario)
4.6. …
4.7. …
5. End of loop. Go to step 4
All of the above actions can be performed by using functions exposed by the RUIDCOM object as described in the next section.
RUIDCOM Functions and Properties
DesktopWidth(width)
Sets the Desktop width in the connection properties. This should only be used before calling TSConnect.
DesktopHeight(Height)
Sets the Desktop height in the connection properties. This should only be used before calling TSConnect.
DesktopBpp(bpp)
Sets the Desktop color depth in the connection properties. Valid values for bpp are all color depths exposed by the Remote Desktop client. This should only be used before calling TSConnect.
TypingRate(wpm)
Sets the typing rate in words per minute. This will control the typing rate when the SendKey function is used.
RedirectDevices (bRedirectDevices)
Enables USB device redirection if bRedirectDevices is 1. Disables USB device redirection if bRedirectDevices is 0.
RedirectPrinters (bRedirectPrinters)
Enables printer redirection if bRedirectPrinters is 1. Disables printer redirection if bRedirectPrinters is 0.
ConnectToAdministerServer (bAdmin)
Specifies whether the control should attempt to connect to the server for administrative purposes.
RemoteProgramMode(bMode)
Enables remote program mode when bMode is 1. When running in Remote Program mode, a few special settings need to be made to the clients and server. On the client machines, the following regkey needs to be set:
DWORD HKCU\Software\Microsoft\Terminal Server Client\RailScalabilityTest = 1
On the server, a task has to be created in the task scheduler that runs at logon for all test users and starts the TSAccSessionAgent.exe tool. Advanced properties of this task should specify that a parallel instance should be launched when an instance is already running on the machine. Also, the Remote Desktop Web Access (RemoteApp) role has to be installed on the server.
RemoteApplicationName(newVal)
Specifies the full path of the remote application that should be opened when the connection is made. In remote program mode, this setting must be specified before a call to TSConnect. This application must be published as a Remote App program on the server.
RemoteApplicationWindowTitle(newVal)
Specifies the window title of the remote application to be opened. The title can be a partial title. In remote program mode, this setting must be specified before a call to TSConnect.
TSConnect(szServer, szUserName, szPassword, szDomain)
This function will make a remote desktop connection to the target server. The parameters are self-explanatory.
Long PressKeyAndWaitForEvent( Label, KeyCode, KeyFlags, szWaitString, SEvent, lTimeout)
This function is the heart and soul of the automation. It sends keyboard input to the Remote Desktop session and also waits for an event which is expected as a consequence of the input. Additionally, it logs an entry in a response-times log specifying the amount of time taken for this action.
Label: is the string used for logging the elapsed time in the response-times log
KeyCode: is the ASCII code of the key that you want to press. Example: asc(“f”) will send the “f” key
KeyFlags: is a combination of the following flags. This is used to send special key combinations like Alt+”f”
VKeyFlag = 1
AltFlag = 2 CtrlFlag = 4
ShiftFlag = 8
Example: AltFlag OR CtrlFlag - this will send a combination of Alt + Ctrl key
szWaitString: is the string associated with the event that you expect to occur on the server as a response to sending the keys
SEvent: is one of the following accessibility events
WINDOW_EVENT = 1
MENU_EVENT = 2
OBJECTSHOW_EVENT = 3 OBJECTFOCUS_EVENT = 4
lTimeout: is the optional time out value in milliseconds. If this is not specified, the script will wait indefinitely for the specified event. Otherwise it will return after the timeout elapses
Return value: the function will return the time elapsed in milliseconds between sending the keyboard input and the firing of the server event. If the wait times out, it will return -1
Long WaitForUIEvent( szWaitString, SEvent, lTimeout)
This function waits for an accessibility event. This is useful when you want to synchronize with an event that occurs without any input.
szWaitString: is the string associated with the event that you expect to occur on the server as a response to sending the keys
SEvent: is one of the following accessibility events
WINDOW_EVENT = 1 MENU_EVENT = 2
OBJECTSHOW_EVENT = 3
OBJECTFOCUS_EVENT = 4
lTimeout: is the optional time out value in milliseconds. If this is not specified, the script will wait indefinitely for the specified event. Otherwise it will return after the timeout elapses
Return value: the function will return the time elapsed in milliseconds between the time the server received the wait request and the firing of the event. If the wait times out, it will return -1
SendKey(szString)
This function is used for typing text
szString: is the text string or character to be typed. Example: “notepad” or “p”
PressVKey(vKeyCode)
This function is used for sending special keys like Return key or Alt Key
vKeyCode: is the virtual key code of the special key. It is one of the following values
VK_RETURN = 13
VK_MENU = 18
VK_CONTROL = 162 VK_TAB = 9
VK_UP = 38
VK_DOWN = 40
VK_RIGHT = 39 VK_LEFT = 37
VK_SHIFT = 16
VK_BACK = 8 VK_ESCAPE = 27
VK_SPACE = 32
VK_END = 35
VK_HOME = 36 VK_DELETE = 46
VK_LWIN = 91
VKeyDown (vKeyCode)
This function is used for sending a key down message
vKeyCode: is the virtual key code of the special key. Same as in PressVKey.
VKeyUp (vKeyCode)
This function is used for sending a key up message
vKeyCode: is the virtual key code of the special key. Same as in PressVKey.
Note: VKeyDown and VKeyUp are useful for key combinations. For example, the Alt+Tab combination will be sent as follows
RUIDCOM.VKeyDown VK_MENU
RUIDCOM.PressVKey VK_TAB
RUIDCOM.VKeyUp VK_MENU
SwitchToWindow(szTitle, ExactMatchMode)
This function is used to switch to other applications – which means it will bring them into focus.
szTitle: is the title of the window to which you want to switch. This can be a partial string from the window title. For example for switching to a window with the title “Untitled – Notepad” the following code can be used
RUIDCOM.SwitchToWindow(“Notepad”)
ExactMatchMode: is optional. If this is set to 1, the szTitle string has to be an exact match to the window title.
Caution: the title string chosen should be unique among all the top-level windows on the desktop including hidden windows.
MinimizeWindow (szTitle, ExactMatchMode)
This function is used to minimize a window.
szTitle: is the title of the window which you want to minimize. This can be a partial string from the window title. For example for minimizing a window with the title “Untitled – Notepad” the following code can be used
RUIDCOM.MinimizeWindow(“Notepad”)
ExactMatchMode: is optional. If this is set to 1, the szTitle string has to be an exact match to the window title.
Caution: the title string chosen should be unique among all the top-level windows on the desktop including hidden windows.
ReportTag(szTag, LogMode)
This function will report the given tag string to the test controller which will display it on the user monitor list. It is useful in watching user activity through the controller. It is good idea to use this function at significant points through the script so that it is easy to monitor what a user is doing. ReportTag can also be used for logging elapsed time between two points in the scenario.
szTag: is the tag string that will be sent to the controller
LogMode: is used to indicate if the tag should be logged in the response-time log. It has the following values:
0: indicates that no logging should occur. This is also the default value in case this
argument is note provided
1: indicates that the tag should be logged. The szTag string is used for logging the
elapsed time in the response-times log. The elapsed time logged will be
measured between the current ReportTag call and the previous ReportTag call
which had LogMode set to 1. The first call to ReportTag will not log anything.
Hint: if ReportTag is called only once with LogMode set to 1 in a looping script,
this will log the cycle-time of the loop.
EnableDebugInfo()
This function enables the debug mode which explained in a later section below. This should be called after calling TSConnect().
LogLabelResponseTime( szLabel, ResponseTime)
This function creates an entry in the user response log.
szLabel: is the Label that used for the log entry.
ResponseTime: elapsed time value that is logged for this entry.
EndScript()
Signals the Controller that this script has come to an end.
StartRemoteProgram(szPath, szTitle)
Starts a new remote program after the initial connection has been made and the first remote program is already running.
szPath: Specifies the full path of the remote application that should be opened when the connection is made. This application must be published as a Remote App program on the server. szTitle: Specifies the window title of the remote application to be opened. The title can be a partial title.
SetProperty(szPropName, szValue)
This function is used to set a property that is exposed by any interface of the Remote Desktop ActiveX Control.
szPropName: name of the property to be set
szValue: the value that should be assigned to the property. This parameter should be a string. For example:
RUIDCOM.SetProperty "ColorDepth", "24"
The Role of Sleep
The sample notepad script shown earlier is using the WScript.Sleep function. Using sleeps is an important and required part of the script. This has to do with how the function PressKeyAndWaitForEvent (which is the main driver of the script) works. PressKeyAndWaitForEvent returns when the required Windows Accessibility event is fired by the server application. In other words, it returns when the drawing happens on the server. At this point if the script calls another PressKeyAndWaitForEvent without any delay, the new input may not get to the application control that it is intended for, and the script may become idle. The reason for this is that although the drawing that we were waiting for did happen, this doesn't mean that the application is also ready for input.
Let's consider the example of notepad where we are trying to open the "save as" dialog. Here is the code from the sample VB script:
1. RUIDCOM.PressKeyAndWaitForEvent "Open File Menu", asc("f"), AltFlag, "File",
MENU_EVENT
2. WScript.Sleep (2000)
3. RUIDCOM.PressKeyAndWaitForEvent "Open Save As Dialog", asc("s"), 0, "Save as",
OBJECTSHOW_EVENT
4. WScript.Sleep (2000)
When line 1 returns, the File Menu has been drawn. But it may not be ready for receiving input at this time. If we jump directly to line 3, the script will send the "s" key to the application. This key may not be received by the File Menu as it wasn't ready for input. The only way we can get around this problem is by putting in a reasonable amount of sleep between subsequent calls to PressKeyAndWaitForEvent. One more thing to consider here is that the amount of time that the File Menu will take to be ready for input is not constant. Firstly it depends on how fast the server is and secondly, this time will increase on a given server as more and more users are loaded onto it. So the amount of sleep should be enough to accommodate that.
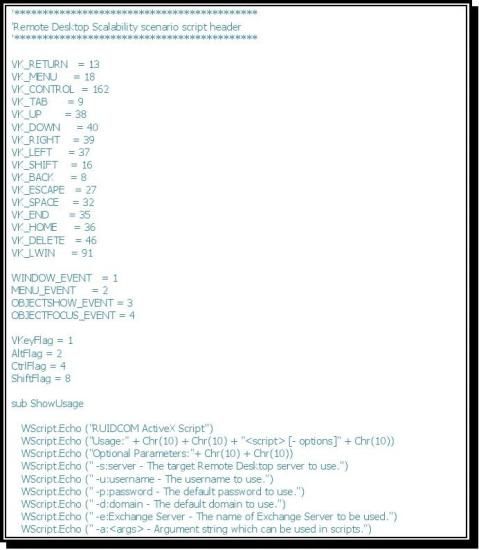
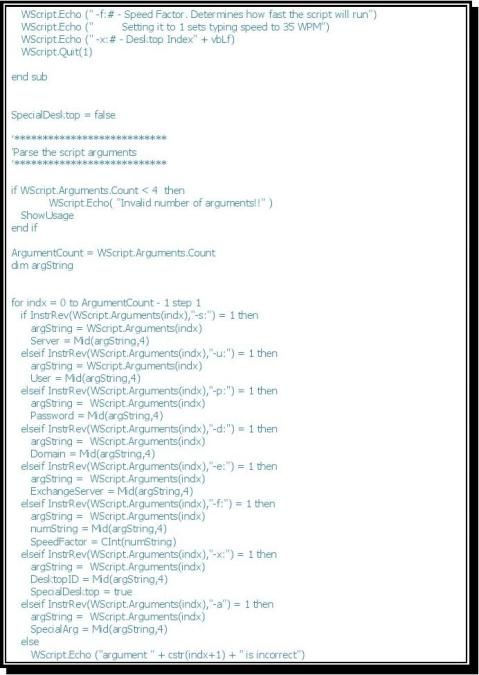
Script Format
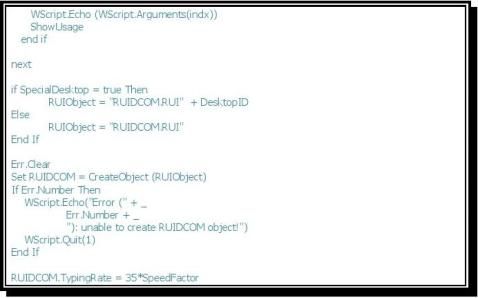
Any script that has to be run using this framework needs to have some common functionality. It needs to accept input in a known format and process it in a way which will facilitate some features of the tools. It should also define some well known constant values which will make the script more readable. The below sample shows the initial part of a test script written in VB Script. This sample should be used as the starting header for a new script. The remaining script should be appended at the end of this code.
Using Debug Mode to create scenario script
When you are trying to create your own script, you need to determine what events you should wait for after sending certain keyboard input. The way to do this is by running a debug script from a client. A debug script uses the EnableDebugInfo function exposed by the RUIDCOM object to switch to debug mode. The following script added to the script header provided above will create a debug script.
You can run this script from the client tools directory on the client machine by running the following command:
Cscript dbg.vbs –u:[User Name] –p:[Password] –s:[Server Name] –d:[Domain]
This will create a remote desktop connection to the server and also open a debug window. Now you can manually give any keyboard input to the remote session and you will see all the Accessibility events (and associated strings) on the server being displayed in the debug window (see figure 3).
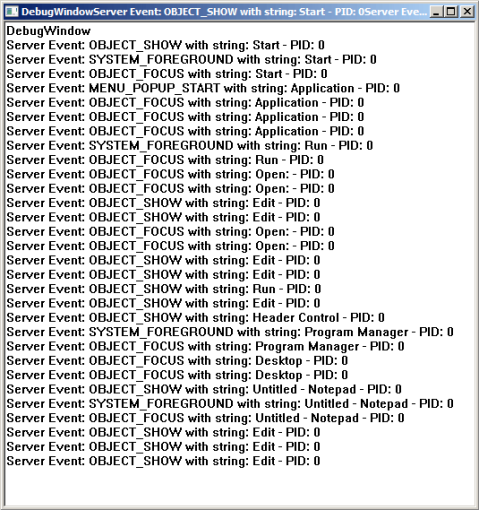
Figure 3
You have to pick one of the events that are displayed when you press a key, and use it in PressKeyAndWaitForEvent() function. You should try and pick a unique event. The preference of picking from multiple types of events is in the following order:
WINDOW_EVENT
MENU_EVENT
OBJECTSHOW_EVENT
OBJECTFOCUS_EVENT
This means that if a WINDOW_EVENT and OBJECTSHOW_EVENT both show up as a response to a keystroke, you should pick WINDOW_EVENT.
Test Results
Typically there are three types of logs that are interesting for analyzing the test results.
1. Controller Logs
2. User Response logs
3. Server Performance logs
Controller Logs
The controller tool produces a test progression log for each test which is of the format [Server]-
[script]-TestProgression-Timestamp.csv. This contains test progression events such as user launch, Connect, Disconnect, Idle, Resume, etc. This log can be used to determine how many active users were running on the server throughout the test.
The controller also produces a test log for every new test. The name of this log is of the format
[Server]-[script]-[Unique Timestamp].log. This log contains all the test settings, a copy of the test script run for the test, and test events that happen during the test. This log is very useful as a chronological history of a particular test run. It will show what the test was about and what happened during this test (launched users, idles, custom commands, errors, and a lot more).
User Response Logs
The other kind of data is from the user response-time logs that can be obtained from the client machines after the test is finished. All client machines have the user response time logs in the %systemdrive%\ResponseLogs directory. The log file name is of the format RUIDCOM-
[username]-Timestamp.log. The way to look at this data is by first aggregating all the response logs into a single file and then plotting the response times of each user action (like "Open File Menu") against time. This way it can be seen how much time particular actions take as the test progresses.
Server Logs
On the server any type of performance monitoring tools can be used to monitor CPU load, memory consumption, Disk I/O, Network activity etc. during the test. One example is using perfmon logs. All of these counters will provide useful information when viewed against the number of active Remote Desktop sessions on the server. One way of running such tools on the server is by using the "Server Setup Before Test" setting in the Controller configuration dialog. Another option is by using the "Custom Command Schedule" tab - this allows you to schedule a custom command to run on the server after a specified user is launched.
Troubleshooting and Debugging
If there are any issues in running the test, The first place to look at is the test log produced by the RDLoadSimulationController tool. Look for any error messages or warnings in this log.
In case of connection issues or idle script problems, some useful information can be obtained from logs produced on the client machines. The RUIDCOM.exe and RemoteUIControl.dll tools produce logs in the %temp% folder location on the client machines. These logs have the following format:
RemoteUIControl-[username]-[timestamp].log
RUIDCOM-[username]-[timestamp].log
In case of problems, errors and warnings are logged in these logs. More detailed information can be obtained from these logs by setting the following regkey on the client machines before running the test:
[HKLM\Software\Microsoft\RemoteUIControl] DWORD FileLogging=5