实验六交换机VLAN及路由器单臂路由综合应用
实验目的及要求
一、 掌握命令方式路由器中单臂路由的设置;
二、 巩固交换机VLAN的基本设置及创建Trunk的基本办法;
三、 提交实验报告一份,电子文档在下周实验课之前统一交至学习委员。
实验环境
YS-Routesim 3.1模拟器
配置:C2900交换机2台、2621路由器1台、PC机4台
实验内容
一、实验预备:参考基本实验六 一个VLAN下的单臂路由;
二、实验预备:参考基本实验七 子接口单臂路由;
三、实验连接图如下所示:
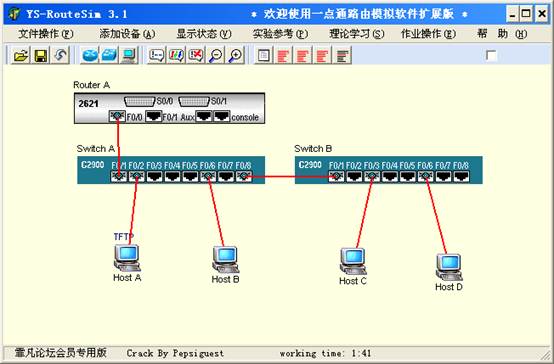
要求:
1.将HostA、HostC设置为同一网段IP,HostB、HostD设置为同一网段IP,并设置网关;
2.分别将SwitchA、SwitchB的F0/5、F0/6、F0/7、F0/8划分到VLAN2,并设置连接端口及网关;
3.路由器单臂路由设置。
效果:不同网段不同VLAN下PC机实现互通。
第二篇:交换机、路由器的基本配置及VLAN划分实验
计算机网络
实验报告
学校:华南理工大学广州汽车学院 系别:计算机工程系
专业班级:计算机科学与技术2班 姓名:李明书
学号:200830891506
序号:19
实验题目:交换机、路由器的基本配置及VLAN划分实验
一、 实验目的:
(1) 掌握交换机、路由器的基本配置
(2) 掌握VLAN技术的基本原理。
(3) 弄清VLAN技术的作用及其类型。
(4) 掌握VLAN的基本配置
(5) 掌握VLAN的划分
二、实验环境:
Windows 2003操作系统的计算机,H3C交换机、路由器
三、实验内容及步骤:
内容:配置交换机、路由器的基本配置;使用交换机实现相同VLAN内的设备可以互相访问,不同VLAN间的设备不能访问;有六台机器,其中PC1、PC3、PC5属于财务部门,PC2、PC4、PC6属于市场部门,把他们设置为不同VLAN。
步骤:
1. 路由器的加电过程如下:
InitDDR
SDRAM TESTING....
Do you want to check SDRAM? Yes or No (Y/N):
system start booting......Version 2.11
Press CTRL+D to stop auto-boot
Booting Normal Extended BootRom
Decompressing...done!
Ensure the baudrate is set to 9600bps!Starting at 0xa00000...
*******************************************************
* *
* H3C ___MSR20-40_____ BOOTROM, Version____2.14_____ *
* *
*******************************************************
Copyright(c) 2004-2007 Hangzhou H3C Technologies Co., Ltd.
Compiled date: Apr 09 2007, 18:13:30
CPU type : _____MPC8248_________
CPU L1 Cache : ____16____KB
CPU Clock Speed : ____400____MHz
Memory Type : DDR SDRAM
Memory Size : ____256_____MB
Memory Speed : ___100_____MHz
BootRom Size : ____4096_____KB
CPLD Version is __________
HardWare Version is __________
CF Card is Inserted, now is mounting...
cf:/ - Volume is OK
Mount CF Card OK!
CF Card Size:___256___MB
Press Ctrl+B to enter extended boot menu...
The current starting file is main application
file--cf:/__main.bin!________________________________________________ The main application file is self-decompressing...
Decompressing...done!
System is starting.....
Ensure the baudrate is set to ____9600_____bps!
Starting at 0x10000...
usrRoot() end
leave BSP
id=0x2000,proc=0xe3d72c
。。。
id=0xf770efff,proc=0xb2445c
It will take a long time to get configuration file, please wait...
Startup configuration file does not exist.ser interface con0 is available.
Press ENTER to get started.
<H3C>
%Aug 13 11:17:18:223 2007 H3C SHELL/4/LOGIN: Console login from con0
<H3C>
2. 路由器的基本配置如下:
<H3C>system-view //进入系统视图
[H3C]user-interface vty 0 4 //可以同时允许5 个用户Telnet 访问设备
[H3C-ui-vty0-4]authentication-mode password //设置用户访问时需要通过密码访问
[H3C-ui-vty0-4]set authentication password simple h3c //设置用户访问密码
[H3C-ui-vty0-4]user privilege level 3 //指定用户访问级别
[H3C]interface GigabitEthernet 0/0
[H3C-GigabitEthernet0/0] ip address 192.168.1.8 255.255.255.0
[H3C]telnet server enable //使能Telnet 服务器端功能
3.交换机的基本配置与划分VLAN如下:
(1).先将6台PC机连到一台交换机中;
(2).在6台PC机中配置同一网段的IP地址(192.168.1.0 255.255.255.0),PC1为192.168.1.1/24,PC2为192.168.1.2/24,PC3为192.168.1.3/24,PC4为192.168.1.4/24,
PC5为192.168.1.5/24,PC6为192.168.1.6/24;
(3).使用console口或控制台登陆交换机;
(4).配置交换机,用交换机划分出2个vlan,每个vlan中有3台PC机。 具体配置如下:
<H3C>system-view
[H3C]user-interface vty 0 4 //可以同时允许5 个用户Telnet 访问设备
[H3C-ui-vty0-4]authentication-mode password //设置用户访问时需要通过密码访问
[H3C-ui-vty0-4]set authentication password simple h3c //设置用户访问密码
[H3C-ui-vty0-4]user privilege level 3 //指定用户访问级别
[H3C]interface vlan 1
[H3C-Vlan-interface1]ip address 192.168.1.7 255.255.255.0 //本接口作为管理使用,因 为交换机上以太口不能够直接配置IP 地址,需要在Vlan-interface 下面配置,作用和路由器上固定接口配置IP 地址一样
[H3C]vlan 10
[H3C]port Ethernet 1/0/1 Ethernet 1/0/3 Ethernet 1/0/5
//把PC1、PC3和PC5划分到vlan 3
[H3C]vlan 20
[H3C]port Ethernet 1/0/2 Ethernet 1/0/4 Ethernet 1/0/6
//把PC2、PC4和PC6划分到vlan 4
四、实验结果与分析
在不划分vlan时,每台PC机都能相互的ping通;在同一个vlan中的PC机可以ping通(如PC1pingPC3);而不在同一个vlan中的PC机不能ping通(如PC1pingPC2)。
能过这次实验,对H3C的交换机与路由器有了不少的了解,如知道了其基本配置等等。