电子信息学院
实验报告书
课程名:《操作系统原理》
题 目: 实验二 Android的视图层与UI设计
实验类别: 【验证、设计】
班 级:
学 号:
姓 名:
1、 实验题目
Android的视图层与UI设计
2、实验目的与要求
(1)实验目的:
让同学熟悉Android开发中的UI设计,包括了解和熟悉常用控件的使用、界面布局和事件时间处理等内容。
(2)实验要求:
1. 熟悉和掌握界面控件设计;
2. 了解Android界面布局;
3. 掌握常用控件的时限和属性设置;
4. 创建和使用定制的控件。
3、实验步骤与源程序
一、 常用控件
1. 新建 “HelloUI” 工程,
2. MainActivity.java

package lin.example.helloui;
import android.app.Activity;
import android.os.Bundle;
import android.widget.TextView;
import android.widget.Button;
public class MainActivity extends Activity {
@Override
public void onCreate(Bundle savedInstanceState) {
super.onCreate(savedInstanceState);
setContentView(R.layout.activity_main);
TextView textView = (TextView)findViewById(R.id.textView1);
Button button = (Button)findViewById(R.id.button1);
}
}
3. res/layout/activity_main.xml
(1) Graphical Layout:
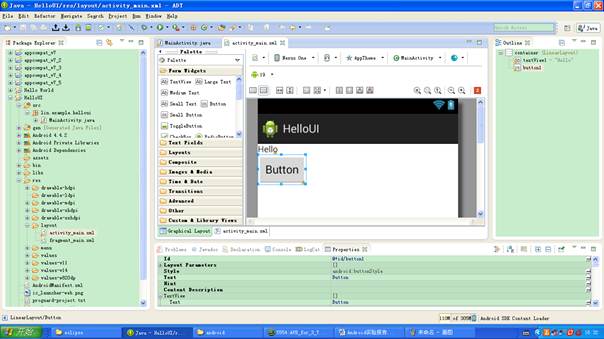
Android中有许多常用控件:
文本框:TextView、EditText
按钮:Button、RadioButton、CheckBox、ImageButton
列表:List、ExpandableListView、Spinner、AutoCompleteTextView、GridView、ImageView
进度条:ProgressBar、ProgressDialog、SeekBar、RatingBar
选择器:DatePicker、TimePicker
菜单:Menu、ContentMenu
对话框:Dialog、ProgressDialog
常用的控件有文本框、按钮和列表等。
控件的属性:可以直接在类中为控件设置属性,也可以在xml文件中设置属性。每个控件都有一系列的属性,例如id、size、text、color等等,大家可以找找API查看控件的属性。
(2)ativity_main.xml:
<LinearLayout xmlns:android="http://schemas.android.com/apk/res/android"
xmlns:tools="http://schemas.android.com/tools"
android:orientation="vertical"
android:id="@+id/container"
android:layout_width="match_parent"
android:layout_height="match_parent"
tools:context="lin.example.helloui.MainActivity"
tools:ignore="MergeRootFrame" >
<TextView
android:id="@+id/textView1"
android:layout_width="wrap_content"
android:layout_height="wrap_content"
android:text="Hello" />
<Button
android:id="@+id/button1"
android:layout_width="wrap_content"
android:layout_height="wrap_content"
android:text="Button" />
</LinearLayout>
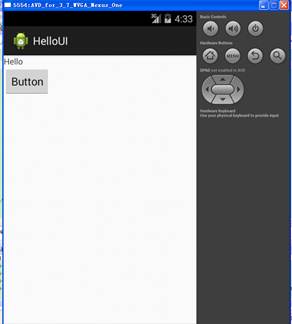
4 运行
Console: Android
[20##-05-03 15:43:52 - HelloUI] ------------------------------
[20##-05-03 15:43:52 - HelloUI] Android Launch!
[20##-05-03 15:43:52 - HelloUI] adb is running normally.
[20##-05-03 15:43:52 - HelloUI] Performing lin.example.helloui.MainActivity activity launch
[20##-05-03 15:43:52 - HelloUI] Automatic Target Mode: launching new emulator with compatible AVD 'AVD_for_3_7_WVGA_Nexus_One'
[20##-05-03 15:43:52 - HelloUI] Launching a new emulator with Virtual Device 'AVD_for_3_7_WVGA_Nexus_One'
[20##-05-03 15:47:48 - HelloUI] New emulator found: emulator-5554
[20##-05-03 15:47:48 - HelloUI] Waiting for HOME ('android.process.acore') to be launched...
[20##-05-03 15:50:54 - HelloUI] HOME is up on device 'emulator-5554'
[20##-05-03 15:50:55 - HelloUI] Uploading HelloUI.apk onto device 'emulator-5554'
[20##-05-03 15:50:58 - HelloUI] Installing HelloUI.apk...
[20##-05-03 15:53:08 - HelloUI] Success!
[20##-05-03 15:53:09 - HelloUI] Starting activity lin.example.helloui.MainActivity on device emulator-5554
4、测试数据与实验结果
二,界面布局
1. 新建 ”Hellouib” 工程
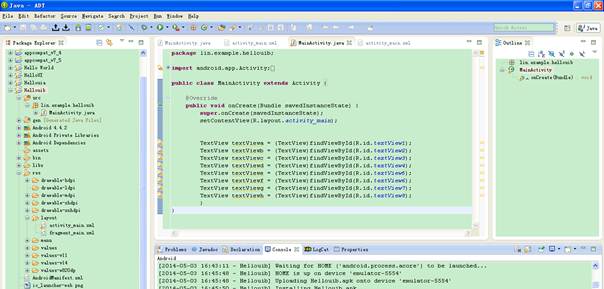
2. MainActivity.java
package lin.example.hellouib;
import android.app.Activity;
import android.os.Bundle;
import android.widget.TextView;
import android.widget.Button;
public class MainActivity extends Activity {
@Override
public void onCreate(Bundle savedInstanceState) {
super.onCreate(savedInstanceState);
setContentView(R.layout.activity_main);
TextView textViewa = (TextView)findViewById(R.id.textView1);
TextView textViewb = (TextView)findViewById(R.id.textView2);
TextView textViewc = (TextView)findViewById(R.id.textView3);
TextView textViewd = (TextView)findViewById(R.id.textView4);
TextView textViewe = (TextView)findViewById(R.id.textView5);
TextView textViewf = (TextView)findViewById(R.id.textView6);
TextView textViewg = (TextView)findViewById(R.id.textView7);
TextView textViewh = (TextView)findViewById(R.id.textView8);
}
}
4. activity_main.xml:
(1)Graphical Layout:
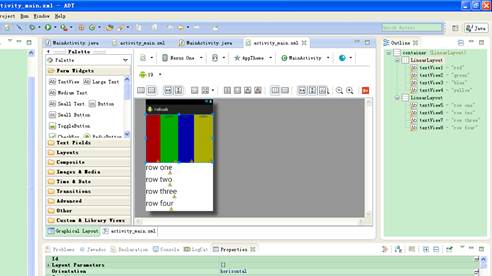
(2)ativity_main.xml:
<LinearLayout xmlns:android="http://schemas.android.com/apk/res/android"
xmlns:tools="http://schemas.android.com/tools"
android:id="@+id/container"
android:orientation="vertical"
android:layout_width="fill_parent"
android:layout_height="fill_parent"
tools:context="lin.example.hellouib.MainActivity"
tools:ignore="MergeRootFrame" >
<LinearLayout
android:orientation="horizontal"
android:layout_width="fill_parent"
android:layout_height="fill_parent"
android:layout_weight="1">
<TextView
android:id="@+id/textView1"
android:layout_width="wrap_content"
android:layout_height="fill_parent"
android:text="red"
android:gravity="center_horizontal"
android:background="#aa0000"
android:layout_weight="1"/>
<TextView
android:id="@+id/textView2"
android:layout_width="wrap_content"
android:layout_height="fill_parent"
android:text="green"
android:gravity="center_horizontal"
android:background="#00aa00"
android:layout_weight="1"/>
<TextView
android:id="@+id/textView3"
android:layout_width="wrap_content"
android:layout_height="fill_parent"
android:text="blue"
android:gravity="center_horizontal"
android:background="#0000aa"
android:layout_weight="1"/>
<TextView
android:id="@+id/textView4"
android:layout_width="wrap_content"
android:layout_height="fill_parent"
android:text="yellow"
android:gravity="center_horizontal"
android:background="#aaaa00"
android:layout_weight="1"/>
</LinearLayout>
<LinearLayout
android:orientation="vertical"
android:layout_width="match_parent"
android:layout_height="match_parent"
android:layout_weight="1">
<TextView
android:id="@+id/textView5"
android:layout_width="wrap_content"
android:layout_height="wrap_content"
android:layout_weight="1"
android:text="row one"
android:textSize="15pt"/>
<TextView
android:id="@+id/textView6"
android:layout_width="wrap_content"
android:layout_height="wrap_content"
android:layout_weight="1"
android:text="row two"
android:textSize="15pt"/>
<TextView
android:id="@+id/textView7"
android:layout_width="wrap_content"
android:layout_height="wrap_content"
android:layout_weight="1"
android:text="row three"
android:textSize="15pt"/>
<TextView
android:id="@+id/textView8"
android:layout_width="wrap_content"
android:layout_height="wrap_content"
android:layout_weight="1"
android:text="row four"
android:textSize="15pt"/>
</LinearLayout>
</LinearLayout>
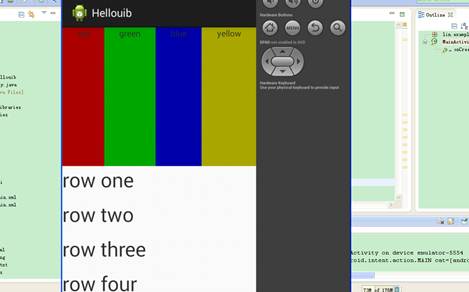
4 运行
Console: Android
[20##-05-03 16:42:31 - Hellouib] ------------------------------
[20##-05-03 16:42:31 - Hellouib] Android Launch!
[20##-05-03 16:42:31 - Hellouib] adb is running normally.
[20##-05-03 16:42:31 - Hellouib] Performing lin.example.hellouib.MainActivity activity launch
[20##-05-03 16:42:31 - Hellouib] Automatic Target Mode: launching new emulator with compatible AVD 'AVD_for_3_7_WVGA_Nexus_One'
[20##-05-03 16:42:31 - Hellouib] Launching a new emulator with Virtual Device 'AVD_for_3_7_WVGA_Nexus_One'
[20##-05-03 16:43:10 - Emulator] emulator: emulator window was out of view and was recentered
[20##-05-03 16:43:10 - Emulator]
[20##-05-03 16:43:11 - Hellouib] New emulator found: emulator-5554
[20##-05-03 16:43:11 - Hellouib] Waiting for HOME ('android.process.acore') to be launched...
[20##-05-03 16:45:48 - Hellouib] HOME is up on device 'emulator-5554'
[20##-05-03 16:45:48 - Hellouib] Uploading Hellouib.apk onto device 'emulator-5554'
[20##-05-03 16:45:50 - Hellouib] Installing Hellouib.apk...
[20##-05-03 16:47:26 - Hellouib] Success!
[20##-05-03 16:47:26 - Hellouib] Starting activity lin.example.hellouib.MainActivity on device emulator-5554
[20##-05-03 16:47:31 - Hellouib] ActivityManager: Starting: Intent { act=android.intent.action.MAIN cat=[android.intent.category.LAUNCHER] cmp=lin.example.hellouib/.MainActivity }
5、测试数据与实验结果
5、结果分析与实验体会
本次试验我们学习Android的视图层与UI设计,再是严重我们熟悉了Android开发中的UI设计,包括了解和熟悉常用控件的使用、界面布局和事件时间处理等内容,在熟悉和掌握了界面控件设计后,使我们更加了解了Android界面布局,随后掌握常用控件的时限和属性设置,并且学会了创建和使用定制的控件。
第二篇:潘占和android实验报告
实 验 报 告
院 系: 黔南民族师范学院
专业班级: 信息管理与信息系统
学 号: 1208045155
学生姓名: 潘占和
指导教师: 刘老师
开课时间:2015学年第二学期
《android程序开发》课程验证性实验报告
