常用交换机配置培训
宽带网中常用交换机主要是以下几种品牌:
Cisco 1924、Cisco 2924、Cisco 2950
3Com系列交换机(型号很多,但配置基本上一样)
港湾 1008湾 1016、港湾 1024、港湾 u2、港湾 3550
华为
交换机常用操作:
登录、查看交换机配置、端口10M/100M设置、端口半工/全工设置、配置VLAN
一、登录
整个登录过程分为超级终端登录和用户登录两个步骤:
超级终端登录,步骤所有交换机都是一样的
例:
启动 超级终端程序
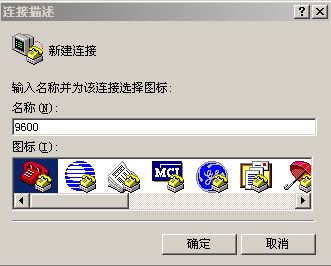
在名称处输入 9600(代表速率),点确定

选择 连接时使用 COM1 口,点确定

选择 每秒位数 9600(一般交换机都是这个速率),点确定在敲击一下回车键,这样就登录进去了
用户登录,不同品牌的交换机用户登录步骤不同:
1、 Cisoc系列:
Switch> 普通模式,
Switch>en 进入管理模式
Switch>password: 输入正确密码 20lgxC02 20lgxC04
Switch# 管理模式,可进行交换机管理操作
Switch#conf t 进入配置模式
Switch(config)# 配置模式,可进行交换机配置操作
2、 3Com系列:
Login:admin 默认管理员
Password: 输入正确密码,可进入管理配置模式
Menu options: --------------3Com SuperStack II Switch 610---------------
bridge - Administer bridging/VLANS
ethernet - Administer Ethernet ports
feature - Administer system features
ip - Administer IP
logout - Logout of the Command Line Interface
snmp - Administer SNMP
system - Administer system-level functions
Type ? for help.
------------------------------------Switch 610 (1)----------------------
Select menu option:
3、 港湾系列:
Login:admin 默认管理员
Password: 默认密码harbour
Harbour> 进入普通模式
Harbour>en 进入管理模式
Harbour(config)# 进入配置模式
4、华为系列:
Password: 默认密码huawei
<huawei> 普通模式,
<huawei>sys 进入管理模式
[huawei] 管理配置模式,可进行交换机管理配置操作
二、查看交换机配置
查看交换机配置是详细了解交换机现有运行状态的重要手段,往往登录后第一步就是查看交换机配置,不同系列命令不同:
1、 Cisoc系列:
Switch#show run
2、 3Com系列:
比较特殊,只能通过菜单一项项查看。
3、 港湾系列:
Harbour(config)#show run
4、华为系列:
huawei#dis cur
三、端口10M/100M设置、端口半工/全工设置
1、 Cisoc系列:设置1口为10M半工
Switch#conf t
Switch(config)#inter f0/1
Switch(config-if)#speed 10
Switch(config-if)#duplex half
2、 3Com系列:
比较特殊,只能通过菜单项来设置。
3、 港湾系列:设置1口100M全工
Harbour(Config)#config port 1 auto off
Harbour(Config)#config port 1 duplex full
Harbour(Config)#config port 1 speed 100
4、 华为系列:设置1口10M全工
[huawei]inter e0/1(华为2403H-EA的交换机进入端口1口inter e1/0/1)
[huawei-Ethernet0/1]speed 10
[huawei-Ethernet0/1]duplex full
四、配置VLAN
配置示例:
现有一小区,用户已达到400户,用户反映网络不稳定,急需划分VLAN,已减小广播域,提高网络利用效率。该小区主干交换机为24交换机,上连口是1口,数据局提供2个VLAN ID,一个是430,一个是431,拟定2-12口划到vlan430名字为test1,13-24口划到vlan 431名字为test2。
1、 Cisco系列:
Switch#conf t
Switch(config)#inter f0/1 进入端口1
Switch(config-if)#speed 100 设置端口1为100M模式
Switch(config-if)#switchport mode trunk 设置该口为trunk模式
Switch(config-if)#switchport trunk encapsulation dot1q 设置封装方式为802.1q
Switch(config-if)#exit
Switch(config)#exit
Switch#vlan database 进入vlan设置
Switch(vlan)#vlan 430 name test1 设置vlan430 ID和名字
Switch(vlan)#vlan 431 name test2 设置vlan431 ID和名字
Switch(vlan)#exit
Switch#conf t
Switch(config)#inter f0/2 进入端口2
Switch(config-if)#switchport access vlan 430 把端口2加入vlan ID 430
Switch(config-if)#switchport mode access
Switch(config)#inter f0/3 进入端口3
Switch(config-if)#switchport access vlan 430 把端口3加入vlan ID 430
Switch(config-if)#switchport mode access
。。。
逐个把4-12端口加入vlan 430,13-24端口加入vlan 431
。。。
Switch(config-if)#exit
Switch(config)#exit
Switch#write 保存配置
2、 3Com系列:
Menu options: --------------3Com SuperStack II Switch 610---------------
bridge - Administer bridging/VLANS
ethernet - Administer Ethernet ports
feature - Administer system features
ip - Administer IP
logout - Logout of the Command Line Interface
snmp - Administer SNMP
system - Administer system-level functions
Type ? for help.
------------------------------------Switch 610 (1)----------------------
Select menu option: (此处为输入命令)
键入bridge命令会出现
Menu options: --------------3Com SuperStack II Switch 610---------------
agingTime - Set the bridge address aging time
display - Display bridge information
multicastFiltering - Administer multicast filtering
port - Administer bridge ports
stpForwardDelay - Set the bridge Spanning Tree forward delay
stpHelloTime - Set the bridge Spanning Tree hello timer
stpMaxAge - Set the bridge Spanning Tree maximum age
stpPriority - Set the Spanning Tree bridge Priority
stpState - Enable/Disable Spanning Tree on a bridge
vlan - Administer VLANs
Type "q" to return to the previous menu or ? for help.
------------------------------------Switch 610 (1)----------------------
Select menu option (bridge):
然后键入vlan命令后
Menu options: --------------3Com SuperStack II Switch 610---------------
addPort - Add a port to a VLAN VLAN加入端口
create - Create a VLAN 创建VLAN
delete - Delete a VLAN 删除VLAN
detail - Display detail information 查看加入VLAN的端口
modify - Modify a VLAN 修改VLAN加入端口
removePort - Remove a port from a VLAN VLAN删除端口
summary - Display summary information 查看VLAN
Type "q" to return to the previous menu or ? for help.
------------------------------------Switch 610 (1)----------------------
Select menu option (bridge/vlan):
先创建VLAN,create命令
Enter VLAN ID (2-4094) [2]: 430 VLAN ID号
Enter Local ID (2-16) [2]:2 本地VLAN ID号
Enter VLAN Name [VLAN 430]:test1 VLAN名称
Creating VLAN. 创建VLAN
[]中为默认值
Select menu option (bridge/vlan): cre
Enter VLAN ID (2-4094) [2]: 431
Enter Local ID (2-16) [3]:
Enter VLAN Name [VLAN 431]: test2
Creating VLAN.
以上创建了2个VLAN号分别为430、431的VLAN。
然后开始加入端口,addPort命令
Select VLAN ID (1-4094) [1]: 430 VLAN ID号
Select Ethernet port (1-26, all): 2 把端口2加入vlan ID 430
Enter tag type (none, 802.1Q) [802.1Q]: none 设置封装方式
(3com低端交换机只能一个一个端口加)
加入VLAN号为430的2-12口
Select menu option (bridge/vlan): add
Select VLAN ID (1-4094) [1]: 430
Select Ethernet port (1-26, all): 3
Enter tag type (none, 802.1Q) [802.1Q]: none
Select menu option (bridge/vlan): add
Select VLAN ID (1-4094) [1]: 430
Select Ethernet port (1-26, all): 4
Enter tag type (none, 802.1Q) [802.1Q]: none
。。。
Select menu option (bridge/vlan): add
Select VLAN ID (1-4094) [1]: 430
Select Ethernet port (1-26, all): 12
Enter tag type (none, 802.1Q) [802.1Q]: none
然后加入VLAN号为431的13-24
Select menu option (bridge/vlan): add
Select VLAN ID (1-4094) [1]: 431
Select Ethernet port (1-26, all): 13
Enter tag type (none, 802.1Q) [802.1Q]: none
。。。
Select menu option (bridge/vlan): add
Select VLAN ID (1-4094) [1]: 431
Select Ethernet port (1-26, all): 24
Enter tag type (none, 802.1Q) [802.1Q]: none
VLAN端口划分完毕,然后做TRUNK口,也是用addPort命令叠加端口
Select menu option (bridge/vlan): add
Select VLAN ID (1-4094) [1]: 430
Select Ethernet port (1-26, all): 1
Enter tag type (none, 802.1Q) [802.1Q]:
Select menu option (bridge/vlan): add
Select VLAN ID (1-4094) [1]: 431
Select Ethernet port (1-26, all): 1
Enter tag type (none, 802.1Q) [802.1Q]:
端口标记一般为802.1Q的协议传输
配置完成
3、 港湾系列:
Harbour(Config)#create vlan test1 建立test1
Harbour(Config)#config vlan test1 tag 430 配置test1的vlan ID为430
Harbour(Config)#config vlan test1 add port 1 tagged 设置1口为test1的上连口
Harbour(Config)#config vlan test1 add port 2,3,4,5,6,7,8,9,10,11,12 untagged
设置2-12到test1
Harbour(Config)#create vlan test2
Harbour(Config)#config vlan test2 tag 431
Harbour(Config)#config vlan test2 add port 1 tagged
Harbour(Config)#config vlan test2 add port 13,14,15,16,17,18,19,20,21,22,23,24
untagged
Harbour(Config)#save
4、 华为系列:
[huawei]inter e0/1 进入端口1
[huawei]port link-type trunk 配置端口为trunk口
[huawei]port trunk permit vlan all 同意所有vlan通过
[huawei]vlan 430 配置vlan ID 430
[huawei-vlan430]description test1 配置vlan430的名字为test1
[huawei-vlan430]port e0/2 to e0/12 把端口2-12加入vlan ID 430
[huawei]vlan 431
[huawei-vlan431]description test2
[huawei-vlan431]port e0/13 to e0/24