Junit 学习笔记
一个 单元(Unit) 是指一个可独立进行的工作,独立进行指的是这个工作不受前一次或接下来的工作的结果影响,简单的说,就是不与上下文(Context)发生关系。
如果是在Java程式中,具体来说一个单元可以是指一个方法(Method),这个方法不依赖于前一次运行的结果,也不牵涉到后一次的运行结果。
举例来说,下面这个程式的gcd()方法可视为一个单元: ? MathTool.java
package onlyfun.caterpillar;
public class MathTool {
public static int gcd(int num1, int num2) {
int r = 0;
while(num2 != 0) {
r = num1 % num2;
num1 = num2;
num2 = r;
}
return num1;
}
}
下面的gcd()方法不视为一个单元,要完成GCD的计算,您必须呼叫setNum1()、setNum2()与gcd()三个方法: ? MathFoo.java
package onlyfun.caterpillar;
public class MathFoo {
private static int num1;
private static int num2;
public static void setNum1(int n) {
num1 = n;
}
public static void setNum2(int n) {
num2 = n;
}
public static int gcd() {
int r = 0;
while(num2 != 0) {
r = num1 % num2;
num1 = num2;
num2 = r;
}
return num1;
}
}
然而要完全使用一个方法来完成一个单元操作在实行上是有困难的,所以单元也可广义解释为数个方法的集合,这数个方法组合为一个单元操作,完成一个工作。
不过设计时仍优先考虑将一个公开的(public)方法要设计为单元,而尽量不用数个公开的方法来完成一件工作,以保持介面简洁与单元边界清晰。
将工作以一个单元进行设计,这可以使得单元可以重用,并且也使得单元可以进行测试,进而促进类别的可重
用性。
单元测试(Unit Test) 指的自然就是对每一个工作单元进行测试,了解其运行结果是否符合我们的预期,例如当您撰写完MathTool类别之后,您也许会这么作个小小的测试程式: ? UnitTestDemo.java
package onlyfun.caterpillar.test;
import onlyfun.caterpillar.MathTool;
public class UnitTestDemo {
public static void main(String[] args) {
if(MathTool.gcd(10, 5) == 5) {
System.out.println("GCD Test OK!");
}
else {
System.out.println("GCD Test Fail!");
}
}
}
这个动作是开发人员很常作的动作,然而您必须自行看着测试程式的输出结果来了解测试是否成功,另一方面,测试程式本身也是个程式,在更复杂的测试中,您也许会遇到测试程式本身出错,而导致无法验证结果的情况。
JUnit是个测试框架,藉由它所提供的工具,您可以减少撰写错误测试程式的机会,而另一方面,您可以有更好的方法来检验测试结果,而不是看着一长串输出的文字 .
2.测试驱动:
大多数的程式设计人员,都习惯先将程式写好,运行它,然后观看结果是否正确,懂得在设计好程式后,撰写专门的测试程式的设计人员已经算是难能可贵。
测试驱动开发(Test-Driven Development, TDD) 鼓励您在撰写程式之前,就先将测试程式完成,之后再根据测试程式的要求,逐步实现您所要设计的程式。
举个例子来说,今天您要设计一个计算最大公因数的单元,在测试驱动开发中,您会先撰写下面的测试程式: ? UnitTestDemo.java
package onlyfun.caterpillar.test;
import onlyfun.caterpillar.MathTool;
public class UnitTestDemo {
public static void main(String[] args) { if(MathTool.gcd(10, 5) == 5) {
System.out.println("GCD Test OK!");
}
else {
System.out.println("GCD Test Fail!");
}
}
}
您第一个所想到的是,这个程式有什么作用? 根本不能编译! 其实要让这个程式能够编译并不是难事,先写个空壳就可以了:
? MathTool.java
package onlyfun.caterpillar;
public class MathTool {
public static int gcd(int num1, int num2) {
return 0;
}
}
现在程式可以编译了,当然,当您运行测试程式时,只会一直显示"GCD Test Fail!"的讯息,为了通过测试,您再来依测试程式的设计完成最大公因数的演算内容: ? MathTool.java
package onlyfun.caterpillar;
public class MathTool {
public static int gcd(int num1, int num2) {
int r = 0;
while(num2 != 0) {
r = num1 % num2;
num1 = num2;
num2 = r;
}
return num1;
}
}
现在编译测试程式,然后运行它,您就可以得到"GCD Test OK!"的讯息,您已经通过测试了。
先写测试的好处是,测试程式本身即是您的设计蓝图,您依据这个蓝图撰写您的单元,为了符合测试程式的要求,您的单元必须设计的可以测试,这迫使您设计程式时,考虑到单元的低耦合。
3.第一个junit 测试
要进行测试,首先要设计测试案例(Test Case),一个案例是对程式给予假定条件,然后运行程式看看在给定的条件之下,是否符合预期结果。
在JUnit下,您可以继承 TestCase 来撰写测试案例,并定义您的测试方法,每一个测试方法是
以 testXXX() 作为命名,一个例子如下所示:
? MathToolTest.java
package onlyfun.caterpillar.test;
import onlyfun.caterpillar.MathTool;
import junit.framework.TestCase;
public class MathToolTest extends TestCase {
public void testGcd() {
assertEquals(5, MathTool.gcd(10, 5));
}
public static void main(String[] args) {
junit.textui.TestRunner.run(MathToolTest.class);
}
}
assertEquals()方法用来断定您希望的预期结果与单元方法实际的传回结果是否相同,如果不同则丢出例外,
TestRunner会捕捉例外,并提取当中的相关讯息报告测试结果,这边使用的是文字模式的TestRunner。
接下来根据测试案例撰写实际的程式,首先试着让测试案例能通过编译: ? MathTool.java
package onlyfun.caterpillar;
public class MathTool {
public static int gcd(int num1, int num2) {
return 0;
}
}
编译完成程式之后,接着运行测试案例,您会得到以下的结果:
.F
Time: 0
There was 1 failure:
1) testGcd(onlyfun.caterpillar.test.MathToolTest)
junit.framework.AssertionFailedError: expected:<5>
but was:<0>
at
onlyfun.caterpillar.test.MathToolTest.testGcd(MathToo
lTest.java:7)
at
sun.reflect.NativeMethodAccessorImpl.invoke0(Native
Method) at
sun.reflect.NativeMethodAccessorImpl.invoke(Unknown
Source)
at
sun.reflect.DelegatingMethodAccessorImpl.invoke(
Unknown Source)
at
nlyfun.caterpillar.test.MathToolTest.main(MathToolTes
t.java:11)
FAILURES!!!
Tests run: 1, Failures: 1, Errors: 0
在测试驱动中,测试案例所回报的结果会是以测试失败作为开始,您要一步步消除这些失败的讯息,接下来我们根据测试案例,完成所设计的程式:
? MathTool.java
package onlyfun.caterpillar;
public class MathTool {
public static int gcd(int num1, int num2) {
int r = 0;
while(num2 != 0) {
r = num1 % num2;
num1 = num2;
num2 = r;
}
return num1;
}
}
再次运行测试案例,您会得到以下的结果:
0 1 2 .
Time: 0
OK (1
test)
这次运行没有问题,测试已经通过!
4.failure and error
在运行TestRunner执行您的测试时,您会发现到有 Failure 与 Error 两种测试尚未通过的讯息。
Failure指的是预期的结果与实际运行单元的结果不同所导致,例如当您使用assertEquals()或其它
assertXXX()方法断言失败时,就会回报Failure,这时候您要检查您的单元方法中的逻辑设计是否有误。
Error指的是您程式没有考虑到的情况,在断言之前程式就因为某种错误引发例外而终止,例如在单元中存取某个阵列,因为存取超出索引而引发ArrayIndexOutOfBoundsException,这会使得单元方法无法正确完成,在测试运行到assertXXXX()前就提前结束,这时候您要检查您的单元方法中是否有未考虑到的情况而引发流程突然中断。
来看个实际的例子,如果您设计了下面的测试案例: ? ObjectArrayTest.java
package onlyfun.caterpillar.test;
import onlyfun.caterpillar.ObjectArray;
import junit.framework.TestCase;
public class ObjectArrayTest extends TestCase {
public void testAdd() {
ObjectArray objArr = new ObjectArray();
Object testObj = new Object();
Object obj = objArr.setObject(0, testObj);
assertEquals(testObj, obj);
} public static void main(String[] args) {
junit.textui.TestRunner.run(ObjectArrayTest.class);
}
}
然后根据这个测试案例,您撰写了ObjectArray类别:
? ObjectArray.java

package onlyfun.caterpillar;
public class ObjectArray {
private Object[] objs;
public Object setObject(int i, Object o) {
return objs[i];
}
}
:
Time: 0
There was 1 error:
1)
testAdd(onlyfun.caterpillar.test.ObjectAr
rayTest)
java.lang.NullPointerException
....
....
FAILURES!!!
Tests run: 1, Failures: 0, Errors: 1
仔细看一下您所设计的ObjectArray类别,显然程式撰写的太勿忙,忘了初始化Object阵列了,因而引发了NullPointerException,这是程式设计上的错误,使得尚未进行断言之前就引发例外中断,所以修正一下ObjectArray,提供一个建构函式,预设产生长度为10的阵列: ? ObjectArray.java
package onlyfun.caterpillar;
public class ObjectArray {
private Object[] objs;
public ObjectArray() {
objs = new Object[10];
}
public Object setObject(int i, Object o) {
return objs[i];
}
}
再运行一次TestRunner,这次Error没了,但是有Failure:
.F
Time: 0
There was 1 failure:
1)
testAdd(onlyfun.caterpillar.test.ObjectArrayTe
st) junit.framework.AssertionFailedError:
expected:<java.lang.Object@10b30a7> but
was:<null>
....
....
FAILURES!!!
Tests run: 1, Failures: 1, Errors: 0
这表示可以执行到assertEquals()完毕,但是断言失败,所以再设计程式以消除Failure:
? ObjectArray.java
package onlyfun.caterpillar;
public class ObjectArray {
private Object[] objs;
public ObjectArray() {
objs = new Object[10];
}
public Object setObject(int i, Object o) {
objs[i] = o;
return objs[i];
}
}
再次运行TestRunner,这次应该可以通过测试了。
如果您的单元在执行时,使用throws声明会丢出某些例外,例如IOException,您希望可以在testXXXX()中测试例外是否真的被丢出,您可以使用try.....catch来处理,下面这个程式是个实例,假设
java.io.FileReader是您所设计的类别,您提供一个测试档案test.txt: ? FileReaderTest.java
package onlyfun.caterpillar.test;
import java.io.*;
import junit.framework.TestCase;
public class FileReaderTest extends TestCase {
public void testClose() throws IOException {
FileReader reader = new FileReader("test.txt");
reader.close();
try {
reader.read();
fail("reading file after closed" +
" and didn't throw IOException");
}
catch(IOException e) {
assertTrue(true);
}
}
public static void main(String[] args) {
junit.textui.TestRunner.run(FileReaderTest.class);
}
}
您所测试的可能是一个预期会丢出的例外,您想要看看当错误的情况成立时,是不是真会丢出例外,例如testClose()测试FileReader在close()之后如果再read() ,是不是会如期丢出IOException,您先行在方法中用try....catch捕捉了这个例外,如果没有如期丢出例外,则不会被catch捕捉,而程式流程继续往下,执行到fail ()陈述,这表示例外处理没有发生,此时主动丢出一个Failure,表示程式的执行并不如您所预期的。
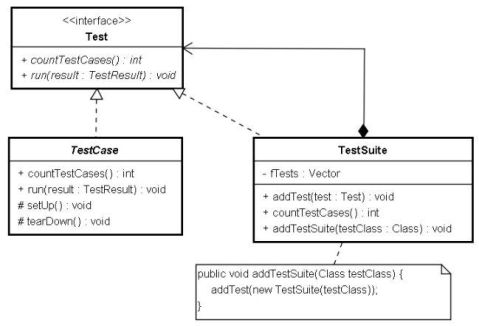
5.TestUnit
您定义自己的TestCase,并使用TestRunner来运行测试,事实上TestRunner并不直接运行TestCase上的单元方法,而是透过 TestSuite ,TestSuite 与TestCase都实作了Test介面,TestSuite 可以将数个TestCase组合在一起,这是 Composite模式 , 这让每个TestCase保持简单。
来看看一个例子:
? MathToolTest.java
package onlyfun.caterpillar.test;
import onlyfun.caterpillar.MathTool;
import junit.framework.TestCase;
public class MathToolTest extends TestCase {
public MathToolTest(String testMethod) {
super(testMethod);
}
public void testGcd() {
assertEquals(5, MathTool.gcd(10, 5));
}
public static void main(String[] args) {
junit.textui.TestRunner. run(MathToolTest.class) ;
}
}
JUnit并没有规定您一定要使用testXXX()这样的方式来命名您的测试方法,如果您要提供自己的方法(当然JUnit鼓励您使用testXXX()这样的方法名称),则可以如上撰写,为了要能够使用建构式提供测试方法名称,您的TestCase必须提供如下的建构式:
public MathToolTest(String testMethod) {
super(testMethod);
}
在这个例子中,您并没有看到任何的TestSuite,这是因为TestRunner的run()方法中会建立TestSuite:
static public void run(Class testClass) {
run(new TestSuite(testClass));
}
在TestSuite的建构式中,会使用反射(reflection)自动找出testXXX()方法,并加入为待执行的测试方法。TestRunner的run()方法中会去执行TestSuite上的run()方法,然后TestSuite会将之委托给Test上的run()方法,而该run()方法中执行每一个testXXX()方法 。简而言之,上例的写法,所有MathToolTest中的testXXX()方法都会被执行 。
如果您使用上面范例的run()方法,则TestRunner就会像上面这样自动为您建立一个TestSuite,并找出testXXX()方法, 您也自行定义suite()方法,组合想要进行的测试:
public static Test suite() {
TestSuite suite = new TestSuite();
// 这边可以加入指定的测试方法名称
suite. addTest(new MathToolTest("otherTest")) ;
return suite;
}
然后使用TestRunner的另一个 版本 run()方法来执行测试:
junit.textui.TestRunner. run(MathToolTest.suite());
如果要加入更多的测试方法,使用addTest()就可以了,您还可以将数个TestSuite组合在一起,例如在一个TestAll类别中如下定义suite():
public static Test suite() {
TestSuite suite= new TestSuite();
suite .addTestSuite(TestCase1.class) ;
suite .addTestSuite(TestCase2.class) ;
return suite;
}
addTestSuite()方法定义如下,一样的,这个执行结果是找出每个TestCase中的testXXX()方法:
public void addTestSuite(Class testClass) {
addTest(new TestSuite(testClass));
}
如此之来,您可以一次运行所有的测试,而不必个别的运行每一个测试案例,例如:
junit.textui.TestRunner.run(TestAll.suite());
TestCase与TestSuite都实作了Test介面,其运行方式为 Command模式 的一个实例,而TestSuite可以组合数个TestSuite或TestCase,这是 Composite模式 的一个实例。
6 TestCase
使用JUnit时,您主要都是透过继承TestCase类别来撰写测试案例,预设上您可以使用testXXX() 名称来撰写单元测试。
在测试一个单元方法时,有时您会需要给它一些物件作为运行时的资料,例如您撰写下面这个测试案例:
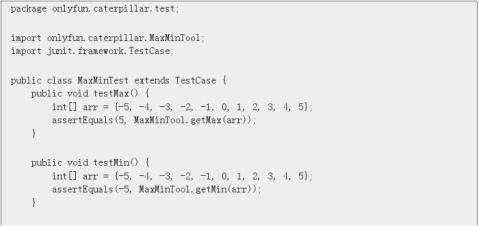

您将设计的MaxMinTool包括静态方法getMax()与getMin(),当您给它一个整数阵列,它们将个别传回阵列中的最大值与最小值,显然的,您所准备的阵列重复出现在两个单元测试之中,重复的程式码在设计中可以减少就尽量减少,在这两个单元测试中,整数阵列的准备是单元方法所需要的资源,我们称之为fixture,也就是一个测试时所需要的资源集合。
fixture必须与上下文(Context)无关,也就是与程式执行前后无关,这样才符合单元测试的意涵,为此,通常将所需的fixture撰写在单元方法之中,如此在单元测试开始时创建fixture ,并于结束后销毁fixture。
然而对于重复出现在各个单元测试中的fixture,您可以集中加以管理,您可以在继承TestCase之后,重新定义setUp() 与 tearDown() 方法,将数个单元测试所需要的fixture在setUp()中创建,并在tearDown()中销毁,例如:
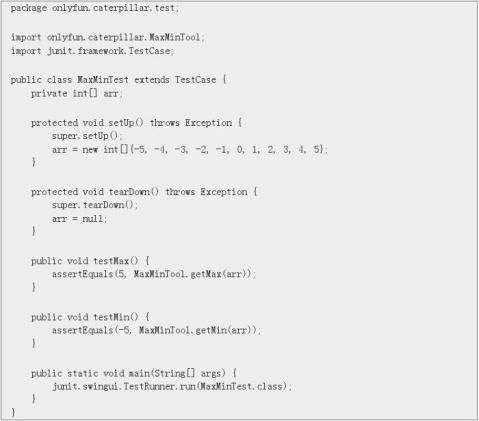
setUp()方法会在每一个单元测试testXXX()方法开始前被呼叫,因而整数阵列会被建立,而tearDown()会在每一个单元测试testXXX()方法结束后被呼叫,因而整数阵列参考名称将会参考至null,如此一来,您可以将fixture的管理集中在setUp()与tearDown()方法之后。
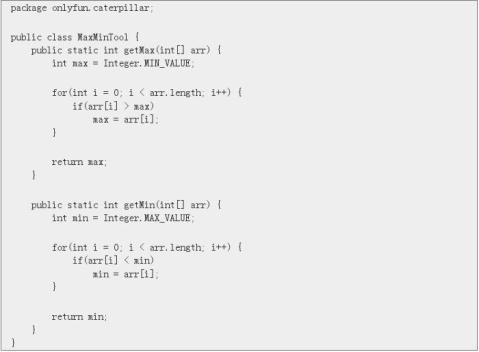
最后按照测试案例的内容,您完成MaxMinTool类别:
Swing介面的TestRunner在测试失败时会显示红色的棒子,而在测试成功后会显示绿色的棒子,而 "Keep the bar green to keep the code clean." 正是JUnit的名言,也是测试的最终目的。