Wireshark抓包分析实验
若惜年
一、实验目的:
1.学习安装使用wireshark软件,能在电脑上抓包。
2.对抓出包进行分析,分析得到的报文,并与学习到的知识相互印证。
二、实验内容:
使用抓包软件抓取HTTP协议通信的网络数据和DNS通信的网络数据,分析对应的HTTP、TCP、IP协议和DNS、UDP、IP协议。
三、实验正文:
IP报文分析:

从图中可以看出:
IP报文版本号为:IPV4
首部长度为:20 bytes
数据包长度为:40
标识符:0xd74b
标志:0x02
比特偏移:0
寿命:48
上层协议:TCP
首部校验和:0x5c12
源IP地址为:119.75.222.18
目的IP为:192.168.1.108
UDP:
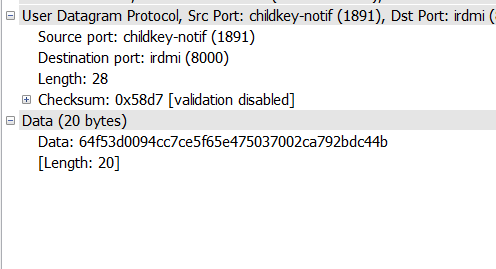
从图中可以看出:
源端口号:1891
目的端口号:8000
udp报文长度为:28
检验和:0x58d7
数据长度:20 bytes
UDP协议是一种无需建立连接的协议,它的报文格式很简单。当主机中的DNS应用程序想要惊醒一次查询时,它构造一个DNS查询报文段并把它给UDP,不需要UDP之间握手,UDP为报文加上首部字段,将报文段交给网络层。
TCP:
第一次握手:
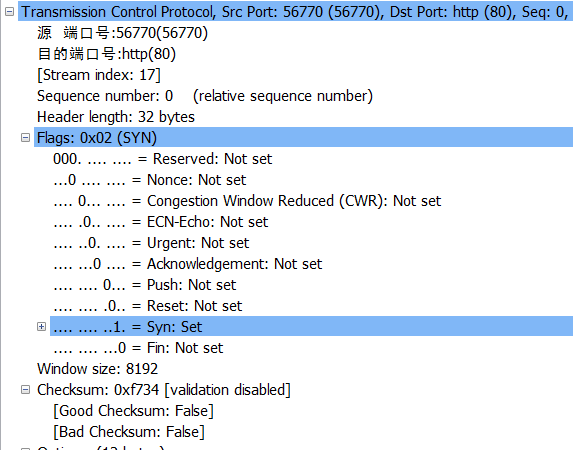
从图中看出:
源端口号:56770
目的端口号:80
序列号为:0
首部长为: 32 bytes
SYN为1表示建立连接成功
当fin为1时表示删除连接。
第二次握手:

从图中看出:
源端口号是:80
目的端口号为:56770
序列号为:0
ack为:1
Acknowledgement为1表示包含确认的报文
Syn为1表示建立连接。
第三次握手:
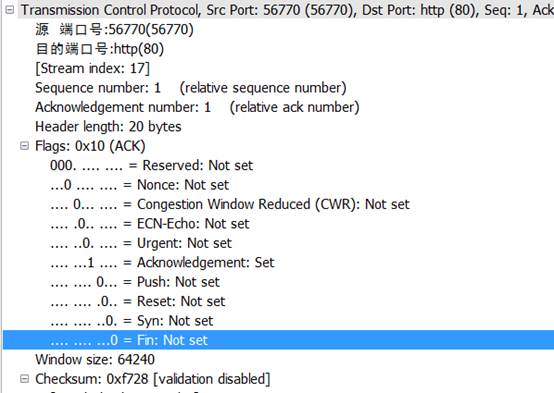
从图中看出:
源端口:56770
目的端口:80
序列号为:1
ACK为:1
首部长为:20bytes
Acknowledgement为1表示包含确认的报文
所以,看出来这是TCP连接成功了
Tcp是因特网运输层的面向连接的可靠的运输协议,在一个应用进程可以开始向另一个应用进程发送数据前,这两个进程必须先握手,即它们必须相互发送预备文段,建立确保传输的参数。
http:
发送报文:
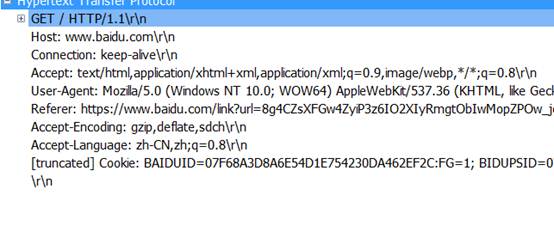 GET/HTTP/1.1:是请求一个页面文件
HOST:是请求的主机名
Connection:持续连接
Accept: 收到的文件
User-Agent : 浏览器的类型
Accept-encoding: gzip ,deflate ,sdch限制回应中可以接受的内容编码值,指示附加内容的解码方式为gzip ,deflate ,sdch 。
Accept-language :申请的语言种类是中文
响应报文:

HTTP/1.1 200 OK: 表示http1.1版请求成功
Server: 表示报文是nginx服务器产生的
Date: 表示服务器产生并发送报文的时间和日期
Content type: 表示文件类型是plain,charset是字符集
Content length:表示发送的字节数
Connection:持久连接
Dns:
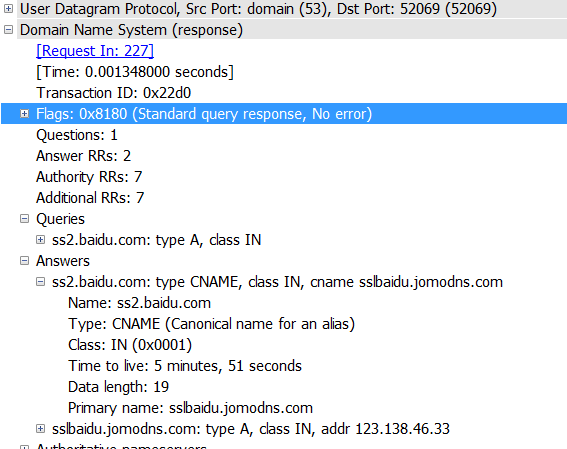
DNS使用的是UDP协议
Question 1 Answers RRs 2: 发出一个问题,收到2个RRS
Queries: 使用递归查询得到百度的地址
Answers: 得到了两个应答,每个应答包括:
Name: 主机查询域名
Type : 类别代码
Class: 地址
Time to live: 生存时间
Date length: 数据长度
Primary name: 首要域名服务器
四、实验总结:
在实验中,我发现UDP大部分被DNS协议使用,TCP被http使用。UDP简单发送方便,但是不可靠,TCP相对麻烦一些,但是可靠,在不同的地方使用不同的协议,可以使我们的交流方便可靠而又快捷。通过这次课程设计,也使我对课堂的知识有了更加深刻的理解,只有自己动手操作了,才能更加直观的了解这些协议的不同。纸上学到的终究是不如自己动手操作记得深刻,也不如这样的理解透彻,动手后有更加直观的认识和理解。这样的课程设计可以让我们学到很多东西,是非常有意义且有趣的课程设计。
第二篇:基于wireshark的协议分析wireshark远程抓包
基于wireshark的协议分析4.wireshark远程抓包 2010-03-10 15:34
基于wireshark的协议分析4.wireshark远程抓包
远程抓包方案
主要参考文档:
使用Wireshark时,我们一般加载已经保存的数据文件或者实时抓取网卡上的数据包,进行数据分析。有时为了监控远程机器网络流量,我们需要远程抓包,并对抓取的包进行实时分析。这时候,我们需要在远程捕获网络流量,并在本地启动wireshark进行数据分析。为实现这个目的,这时候我们就面临一下几个问题:
1.远程主机上如何抓包:远程主机OS是windows还是linux
2.本地主机和远程主机通过什么连接:ssh、netcat,还是其他协议
3.远程主机数据如何传到本地:是传到named pipe(命名管道)还是stdout 根据wireshark wiki文档,我们知道目前有这三种解决方案:
? - using a UNIX pipe and use a different tool to capture from
下文主要讨论这种方式
? - using []'s remote capturing feature (rpcapd) -
currently not supported
在windows下安装winpcap后,winpcap安装目录下就有rpcapd这个命令行工具,但wireshark目前不支持读取rpcapd的输出,可以用其他工具读取rpcapd的输出。这种方式只限于windows操作系统。
? RMON - use SNMP's RMON to capture - currently not supported ( explains why it doesn't work well)
这种方式不清楚怎么用
测试一:named pipe on local machine (本地named pipe测试)
利用管道,将libpcap数据文件作为输入,输出到tshark,开始分析
local machine : 192.168.1.86
hank@gts ~ $mkfifo /tmp/pipe
hank@gts ~ $./tshark -i /tmp/pipe &
hank@gts ~ $cat /home/hank/net-data/iups.cap > /tmp/pipe &
测试二:SSH + pipe
利用ssh登录远程主机,发送抓包命令,并将捕获的数据包发送到本地的named pipe,本地tshark监听该named pipe,有数据即开始分析。
remote machine : 192.168.1.82
local machine : 192.168.1.86
开启一个终端,执行:
hank@gts ~ $mkfifo /tmp/pipe
hank@gts ~ $ssh root@192.168.1.82 "tcpdump -w - -i eth0" > /tmp/pipe
开启另一个终端,执行:
hank@gts ~ $ wireshark -k -i /tmp/pipe
在/CaptureSetup/Pipes中,执行ssh登录时,没有将输出重定向到pipe中去,于是我对该wiki做了修改,修改记录为:
CaptureSetup/Pipes (last edited 2009-05-14 08:02:36 by )
测试三:netcat
这个测试见《How to monitor packets from a remote interface in real time》 ,该方式设计三台计算机,并且使用了netcat,本地接听某个端口,远程主机将数据发送到该端口。
remote machine : 192.168.1.82
local machine : 192.168.1.86
本地主机执行:
hank@gts ~/wireshark-dev/bin $ nc -l -p 3000
远程主机执行:
[root@localhost ~]# cat /dev/urandom | nc 192.168.1.86 3000
本地另开一个终端,执行:
gts bin # ./tshark -i eth0 -R tcp.port==3000
综上,SSH + pipe 作为远程抓包是十分理想的方案,前提是能ssh登陆远程主机,并且远程主机上有抓包工具。
附英文原文如下:
Step 5: Capture traffic using a remote machine
Make sure you've finished step 4 successfully! In this step: Don't use your local machine to capture traffic as in the previous steps but use a remote machine to do so.
Remote Capturing is currently very limited:
? - using a UNIX pipe and use a different tool to capture from
? - using []'s remote capturing feature (rpcapd) -
currently not supported
? RMON - use SNMP's RMON to capture - currently not supported ( explains why it doesn't work well)
Of course, you can use Wireshark installed on a remote machine in combination with a remote control software (e.g. VNC, Windows Remote Desktop, ...). XXX - explain special capture filter strings relevant to remote capturing! Pipes
The following will explain capturing using pipes a bit. Contents
?
?
?
3. 4.
Before pipes, Wireshark could read the captured packets to display either from a file (which had been previously created) or for a network interface (in real time). Since pipes are supported, Wireshark can also read packets from another application, and shows them in real time. This is useful if you want to watch a network in real time, and Wireshark cannot capture from that network, e.g. because it is not an Ethernet network, or it is not on the local machine.
There are three main limitations that you should be aware of:
1. It is not currently known whether this works on Windows. If you want to
use this on Windows, give it a try and report your results to the
development list (and/or update this page). If you want to help testing, you should be able to compile Wireshark from sources.
2. This only works with the de facto standard libpcap format version 2.4, as
described in . Some other formats may work in theory, but this has not been tested.
3. Capturing from a pipe is inconvenient, because you have to set up the pipe
and put a file header into the pipe before you can start the capture. A few patches have been mailed to the development list that could solve this, so if you find the approach inconvenient, try the patches.
XXX - mention to configure live update of the Wireshark window
Named pipes
A named pipe looks like a file, but it is really just a buffer for interprocess
communication. One process can send data to it, and another process can read it. There are two main ways to create a named pipe: with mkfifo or using special syntax of the bash shell.
Way 1: mkfifo
If you have a capture file in the right format (from Wireshark or tcpdump), you can do the following:
> mkfifo /tmp/pipe > wireshark -k -i /tmp/pipe &> cat capture.cap > /tmp/pipe & This should start a capture from the named pipe /tmp/pipe. After you start the last command, a list of packets from the file should start appearing on the screen.
An example of remote capture using pipes can be found in . Way 2: bash
You can do exactly the same with special bash syntax:
> wireshark -k -i
Way 3: python
The following small python script shows how to use python on Windows:
# Win32 Wireshark named pipes example # Requires Python for Windows and the Python for Windows Extensions: # #
import win32pipe, win32file cf =
open(r'c:pipetest.pcap', 'rb') p = win32pipe.CreateNamedPipe( r'\.pipewireshark', win32pipe.PIPE_ACCESS_OUTBOUND, win32pipe.PIPE_TYPE_MESSAGE | win32pipe.PIPE_WAIT, 1, 65536, 65536, 300, None)
win32pipe.ConnectNamedPipe(p, None) data = cf.read() win32file.WriteFile(p, data)
Named pipes conclusion
In all of the above cases you cannot use the buttons in Wireshark to (re)start the capture, because the feeding process has no way of knowing that a new capture should be started. Also the feeding process may not be killed after Wireshark terminates. I think it is killed if you stop the capture before closing Wireshark, but I am not quite sure why.
There was a short discussion that the feeding process could detect that the pipe is not connected, and then restart the capture once it is connected again. So maybe this is possible, if you write the feeding process accordingly. There are also two patches that support reading from a TCP network connect (which has a define connection sequence), and from spawned child processes. Both patches should solve this specific problem.
Of course these examples are not really useful, because you could just read the file directly. In a real scenario, the feeding process would be either a remote capture process, or a special application.
Remote Capture
In bash syntax, remote capture is possible with the following command: > wireshark -k -i
The main problem is that you have to exclude the traffic generated by the ssh session from capturing. Several patches are available to do this, but excluding port 22 is probably the easiest solution for now. The second problem is that ssh cannot ask for a password on stdin. You should either set up ssh-agent, so that you don't need a password, or you should configure x-askpass to open a window for the password.
This can be worked around by combining SSH with a FIFO.
>mkfifo /tmp/pipe >ssh user@remote-host "tshark -w - not port 22"
In another terminal run the following:
>wireshark -k -i /tmp/pipe
As soon as Wireshark starts "listening" on the pipe, SSH will prompt for the password and allow you to continue. Wireshark can also be switched out for dumpcap and tcpdump can be used in place of tshark with slight variations on the above commands.
Special feeding application
Sometimes you want to display traffic from a network that is not accessible to the usual capture tools like tshark, tcpdump and snoop. You may have your own application to capture the traffic, and Wireshark can read the capture files, but how do you interface it with Wireshark to show traces in real time?
Pipes are the answer. As long as you use the de facto standard libpcap format, you should be able to write the capture to a named pipe, and view the packets in real time with Wireshark reading from this pipe.
Stdin
As described in the man page, you can use the minus sign for the interface name to capture from stdin. Stdin is a file descriptor that is predefined for every process, and it is usually connected to an anonymous pipe by the shell calling the process. So reading from stdin, you should be able to rewrite the command above to
> cat capture.cap | wireshark -k -i -
While the documentation says that Wireshark should be able to capture from stdin (which is an anonymous pipe), it is not clear whether it always works. Some people have reported success, but for me it only works with tshark, not with wireshark. Maybe this is related to the following bug?
Please note: this feature won't work with all versions of libiconv, as it will interpret the - sign as the start of a new parameter, see:
XXX - is this possible for both command line and interactive usage?
20xx年10月31日
15:30