课程编号:B080103040
Linux操作系统
实验报告


东北大学软件学院
实验一 熟悉Linux环境
【实验内容】
一、练习常用的Shell命令。
当用户登录到字符界面系统或使用终端模拟窗口时,就是在和称为shell的命令解释程序进行通信。当用户在键盘上输入一条命令时,shell程序将对命令进行解释并完成相应的动作。这种动作可能是执行用户的应用程序,或者是调用一个编辑器、GNU/Linux实用程序或其他标准程序,或者是一条错误信息,告诉用户输入了错误的命令。
二、熟悉vim编辑器
在编写文本或计算机程序时,需要创建文件、插入新行、重新排列行、修改内容等,计算机文本编辑器就是用来完成这些工作的。
Vim编辑器的两种操作模式是命令模式和输入模式(如图2所示)。当vim处于命令模式时,可以输入vim命令。例如,可以删除文本并从vim中退出。在输入模式下,vim将把用户所输入的任何内容都当作文本信息,并将它们显示在屏幕上。
三、熟悉gcc编译器
GNU/Linux中通常使用的C编译器是GNU gcc。编译器把源程序编译生成目标代码的任务分为以下4步:
a. 预处理,把预处理命令扫描处理完毕 ;
b. 编译,把预处理后的结果编译成汇编或者目标模块;
c. 汇编,把编译出来的结果汇编成具体CPU上的目标代码模块;
d. 连接,把多个目标代码模块连接生成一个大的目标模块;
四、熟悉gdb调试工具
LINUX包含了一个叫gdb的GNU调试程序。gdb是一个用来调试C和C++程序的强有力调试器。它使你能在程序运行时观察程序的内部结构和内存的使用情况。它具有以下一些功能:
·监视程序中变量的值;
·设置断点以使程序在指定的代码行上停止执行;
·一行行的执行代码。
五、掌握Linux下C程序编辑运行过程
Linux下编写C程序要经过以下几个步骤:
⑴启动常用的编辑器,键入C源程序代码。
⑵编译源程序
⑶运行可执行文件
【实验总结】
在学习linux的过程中间,最主要的就是耐心和细心。linux的命令很多,只有一遍一遍的看一次又一次的用,才能记住很多的命令,才能很好的使用linux。通过这次实验,我对linux的系统以及vim编辑器,gcc编译器,gdb调试工具更加熟悉,这也让我让我能够更加努力学习。
实验二 文件操作
【实验内容】
1.文件的创建(必做题)
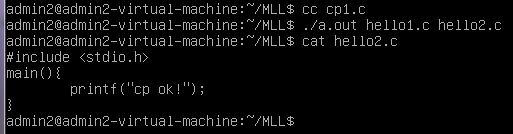
编写程序,实现cp命令的功能。被复制的文件名与复制出的新文件由用户指定。调用方法:“你编写的程序名 被复制文件名 复制出的文件名”。要求程序有一定的健壮性,即对用户错误调用及其他错误要有处理和反馈。(提示:可以使用man手册查看具体的系统调用,e.g., man 2 open)。
#include <sys/types.h>
#include <sys/stat.h>
#include <fcntl.h>
#include <stdio.h>
#include <stdlib.h>
main(int ac, char *av[]){
int fd1, fd2;
int n;
char buf[512];
if(ac!=3){
printf("missing file operand\n");
exit(1);
}
if((fd1=open(av[1], O_RDONLY))==-1){
perror("cannot open");
exit(1);
}
if((fd2=creat(av[2], 0777))==-1){
perror("cannot creat");
exit(1);
}
while((n=read(fd1, buf, 512))>0){
write(fd2, buf, n);
}
close(fd1);
close(fd2);
}
2.查看目录内容及文件属性
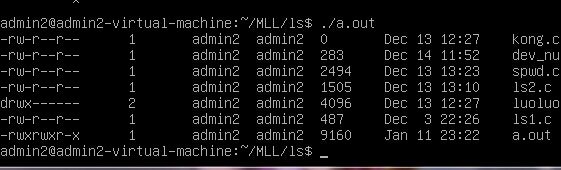
(1)编写程序,实现ls -l的功能。调用方法:“你编写的程序名”——这时打印出当前目录文件及其属性;“你编写的程序名 目录名”——这时在终端显示给定目录下的文件及其属性。(提示:当用户给定目录后,需要改变进程的当前目录,可使用chdir()。)
#include <stdio.h>
#include <sys/types.h>
#include <dirent.h>
#include <sys/types.h>
#include <sys/stat.h>
#include <unistd.h>
#include <string.h>
#include <pwd.h>
#include <grp.h>
#include <time.h>
void mode_to_str(mode_t mode, char *str){
strcpy(str, "----------");
if(S_ISDIR(mode)) str[0]='d';
if(mode & 0400) str[1]='r';
if(mode & 0200) str[2]='w';
if(mode & 0100) str[3]='x';
if(mode & 040) str[4]='r';
if(mode & 020) str[5]='w';
if(mode & 010) str[6]='x';
if(mode & 04) str[7]='r';
if(mode & 02) str[8]='w';
if(mode & 01) str[9]='x';
}
void show_file_info(char * filename){
struct stat buf;
char modestr[10];
stat(filename, &buf);
mode_to_str(buf.st_mode, modestr);
printf("%.10s\t", modestr);
printf("%d\t", buf.st_nlink);
printf("%s\t", getpwuid(buf.st_uid)->pw_name);
printf("%s\t", getgrgid(buf.st_gid)->gr_name);
printf("%d\t", buf.st_size);
printf("%.12s\t", 4+ctime((const time_t *)&(buf.st_mtime)));
printf("%s\n", filename);
}
main(int ac, char *av[]){
DIR * dirp;
struct dirent * p;
if(1==ac){
dirp=opendir(".");
}else{
dirp=opendir(av[1]);
}
while((p=readdir(dirp))!=NULL){
if(p->d_name[0]!='.'){
show_file_info(p->d_name);
}
}
closedir(dirp);
}
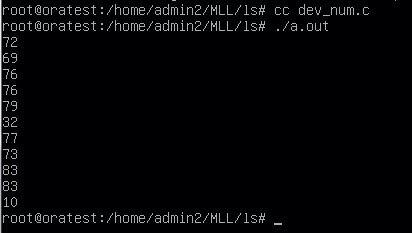
3. 设备文件操作
在/dev目录下,找到你的鼠标对应的文件。打开这个文件,从该文件循环读出字符,并将字符对应的ascII代码在终端显示出来。
【实验总结】
通过这个实验,我学会了如何在编译器里操作文件,也学会了如何使用man手册。
实验三进程间通信
UNIX/LINUX系统的进程间通信机构(IPC)允许在任意进程间大批量地交换数据。本实验的目的是了解和熟悉LINUX支持的信号量机制、管道机制、消息通信机制及共享存储区机制。
(一)进程创建实验
【实验内容】
1.进程的创建
编写一段程序,使用系统调用fork( )创建两个子进程,在系统中有一个父进程和两个子进程活动。让每个进程在屏幕上显示一个字符;父进程显示字符“a”,子进程分别显示字符“b” 和“c”。试观察记录屏幕上的显示结果,并分析原因。
# include<stdio.h>
main()
{ int p1, p2;
while((p1=fork())= = -1);
if(p1= =0)
putchar(‘b’); /*在子进程1中*/
else /*在父进程中*/
{ while((p2=fork())= =-1);
if(p2= =0)
putchar(‘c’); /*在子进程2中*/
else /*在父进程中*/
putchar( ‘a’);
}
}

实验结果为: cb
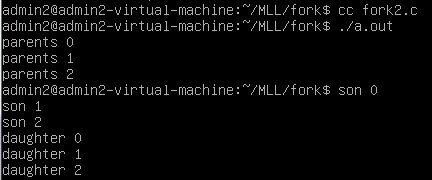
2. 修改已编写的程序,将每个进程的输出由单个字符改为一句话,再观察程序执行时屏幕上出现的现象,并分析其原因。
<参考程序>
# include<stdio.h>
main()
{ int p1, p2, i;
while((p1=fork())= = -1);
if(p1= =0) /*在子进程1中*/
for(i=0;i<500;i++)
printf(“daughter %d\n”,i);
else
{ while((p2=fork())= =-1);
If(p2= =0) /*在子进程2中*/
for(i=0;i<500;i++)
printf(“son%d\n”,i);
else
for(i=0;i<500;i++)
printf(“parents%d\n”,i);
}
}
由于输出500的循环太大,无法看到全部结果,i分别采用3,10,100,当i为3时,是先输出3个“parents i ”,然后再输出3个“son i”,最后输出5个“daughter i”;当i为10时,结果与i为3一样;截图如下:
但是当i为100时,是先输出100个“parents i”,再输出“son i” 但是在“son i”输出的同时,“daughte i”也开始输出,由于屏幕显示有限,图片就不粘贴了。
当“parents i”全部输出完之后,开始输出“son i”;
在“son i”输出的过程中,也开始输出“daughter i”:
最后输出完“daughter i”。
当i为500时,“parent i”输出的时候,“son i”也开始输出,但整体上是“parent i”先输出完,然后是“son i”,最后是“daughter i”
【思考题】
1.系统是怎样创建进程的?
答:linux 系统创建进程都是用 fork() 系统调用创建子进程,在UNIX系统中,只有0进程是在系统引导时被创建的,在系统初启时由0进程创建1进程,以后0进程变成对换进程,1进程成为系统中的始祖进程。UNIX利用fork( )为每个终端创建一个子进程为用户服务,如等待用户登录、执行SHELL命令解释程序等,每个终端进程又可利用fork( )来创建其子进程,从而形成一棵进程树。可以说,系统中除0进程外的所有进程都是用fork( )创建的。
fork() 函数被调用一次,但返回两次。如果 fork()进程调用成功,两次返回的区别是子进程的返回值是0,而父进程的返回值则是新子进程的进程号
2.当前运行的程序(主进程)的父进程是什么?
答:当前运行的程序(主进程)的父进程是fork()出这个进程的进程,在UNIX系统中,只有0进程是在系统引导时被创建的,在系统初启时由0进程创建1进程,以后0进程变成对换进程,1进程成为系统中的始祖进程。
【实验总结】
通过本次实验,掌握了进程的概念,明确进程和程序的区别:通俗的讲程序是一个包含可以执行代码的文件,是一个静态的文件.而进程是一个开始执行但是还没有结束的程序的实例.就是可执行文件的具体实现. 一个程序可能有许多进程,而每一个进程又可以有许多子进程.依次循环下去,而产生子孙进程. 当程序被系统调用到内存以后,系统会给程序分配一定的资源(内存,设备等等)然后进行一系列的复杂操作,使程序变成进程以供系统调用.在系统里面只有进程没有程序;
认识和了解并发执行的实质,即linux中内核并发机制也就是同步机制产生的原因,总的来说可归纳为一下4点:l 中断——中断几乎可以在任何时刻异步发生,也就可能随时打断当前正在执行的代码;2 睡眠及与用户空间的同步——在内核执行的进程可能会睡眠,这就会唤醒调度程序,从而导致调度一个新的用户进程执行;3 对称多处理——两个或多个处理器可以同时执行代码;4内核抢占——因为内核具有抢占性,所以内核中的任务可能会被另一任务抢占(在2.6内核引进的新能力)。
(二)信号量机制实验
【实验内容】
1.编写一段程序,使用系统调用fork( )创建两个子进程,再用系统调用signal( )让父进程捕捉键盘上来的中断信号(即按ctrl+c键),当捕捉到中断信号后,父进程用系统调用kill( )向两个子进程发出信号,子进程捕捉到父进程发来的信号后,分别输出下列信息后终止:
Child process 1 is killed by parent!
Child process 2 is killed by parent!
父进程等待两个子进程终止后,输出以下信息后终止:
Parent process is killed!
# include<stdio.h>
# include<signal.h>
# include<unistd.h>
#include<sys/types.h>
#include<sys/wait.h>
int wait_mark;
void waiting(),stop();
void main()
{ int p1, p2;
signal(SIGINT,stop);
while((p1=fork())==-1);
if(p1>0) /*在父进程中*/
{ ①
while((p2=fork())= =-1);
If(p2>0) /*在父进程中*/
{ ②
wait_mark=1;
waiting(0);
kill(p1,10);
kill(p2,12);
wait( );
wait( );
printf(“parent process is killed!\n”);
exit(0);
}
else /*在子进程2中*/
{
wait_mark=1;
signal(12,stop);
waiting();
lockf(1,1,0);
printf(“child process 2 is killed by parent!\n”);
lockf(1,0,0);
exit(0);
}
}
else /*在子进程1中*/
{
wait_mark=1;
signal(10,stop);
waiting();
lockf(1,1,0);
printf(“child process 1 is killed by parent!\n”);
lockf(1,0,0);
exit(0);
}
}
void waiting()
{
while(wait_mark!=0);
}
void stop()
{
wait_mark=0;
}
⑴ 运行程序并分析结果。
答:运行结果如下:
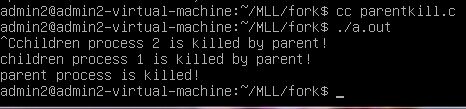
运行程序之后,输入字符程序没有反应,按Ctrl+C发送信号给前台进程组中的所有进程,终止正在运行的程序。首先子进程1被终止,然后是子进程2结束,父进程通过两个wait(null );检测子进程的状态,当子进程1,2都终止后,父进程也终止,输出“parents process is killed”
⑵ 如果把signal(SIGINT,stop)放在①号和②号位置,结果会怎样并分析原因。
答:如果把signal(SIGINT,stop)放在(1)号和(2)号位置后,结果先输出child process 2 is killed by parent!然后输出parent process is killed!而不会输出child process 1 is killed by parent!因为在fork子进程1后,子进程1中没有设置对SIGINT信号的处理,当按下CTRL+C后,进程1默认为终止,所以没有输出.
⑶ 该程序段前面部分用了两个wait(0),为什么?
答:父进程通过两个wait(null );检测子进程的状态,当子进程1,2都终止后,父进程也终止,输出“parents process is killed”
⑷ 该程序段中每个进程退出时都用了语句exit(0),为什么?
答:每个进程退出时都用了语句exit(0),一方面要结束进程,另外向父进程返回结束标志0。
2.修改上面的程序,增加语句signal(SIGINT,SIG_IGN)和语句signal(SIGQUIT,SIG_IGN),再观察程序执行时屏幕上出现的现象,并分析其原因。
# include<stdio.h>
# include<signal.h>
# include<unistd.h>
int pid1, pid2;
int EndFlag=0;
pf1=0;
pf2=0;
void IntDelete()
{
kill(pid1,10);
kill(pid2,12);
EndFlag=1;
}
void Int1()
{
printf(“child process 1 is killed by parent !\n”);
exit(0);
}
void Int2()
{
printf(“child process 2 is killed by parent !\n”);
exit(0);
}
main()
{
int exitcode;
signal(SIGINT,SIG_IGN);
signal(SIGQUIT,SIG_IGN);
while((pid1=fork())==-1);
if(pid1==0)
{
signal(SIGUSR1,Int1);
signal(SIGINT,SIG_IGN);
pause();
exit(0);
}
else
{
while((pid2=fork())= =-1);
if(pid2==0)
{
signal(SIGUSR2,Int2);
signal(SIGINT,SIG_IGN);
pause();
exit(0);
}
else
{
signal(SIGINT,IntDelete);
waitpid(-1,&exitcode,0); /*等待任何子进程中断或结束*/
printf(“parent process is killed \n”);
exit(0);
}
}
}
运行程序并分析结果。
答:
结果分析:由于忽略了中断与退出信号,程序会一直保持阻塞状态而无法退出。
⑶司机售票员问题(选做题)
编程用fork()创建一个子进程代表售票员,司机在父进程中,再用系统调用signal()让父进程(司机)捕捉来自子进程(售票员)发出的中断信号,让子进程(售票员)捕捉来自(司机)发出的中断信号,以实现进程间的同步运行。
创建子进程代表售票员,父进程代表司机,同步过程如下:
售货员捕捉SIGINT(代表开车),发SIGUSR1给司机,司机打印:let us go go go
售票员捕捉SIFQUIT(代表开车),发SIGUSR2给司机,司机:top the bus
司机捕捉SIGTSTP(代表车到总站),发SIGUSR1给售票员,售票员打印:please get off the bus
#include <stdio.h>
#include <stdlib.h>
#include<sys/wait.h>
#include<signal.h>
#include<unistd.h>
int pid1,pid2;
void Init1()
{
puts("let us go go go");
}
void Init2()
{
puts("stop the bus");
}
void Init3()
{
puts("please get off the bus");
}
void Init4()
{
kill(pid1,10);
}
void Init5()
{
int k=getppid();
kill(k,10);
}
void Init6()
{
int j=getppid();
kill(j,12);
}
int main(void)
{
signal(SIGINT,SIG_IGN);
signal(SIGQUIT,SIG_IGN);
signal(SIGTSTP,SIG_IGN);
pid1=fork();
if(pid1>0)//父进程
{
signal(10,Init1);
signal(12,Init2);
signal(SIGTSTP,Init4);
while(1);
exit(0);
}
else if(pid1==0)
{
signal(SIGINT,Init5);
signal(SIGQUIT,Init6);
signal(10,Init3);
while(1);
exit(0);
}
else
{
puts("wrong");
}
return EXIT_SUCCESS;
}
【实验总结】
通过这次实验,我了解了信号的概念,知道了:每个进程在运行时,都要通过信号机制来检查是否有信号到达。若有,便中断正在执行的程序,转向与该信号相对应的处理程序,以完成对该事件的处理;处理结束后再返回到原来的断点继续执行。
(三)进程的管道通信实验
【实验内容】
1.编制一段程序,实现进程的管道通信。使用pipe()建立一条管道线。两个子进程p1和p2分别向管道各写一句话:
Child 1 is sending message!
Child 2 is sending message!
而父进程则从管道中读出来自于两个子进程的信息,显示在屏幕上。
<参考程序>
# include<unistd.h>
# include<signal.h>
# include<stdio.h>
int pid1,pid2;
main()
{
int fd[2];
char OutPipe[100],InPipe[100];
pipe(fd);
while((pid1=fork())= = -1);
if(pid1= =0)
{
lockf(fd[1],1,0);
sprintf(OutPipe,“child 1 process is sending message!”);
write(fd[1],OutPipe,50);
sleep(5);
lockf(fd[1],0,0);
exit(0);
}
else
{
while((pid2=fork())= = -1);
if(pid2= =0)
{
lockf(fd[1],1,0);
sprintf(OutPipe,“child 2 process is sending message!”);
write(fd[1],OutPipe,50);
sleep(5);
lockf(fd[1],0,0);
exit(0);
}
else
{
wait(0);
read(fd[0],InPipe,50);
printf(“%s\n”,InPipe);
wait(0);
read(fd[0],InPipe,50);
printf(“%s\n”,InPipe);
exit(0);
}
}
}
实验结果为:

延迟5秒后显示:
child1 process is sending message!

再延迟5秒:
child2 process is sending message!
2.在父进程中用pipe()建立一条管道线,往管道里写一句话,两个子进程接收这句话。
答:实验程序如下:
#include<unistd.h>
#include<stdio.h>
#include<stdlib.h>
#include<sys/types.h>
int main()
{
int n, fd[2];
pid_t pid, pid1;
char buffer[BUFSIZ+1];
if(pipe(fd) < 0)
{
printf("pipe failed!\n");
exit(1);
}
if((pid = fork()) < 0)
{
printf("fork failed");
exit(1);
}
else if(pid > 0)
{
if((pid1 = fork()) < 0)
{
printf("fork failed");
exit(1);
}
else if(pid1 >0)
{
close(fd[0]);
write(fd[1], "Hello World!", 12);
}
else
{
close(fd[1]);
n = read(fd[0], buffer, 6);
write(STDOUT_FILENO,"\np1 get:\n", 8);
write(STDOUT_FILENO, buffer, n);
}
}
else
{
close(fd[1]);
n = read(fd[0], buffer, 6);
write(STDOUT_FILENO,"\np0 get:\n", 8);
write(STDOUT_FILENO, buffer, n);
}
exit(0);
}
【实验总结】
通过这次实验,了解什么是管道,知道了管道是UNIX系统的一大特色。所谓管道,是指能够连接一个写进程和一个读进程的、并允许它们以生产者—消费者方式进行通信的一个共享文件,又称为pipe文件。
(四)消息的发送与接收实验
【实验内容】
1.消息的创建、发送和接收。使用系统调用msgget( ),msgsnd( ),msgrev( ),及msgctl( )编制一长度为1k的消息发送和接收的程序。
<参考程序>
①client.c
#include <sys/types.h>
#include <sys/msg.h>
#include <sys/ipc.h>
#define MSGKEY 75
struct msgform
{ long mtype;
char mtext[1000];
}msg;
int msgqid;
void client()
{
int i;
msgqid=msgget(MSGKEY,0777); /*打开75#消息队列*/
for(i=10;i>=1;i--)
{
msg.mtype=i;
printf(“(client)sent\n”);
msgsnd(msgqid,&msg,1024,0); /*发送消息*/
}
exit(0);
}
main( )
{
client( );
}
②server.c
#include <sys/types.h>
#include <sys/msg.h>
#include <sys/ipc.h>
#define MSGKEY 75
struct msgform
{ long mtype;
char mtext[1000];
}msg;
int msgqid;
void server( )
{
msgqid=msgget(MSGKEY,0777|IPC_CREAT); /*创建75#消息队列*/
do
{
msgrcv(msgqid,&msg,1030,0,0); /*接收消息*/
printf(“(server)received\n”);
}while(msg.mtype!=1);
msgctl(msgqid,IPC_RMID,0); /*删除消息队列,归还资源*/
exit(0);
}
main( )
{
server( );
}
程序说明:
①为了便于操作和观察结果,编制二个程序client.c和server.c,分别用于消息的发送与接收。
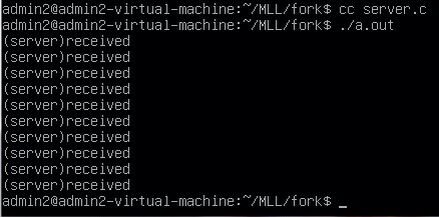
②server建立一个 Key 为75的消息队列,等待其它进程发来的消息。当遇到类型为1的消息,则作为结束信号,取消该队列,并退出server。server每接收到一个消息后显示一句“(server)received。”
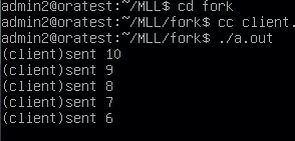
③client使用 key为75的消息队列,先后发送类型从10到1的消息,然后退出。最后一个消息,即是 server端需要的结束信号。client 每发送一条消息后显示一句 “(client)sent”。
④注意: 二个程序分别编辑、编译为client与server。 执行:
实验截图:
2. 在父进程中创建一个消息队列,用fork创建一个子进程,在子进程中将一条消息传送至消息队列,父进程接受队列的消息,并将消息送屏幕显示。
编写程序如下:
#include <stdio.h>
#include <stdlib.h>
#include <fcntl.h>
#include <string.h>
#include <unistd.h>
#include <sys/types.h>
#include <sys/ipc.h>
#include <sys/msg.h>
#define MAX_TEXT 512
struct msg_st //消息队列的结构体
{
int my_msg_type;
char msg_text[BUFSIZ];
};
int main(int argc,char **argv)
{
pid_t pid;
int i = 1;
int status;
if( (pid = fork()) == -1)
{
perror("fork");
exit(EXIT_FAILURE);
}
else if ( pid == 0) //子进程
{
struct msg_st some_data;
int msgid;
char buffer[BUFSIZ];
if((msgid = msgget((key_t)12345,0666|IPC_CREAT)) == -1 )
{
perror("msgget");
exit(EXIT_FAILURE);
}
printf("Enter the mssage to send:");
fgets(buffer,BUFSIZ,stdin);
some_data.my_msg_type = 1;
strcpy(some_data.msg_text,buffer);
if((msgsnd(msgid,(void *) &some_data,MAX_TEXT,0)) == -1)
{
perror("msgsnd");
exit(EXIT_FAILURE);
}
return 0;
}
else //父进程
{
int msgid1;
struct msg_st some_data1;
int msg_to_recevie = 0;
if((msgid1= msgget((key_t)12345,0666|IPC_CREAT)) == -1)
{
perror("msgget");
exit(EXIT_FAILURE);
}
if(msgrcv(msgid1,(void *) &
some_data1,BUFSIZ,msg_to_recevie , 0) == -1)
{
perror("msgrcv");
exit(EXIT_FAILURE);
}
printf("recevier mssage : %s",some_data1.msg_text);
if(msgctl(msgid1,IPC_RMID,0) == -1)
{
fprintf(stderr,"msgctl(IPC_RMID) failed \n");
exit(EXIT_FAILURE);
}
return 0;
}
}
【实验总结】
通过这次实验,了解了消息的概念,即消息(message)是一个格式化的可变长的信息单元。消息机制允许由一个进程给其它任意的进程发送一个消息。当一个进程收到多个消息时,可将它们排成一个消息队列;熟悉了消息传送机理;学习了消息的发送与接收。
实验四 编写Web服务器
【实验内容】
1.服务器设计重点
基于socket的客户/服务器系统大多是类似的。一旦理解了一个socket流的客户/服务器系统,就可以理解大多数其他的系统。
2.三个主要操作
客户和服务器都是进程。服务器设立服务,然后进入循环接收和处理请求。客户连接到服务器,然后发送、接受或者交换数据,最后退出。该交互过程中主要包含了一下三个操作:
(1)服务器设立服务
(2)客户连接到服务器
(3)服务器和客户处理事务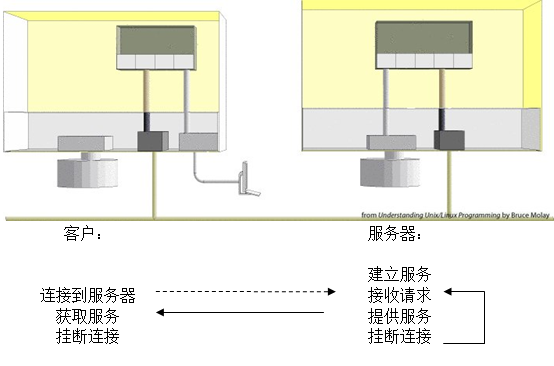
3.连接过程
操作1:建立服务器端socket
设立一个服务一般需要如下3个步骤:
(1)创建一个 socket
socket = socket ( PF_INET, SOCK_STREAM, 0 )
(2)给 socket 绑定一个地址
bind ( sock, &addr, sizeof(addr) )
(3)监听接入请求
listen ( sock, queue_size )

为了避免在编写服务器时重复输入上述代码,将这3个步骤组合成一个函数:make_server_socket。在编写服务器的时候,只需调用该函数就可以创建一个服务端socket。具体如下:
sock=make_server_socket(int portnum)
return -1 if error, or a server socket listening at port “portnum”
操作2:建立到服务器的连接
基于流的网络客户连接到服务器包含以下两个步骤:
(1)创建一个 socket
socket = socket ( PF_INET, SOCK_STREAM, 0 )
(2)使用该 socket 连接到服务器
connect ( sock, &serv_addr, sizeof ( serv_addr ) )
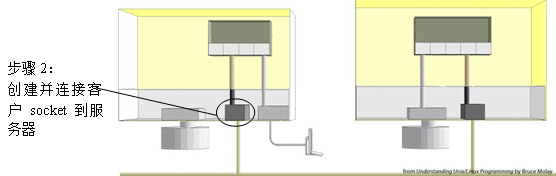
将这两个步骤抽象成一个函数:connet_to_server。当编写客户端程序时,只要调用该函数就可以建立到服务器的连接。具体如下:
fd=connet_to_server(hostname, portnum)
return -1 if error,
or a fd open for reading and writing connected to the socket at port “portnum” on host “hostname”
/*
* socklib.c
*
* This file contains functions used lots when writing internet
* client/server programs. The two main functions here are:
*
* make_server_socket( portnum ) returns a server socket
* or -1 if error
* make_server_socket_q(portnum,backlog)
*
* connect_to_server(char *hostname, int portnum)
* returns a connected socket
* or -1 if error
*/
socklib.c
#include <stdio.h>
#include <unistd.h>
#include <sys/types.h>
#include <sys/socket.h>
#include <netinet/in.h>
#include <netdb.h>
#include <time.h>
#include <strings.h>
#define HOSTLEN 256
#define BACKLOG 1
int make_server_socket_q(int , int );
int make_server_socket(int portnum)
{
return make_server_socket_q(portnum, BACKLOG);
}
int make_server_socket_q(int portnum, int backlog)
{
struct sockaddr_in saddr; /* build our address here */
struct hostent *hp; /* this is part of our */
char hostname[HOSTLEN]; /* address */
int sock_id; /* the socket */
sock_id = socket(PF_INET, SOCK_STREAM, 0); /* get a socket */
if ( sock_id == -1 )
return -1;
/** build address and bind it to socket **/
bzero((void *)&saddr, sizeof(saddr)); /* clear out struct */
gethostname(hostname, HOSTLEN); /* where am I ? */
hp = gethostbyname(hostname); /* get info about host */
/* fill in host part */
bcopy( (void *)hp->h_addr, (void *)&saddr.sin_addr, hp->h_length);
saddr.sin_port = htons(portnum); /* fill in socket port */
saddr.sin_family = AF_INET ; /* fill in addr family */
if ( bind(sock_id, (struct sockaddr *)&saddr, sizeof(saddr)) != 0 )
return -1;
/** arrange for incoming calls **/
if ( listen(sock_id, backlog) != 0 )
return -1;
return sock_id;
}
int connect_to_server(char *host, int portnum)
{
int sock;
struct sockaddr_in servadd; /* the number to call */
struct hostent *hp; /* used to get number */
/** Step 1: Get a socket **/
sock = socket( AF_INET, SOCK_STREAM, 0 ); /* get a line */
if ( sock == -1 )
return -1;
/** Step 2: connect to server **/
bzero( &servadd, sizeof(servadd) ); /* zero the address */
hp = gethostbyname( host ); /* lookup host's ip # */
if (hp == NULL)
return -1;
bcopy(hp->h_addr, (struct sockaddr *)&servadd.sin_addr, hp->h_length);
servadd.sin_port = htons(portnum); /* fill in port number */
servadd.sin_family = AF_INET ; /* fill in socket type */
if ( connect(sock,(struct sockaddr *)&servadd, sizeof(servadd)) !=0)
return -1;
return sock;
}
操作3:客户/服务器的会话
至此,可以使用专门的函数来建立服务器端,也有专门的函数来连接到服务器。
(1)一般的客户端
网络客户通常调用服务器来获得服务,一个典型的客户程序如下:
mian(){
int fd;
fd=connect_to_server(host, port); /*call the server*/
if(fd==-1)
exit(1); /*or die*/
talk_with_server(fd); /*chat with server*/
close(fd); /*hang up when done*/
}
函数talk_with_server 处理与服务器的对话。具体的内容取决于特定应用。例如,e-mail客户和邮件服务器交谈的是邮件,而天气预报客户和服务器交谈的则是天气。
(2)一般的服务器端
一个典型的服务器如下:
main(){
int sock, fd; /*socket and connection*/
if(sock==-1)
exit(1);
while(1){
fd=accept(sock, NULL, NULL); /*take next call*/
if(fd==-1)
break; /*or die*/
process_request(fd); /*chat with client*/
close(fd); /*hang up when done*/
}
函数process_trquest处理客户的请求。具体内容取决于特定的应用。
(3)服务器的设计问题:DIY或代理
两种服务器的设计方法:
DIY——服务器接收请求,自己处理工作。
代理——服务器接收请求,然后创建一个新进程来处理工作。
每种方法的优缺点:
自己做用于快速简单的任务
代理用于慢速的更加复杂的任务
使用SIGCHLD来阻止僵尸(zombie)问题
4.编写Web服务器
Web 服务器通常要具备3种用户操作:
(1)列举目录信息
(2)cat 文件
(3)运行程序
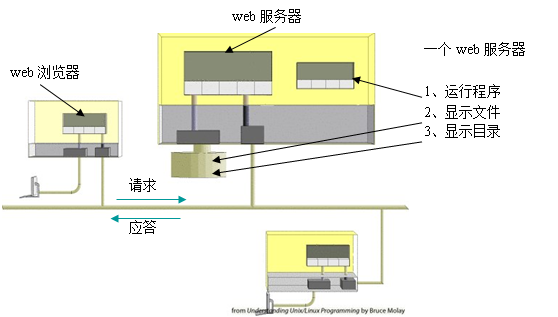
Web服务器通过基于流的socket连接为客户提供上述3种操作。用户连接到服务器后,发送请求,然后服务器返回客户请求的信息。具体过程如下:

设计Web服务器所要编写的操作如下:
(1)建立服务器
使用socklib.c中的make_server_socket
(2)接收请求
使用accept来得到指向客户端的文件描述符。可以使用fdopen使得该文件描述符转换成缓冲流。
(3)读取请求
(4)处理请求
(5)发送应答
Web服务器协议:
客户端(浏览器)与Web服务器之间的交互主要包含客户的请求和服务器的应答。请求和应答的格式在超文本传输协议(HTTP)中有定义。HTTP使用纯文本。可以使用telnet和Web服务器进行交互。Web服务器在端口80监听。下面是两个例子:
第一个例子:
#telnet www.neu.edu.cn 80
Trying 202.118.1.7...
Connected to www.neu.edu.cn.
Escape character is '^]'.
GET /index.html HTTP/1.0
HTTP/1.0 403 Forbidden
Server: squid/2.5.STABLE3
Mime-Version: 1.0
Date: Mon, 21 May 20## 03:15:58 GMT
Content-Type: text/html
Content-Length: 732
Expires: Mon, 21 May 20## 03:15:58 GMT
X-Squid-Error: ERR_ACCESS_DENIED 0
X-Cache: MISS from www.neu.edu.cn
X-Cache: MISS from www.neu.edu.cn
Connection: close
<!DOCTYPE HTML PUBLIC "-//W3C//DTD HTML 4.01 Transitional//EN" "http://www.w3.org/TR/html4/loose.dtd">
<HTML><HEAD>
<META HTTP-EQUIV="Content-Type" CONTENT="text/html; charset=gb2312">
<TITLE>...::: Welcome to NEU WebSite :::...</TITLE>
<STYLE type="text/css"><!--BODY{background-color:#ffffff;font-family:verdana,sans-serif}PRE{font-family:sans-serif}--></STYLE>
</HEAD><BODY>
<H2>Loading...</H2>
<P>Please use <a href="http://www.neu.edu.cn">http://www.neu.edu.cn</a> to access this site.<br>
锟斤拷使锟斤拷 <a href="http://www.neu.edu.cn">http://www.neu.edu.cn</a> 锟斤拷锟绞憋拷站锟斤拷
<P>
<BR clear="all">
<HR noshade size="1px">
<ADDRESS>
Generated Mon, 21 May 20## 03:15:58 GMT by www.neu.edu.cn (squid/2.5.STABLE3)
</ADDRESS>
</BODY></HTML>
Connection to www.neu.edu.cn closed by foreign host.
第二个例子:
#telnet www.prenhall.com 80
Trying 165.193.123.253...
Connected to www.prenhall.com.
Escape character is '^]'.
GET /index.html HTTP/1.0
HTTP/1.1 200 OK
Server: Netscape-Enterprise/6.0
Date: Mon, 21 May 20## 03:20:54 GMT
Content-length: 327
Content-type: text/html
Last-modified: Mon, 09 Jun 20## 23:03:02 GMT
Accept-ranges: bytes
Connection: close
<HTML><HEAD>
<META HTTP-EQUIV="Refresh" CONTENT="0; URL=http://vig.prenhall.com/">
</HEAD><BODY></BODY></HTML>
<!-- -------------------------------------------------------------- -->
<!-- Caught you peeking! -->
<!-- -------------------------------------------------------------- -->
Connection to www.prenhall.com closed by foreign host.
这里只发送了一行请求,却接收了多行返回。
(1)HTTP请求:GET
telnet创建了一个socket并调用了connect来连接到Web服务器。服务器接受连接请求,并创建了一个基于socket的从客户端的键盘到Web服务器进程的数据通道。
接下来,输入请求:
GET /index.html HTTP/1.0
一个HTTP请求包含有3个字符串。第一个字符串是命令,第二个是参数,第三个是所用协议的版本号。在该例子中,使用了GET命令,以index.html作为参数,使用了HTTP版本1.0。
HTTP还包含几个其他的命令。大部分Web请求使用GET,因为大部分时间中用户是单击链接来获取网页。GET命令可以跟几行参数。这里使用了简单的请求,以一个空行来表示参数的结束,并使用与本书前面提及的关于shell的相同约定。实际上,一个Web服务器只是集成了cat和ls的Unix shell。
(2)HTTP应答:OK
服务器读取请求,检查请求,然后返回一个请求。应答有两部分:头部和内容。头部以状态行起始,如下所示:
HTTP/1.1 200 OK
状态行含有两个或更多的字符串。第一个串是协议的版本,第二个串是返回码,200的文本解释是OK。这里请求的文件叫/info.html,而服务器给出应答表示可以得到该文件。如果服务其中没有请求的文件名,返回码将是404,其解释将是“未找到”。
头部的其余部分是关于应答的附加信息。在该例子种,附加信息包含服务器名、应答时间、服务器所发送数据类型以及应答的连接类型。一个应答头部可以包含有多行信息,以空行表示结束,空行位于Connection:close后面。
应答的其余部分是返回的具体内容。这里,服务器返回了文件/index.html的内容。
(3)HTTP小结
客户端和web服务器交互的基本结构如下:
1)客户端发送请求
GET filename HTTP/version
可选参数
空行
2)服务器发送应答
HTTP/version status-code status-message
附加信息
空行
内容
协议的完整描述可以参阅网上的版本1.0的RFC1945和版本1.1的RFC2068。
Web服务器必须接受客户的HTTP请求,并发送HTTP应答。请求和应答采用纯文本格式,是为了便于使用C中的输入/输出以及字符串函数读取和处理。
编写Web服务器:
要求Web服务器只支持GET命令,只接收请求行,跳过其余参数,然后处理请求和发送应答,主要循环如下:
while(1){
fd=accept(sock, NULL, NULL);
fpin=fdopen(fd,”r”);
fgets(fpin, request, LEN);
read_until_crnl(fpin);
process_rq(request, fd);
fclose(fpin);
}
为了简洁,这里忽略了出错检查。
(1)处理请求
处理请求包含识别命令和根据参数进行处理:
process_rq( char *rq, int fd )
{
char cmd[BUFSIZ], arg[BUFSIZ];
/* create a new process and return if not the child */
if ( fork() != 0 )
return;
strcpy(arg, "./"); /* precede args with ./ */
if ( sscanf(rq, "%s%s", cmd, arg+2) != 2 )
return;
if ( strcmp(cmd,"GET") != 0 )
cannot_do(fd);
else if ( not_exist( arg ) )
do_404(arg, fd );
else if ( isadir( arg ) )
do_ls( arg, fd );
else if ( ends_in_cgi( arg ) )
do_exec( arg, fd );
else
do_cat( arg, fd );
}
服务器为每个请求创建一个新的进程来处理。子进程将请求分割成命令和参数。如果命令不是GET,服务器应答HTTP返回码表示未实现的命令。如果命令是GET,服务器将期望得到一个目录名,一个以 .cgi 结尾的可执行程序或文件名。如果没有该目录或指定的文件名,服务器报错。
如果存在目录或文件,服务器决定所要使用的操作:ls、exec或cat。
(2)目录列表函数
函数do_ls处理列出目录信息的请求:
do_ls(char *dir, int fd)
{
FILE *fp ;
fp = fdopen(fd,"w");
header(fp, "text/plain");
fprintf(fp,"\r\n");
fflush(fp);
dup2(fd,1);
dup2(fd,2);
close(fd);
execlp("ls","ls","-l",dir,NULL);
perror(dir);
exit(1);
}
这里没有使用popen,而是通过调用ls命令,避免用户向shell popen传递任意字符串来运行的问题。
Webserv的源程序
/* webserv.c - a minimal web server (version 0.2)
* usage: ws portnumber
* features: supports the GET command only
* runs in the current directory
* forks a new child to handle each request
* has MAJOR security holes, for demo purposes only
* has many other weaknesses, but is a good start
* build: cc webserv.c socklib.c -o webserv
*/
#include <stdio.h>
#include <sys/types.h>
#include <sys/stat.h>
#include <string.h>
main(int ac, char *av[])
{
int sock, fd;
FILE *fpin;
char request[BUFSIZ];
if ( ac == 1 ){
fprintf(stderr,"usage: ws portnum\n");
exit(1);
}
sock = make_server_socket( atoi(av[1]) );
if ( sock == -1 ) exit(2);
/* main loop here */
while(1){
/* take a call and buffer it */
fd = accept( sock, NULL, NULL );
fpin = fdopen(fd, "r" );
/* read request */
fgets(request,BUFSIZ,fpin);
printf("got a call: request = %s", request);
read_til_crnl(fpin);
/* do what client asks */
process_rq(request, fd);
fclose(fpin);
}
}
/* ------------------------------------------------------ *
read_til_crnl(FILE *)
skip over all request info until a CRNL is seen
------------------------------------------------------ */
read_til_crnl(FILE *fp)
{
char buf[BUFSIZ];
while( fgets(buf,BUFSIZ,fp) != NULL && strcmp(buf,"\r\n") != 0 )
;
}
/* ------------------------------------------------------ *
process_rq( char *rq, int fd )
do what the request asks for and write reply to fd
handles request in a new process
rq is HTTP command: GET /foo/bar.html HTTP/1.0
------------------------------------------------------ */
process_rq( char *rq, int fd )
{
char cmd[BUFSIZ], arg[BUFSIZ];
/* create a new process and return if not the child */
if ( fork() != 0 )
return;
strcpy(arg, "./"); /* precede args with ./ */
if ( sscanf(rq, "%s%s", cmd, arg+2) != 2 )
return;
if ( strcmp(cmd,"GET") != 0 )
cannot_do(fd);
else if ( not_exist( arg ) )
do_404(arg, fd );
else if ( isadir( arg ) )
do_ls( arg, fd );
else if ( ends_in_cgi( arg ) )
do_exec( arg, fd );
else
do_cat( arg, fd );
}
/* ------------------------------------------------------ *
the reply header thing: all functions need one
if content_type is NULL then don't send content type
------------------------------------------------------ */
header( FILE *fp, char *content_type )
{
fprintf(fp, "HTTP/1.0 200 OK\r\n");
if ( content_type )
fprintf(fp, "Content-type: %s\r\n", content_type );
}
/* ------------------------------------------------------ *
simple functions first:
cannot_do(fd) unimplemented HTTP command
and do_404(item,fd) no such object
------------------------------------------------------ */
cannot_do(int fd)
{
FILE *fp = fdopen(fd,"w");
fprintf(fp, "HTTP/1.0 501 Not Implemented\r\n");
fprintf(fp, "Content-type: text/plain\r\n");
fprintf(fp, "\r\n");
fprintf(fp, "That command is not yet implemented\r\n");
fclose(fp);
}
do_404(char *item, int fd)
{
FILE *fp = fdopen(fd,"w");
fprintf(fp, "HTTP/1.0 404 Not Found\r\n");
fprintf(fp, "Content-type: text/plain\r\n");
fprintf(fp, "\r\n");
fprintf(fp, "The item you requested: %s\r\nis not found\r\n",
item);
fclose(fp);
}
/* ------------------------------------------------------ *
the directory listing section
isadir() uses stat, not_exist() uses stat
do_ls runs ls. It should not
------------------------------------------------------ */
isadir(char *f)
{
struct stat info;
return ( stat(f, &info) != -1 && S_ISDIR(info.st_mode) );
}
not_exist(char *f)
{
struct stat info;
return( stat(f,&info) == -1 );
}
do_ls(char *dir, int fd)
{
FILE *fp ;
fp = fdopen(fd,"w");
header(fp, "text/plain");
fprintf(fp,"\r\n");
fflush(fp);
dup2(fd,1);
dup2(fd,2);
close(fd);
execlp("ls","ls","-l",dir,NULL);
perror(dir);
exit(1);
}
/* ------------------------------------------------------ *
the cgi stuff. function to check extension and
one to run the program.
------------------------------------------------------ */
char * file_type(char *f)
/* returns 'extension' of file */
{
char *cp;
if ( (cp = strrchr(f, '.' )) != NULL )
return cp+1;
return "";
}
ends_in_cgi(char *f)
{
return ( strcmp( file_type(f), "cgi" ) == 0 );
}
do_exec( char *prog, int fd )
{
FILE *fp ;
fp = fdopen(fd,"w");
header(fp, NULL);
fflush(fp);
dup2(fd, 1);
dup2(fd, 2);
close(fd);
execl(prog,prog,NULL);
perror(prog);
}
/* ------------------------------------------------------ *
do_cat(filename,fd)
sends back contents after a header
------------------------------------------------------ */
do_cat(char *f, int fd)
{
char *extension = file_type(f);
char *content = "text/plain";
FILE *fpsock, *fpfile;
int c;
if ( strcmp(extension,"html") == 0 )
content = "text/html";
else if ( strcmp(extension, "gif") == 0 )
content = "image/gif";
else if ( strcmp(extension, "jpg") == 0 )
content = "image/jpeg";
else if ( strcmp(extension, "jpeg") == 0 )
content = "image/jpeg";
fpsock = fdopen(fd, "w");
fpfile = fopen( f , "r");
if ( fpsock != NULL && fpfile != NULL )
{
header( fpsock, content );
fprintf(fpsock, "\r\n");
while( (c = getc(fpfile) ) != EOF )
putc(c, fpsock);
fclose(fpfile);
fclose(fpsock);
}
exit(0);
}
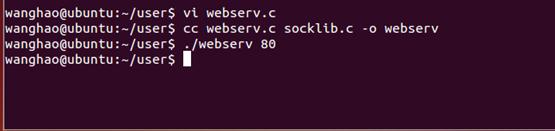
运行Web服务器:
编译程序,并在某个端口(建议用80)运行它:
$cc webserv.c socklib.c –o webserv
$./webserv 80
编译成功:
现在可以访问Web服务器,网址为http://yourhostname/。将html文件放到该目录中并用http://yourhostname/filename.html来打开它。创建下面的shell脚本:
#!/bin/sh
printf “Content-type: text/plain\n\nhello\n”;

将它命名为hello.cgi,用chmod改变权限为755,然后用浏览器调用该程序:http://yourhostname/hello.cgi。
用chmod改变权限为755:

四、实验总结
通过做该实验,我学到了很多课本上没有的知识,增强了自己的动手能力和编程能力。时在课本上看了很多的程序,但是我很少编写过,对书上的程序仅仅有一些浅显的理解。经过做实验,我对程序有了更深一层的理解,更加形象生动的感知到了每个符号的生命和活力。不但了解了并发服务器的运行模式和套接字的作用和使用方法,而且加深了对课本知识的理解。并且掌握了socket编程,以及调试技巧。由于Web服务器要使用多进程(或多线程),让我对进程有了更深入的理解。